This page should serve as a reference for the many "things Linux" we use in this course. It is by no means complete – Linux is **huge** – but offers introductions to many important topics.
Terminal programs, shells and commands
You need a Terminal program in order to ssh to a remote computer.

- Macs and Linux have a Terminal program built-in
- Windows options:
- Windows 10+
- Command Prompt and PowerShell programs have ssh and scp (may require latest Windows updates)
- Start menu → Search for Command
- Putty – http://www.chiark.greenend.org.uk/~sgtatham/putty/download.html
- simple Terminal and file copy programs
- download either the Putty installer or just putty.exe (Terminal) and pscp.exe (secure copy client)
- Windows Subsystem for Linux – Windows 10 Professional includes a Ubuntu-like bash shells
- See https://docs.microsoft.com/en-us/windows/wsl/install-win10
- We recommend the Ubuntu Linux distribution, but any Linux distribution will have an SSH client
- Command Prompt and PowerShell programs have ssh and scp (may require latest Windows updates)
- Windows 10+
Use ssh (secure shell) to login to a remote computers.
# General form:
ssh <user_name>@<full_host_name>

# For example
ssh abattenh@ls6.tacc.utexas.edu
The bash shell REPL and commands
When you type something in at a bash command-line prompt, it Reads the input, Evaluates it, then Prints the results, then does this over and over in a Loop. This behavior is called a REPL – a Read, Eval, Print Loop.
The input to the bash REPL is a command, which consists of:
- The command name
- One or more (optional) options, usually noted with a leading dash (-) or double-dash (--).
- short (1-character) options can be provided separately, prefixed by a single dash (-)
- or can be combined with the combination prefixed by a single dash
- long (multi-character or "word") options are prefixed with a double dash (--) and must be supplied separately.
- Both long and short options can be assigned a value
- short (1-character) options can be provided separately, prefixed by a single dash (-)
- One or more command-line arguments, which are often (but not always) file names
Some examples using the ls (list files) command:
ls               # example 1 - no options or arguments
ls -l            # example 2 - one "short" (single character) option only (-l)
ls --help        # example 3 - one "long" (word) option (--help)
ls .profile      # example 4 - one argument, a file name (.profile)
ls --width=20    # example 5 - a long option that has a value (--width is the option, 20 is the value)
ls -w 20         # example 6 - a short option w/a value, as above, where -w is the same as --width
ls -l -a -h      # example 7 - three short options entered separately (-l -a -h)
ls -lah          # example 8 - three short options that can be combined after a dash (-lah)
- The arguments to ls are one or more file or directory names. If no arguments are provided, the contents of the current directory are listed.
- If an argument is a directory name, the contents of that directory are listed.
- If an argument is a directory name, the contents of that directory are listed.
Some handy options for ls:
- -l shows a long listing, including file permissions, ownership, size and last modified date.
- -a shows all files, including dot files whose names start with a period ( . ) which are normally not listed
- -h says to show file sizes in human readable form (e.g. 12M instead of 12201749)
Getting help
How do you find out what options and arguments a command uses?
- In the Terminal, type in the command name then the --help long option (e.g. ls --help)
- Works for most Linux commands; 3rd party tools may use -h or -? or even /? instead
- May produce a lot of output, so you may need to scroll up quite a bit, or pipe the output to a pager
- e.g. ls --help | more
- a space advances the output by one screen/"page", and typing Ctrl-C will exit more
- e.g. ls --help | more
- Use the built-in manual system (e.g. type man ls)
- This system uses the less pager described below
- For now, just know that a space advances the output by one screen/"page", and typing q will exit the display.
- Ask the Google, e.g. search for ls man page
- Can be easier to read
Literal characters and metacharacters
In the bash shell, and in most tools and programming environment, there are two kinds of input:
- literal characters, that just represent (and print as) themselves
- e.g. alphanumeric characters A-Z, a-z, 0-9
- metacharacters - these are special characters that are associated with an operation in the environment
- e.g. the pound sign ( # ) comment character that tells the shell to ignore everything after the #
- e.g. the pound sign ( # ) comment character that tells the shell to ignore everything after the #
There are many metacharacters in bash: # \ $ | ~ [ ] to name a few.
Pay attention to the different metacharacters and their usages – which can depend on the context where they're used.
About command line input
You know the command line is ready for input when you see the command line prompt. The shell executes command line input when it sees a linefeed character (\n, also called a newline), which happens when you press Enter after entering the command.
More than one command can be entered on a single line – just separate the commands with a semi-colon ( ; ).
cd; ls -lh
A single command can also be split across multiple lines by adding a backslash ( \ ) at the end of the line you want to continue, before pressing Enter.
ls6:~$ ls ~/.bashrc \
> ~/.profile
Notice that the shell indicates that it is not done with command-line input by displaying a greater than sign ( > ). You just enter more text then Enter when done.
Use Ctrl-C to exit the current command input
At any time during command input, whether on the 1st command line prompt or at a > continuation, you can press Ctrl-c (Control key and the c key at the same time) to get back to the command prompt.
Text lines and the Terminal
Sometimes a line of text is longer than the width of your Terminal. In this case the text is wrapped. It can appear that the output is multiple lines, but it is not. For example, FASTQ files often have long lines:
head $CORENGS/misc/small.fq
Note that most Terminals let you increase/decrease the width/height of the Terminal window. But there will always be single lines too long for your Terminal width (and too many lines of text for its height).
So how long is a line? So how many lines of output are there really? And how long is a line? The wc (word count) command can tell us this.
- wc -l reports the number of lines in its input
- wc -c reports the number of characters in its input (including invisible linefeed characters)
And when you give wc -l multiple files, it reports the line count of each, then a total.
wc -l $CORENGS/misc/small.fq           # Reports the number of lines in the small.fq file
cat $CORENGS/misc/small.fq | wc -l     # Reports the number of lines on its standard input
wc -l $CORENGS/misc/*.fq               # Reports the number of lines in all matching *.fq files
tail -1 $CORENGS/misc/small.fq | wc -c # Reports the number of characters of the last small.fq line
Command input errors
You don't always type in commands, options and arguments correctly – you can misspell a command name, forget to type a space, specify an unsupported option or a non-existent file, or make all kinds of other mistakes.
What happens? The shell attempts to guess what kind of error it is and reports an appropriate error message as best it can. Some examples:
# You type the name of a command that is not installed on your system
ls6:~$ lz
Command 'lz' not found, but can be installed with:
apt install mtools
Please ask your administrator.

# You enter something that is close to an existing, or known, command
ls6:~$ catt
Command 'catt' not found, did you mean:
  command 'cat' from deb coreutils (8.30-3ubuntu2)
  command 'catty' from deb node-catty (0.0.8-1)
  command 'ratt' from deb ratt (0.0~git20180127.c44413c-2)
Try: apt install <deb name>

# You try to use an unsupported option
ls6:~$ ls -z
ls: invalid option -- 'z'
Try 'ls --help' for more information.

# You specify the name of a file that does not exist
ls6:~$ ls xxx
ls: cannot access 'xxx': No such file or directory
Basic Linux commands
One of the steepest Unix/Linux learning curves is the sheer number of built-in commands, all of which have many options – most of which you'll never use, and the more advanced commands are extremely complex.
To help address this, this section introduces a number of built-in Linux utilities along with some of their common options, by category.
Command line arguments can be replaced by standard input
Most built-in Linux commands that obtain data from a file can also accept the data piped in on their standard input.
And here's a Linux commands cheat sheet you may find useful: ![]()
Displaying file contents
- cat outputs all the contents of its input (one or more files and/or standard input) or the specified file
- cat -n prefixes each line of output with its line number
- CAUTION – only use on small files!
- zcat <file.gz> like cat, but understands the gzip (.gz) format, and decompresses the data before writing it to standard output
- CAUTION – only use on small files!
- Another CAUTION – does not understand .zip or .bz2 compression formats
- more and less pagers
- both display their (possibly very long) input one Terminal "page" at a time
- in more:
- use spacebar to advance a page
- use q or Ctrl-c to exit more
- in less:
- q – quit
- Ctrl-f or space – page forward
- Ctrl-b – page backward
- /<pattern> – search for <pattern> in forward direction
- n – next match
- N – previous match
- ?<pattern> – search for <pattern> in backward direction
- n – previous match going back
- N – next match going forward
- use less -N to display line numbers
- less -I says to do pattern matching ignoring case
- can be used directly on .gz format files
- head and tail
- show you the first or last 10 lines (by default) of their input
- head -n 20 or just head -20 shows the first 20 lines
- tail -n 2 or just tail -2 shows the last 2 lines
- tail -n +100 shows lines starting at line 100
- tail -n +100 | head -20 shows 20 lines starting at line 100
- tail -f shows the last lines of a file, then follows the output as more lines are written (Ctrl-c to quit)
- gunzip -c <file.gz> | more (or less) – like zcat, un-compresses lines of <file.gz> and outputs them to standard output
- <file.gz> is not altered on disk
- always pipe the output to a pager!
File system navigation
- ls - list the contents of the specified directory
- -l says produce a long listing (including file permissions, sizes, owner and group)
- -a says show all files, even normally-hidden dot files whose names start with a period ( . )
- -h says to show file sizes in human readable form (e.g. 12M instead of 12201749)
- -t says to sort files on last modification time
- -r says to reverse the current sort order
- -d says to show directory listing information only, instead of directory contents
- usually combined with -l, e.g.: ls -ld <dirname>
- cd <whereto> - change the current working directory to <whereto>. Some special <wheretos>:
- .. (period, period) means "up one directory level"
- ~ (tilde) means "my Home directory"
- - (dash) means "the last directory I was in"
- find <in_directory> [ operators ] -name <expression> [ tests ]
- looks for files matching <expression> in <in_directory> and its sub-directories
- <expression> can be a double-quoted string including pathname wildcards (e.g. "[a-g]*.txt")
- there are tons of operators and tests:
- -type f (file) and -type d (directory) are useful tests
- -maxdepth NN is a useful operator to limit the depth of recursion.
- file <file> tells you what kind of file <file> is
- df shows you the top level directory structure of the system you're working on, along with how much disk space is available
- -h says to show sizes in human readable form (e.g. 12G instead of 12318201749)
- pwd - display the present working directory
- -P says to display the full absolute path, resolving any symbolic links or relative path syntax
- -P says to display the full absolute path, resolving any symbolic links or relative path syntax
- tree <directory> - shows the file system hierarchy of the specified directory
- tree is not always available on all Linux systems
Create, rename, link to, delete files
- touch <file> – create an empty file, or update the modification timestamp on an existing file
- mkdir -p <dirname> – create directory <dirname>.
- -p says to create any needed sub-directories also
- mv <file1> <file2> – renames <file1> to <file2>
- mv <file1> <file2> ... <fileN> <to_dir>/ – moves files <file1> <file2> ... <fileN> into directory <to_dir>
- mv -t <dir> <file1> <file2> ... <fileN> – same as above, but specifies the target directory as an option (-t <to_dir>)
- ln -s <path> creates a symbolic (-s) link (a.k.a symlink) to <path> in the current directory
- default link name corresponds to the last name component in <path>
- always change into (cd) the directory where you want the link before executing ln -s
- a symbolic link can be deleted without affecting the linked-to file
- ln -sf -t <target_dir> <file1> <file2> ... <fileN> – creates symbolic links to <file1> <file2> ... <fileN> in target directory <target_dir>
- rm <file> deletes a file. This is permanent - not a "trash can" deletion.
- rm -rf <dirname> deletes an entire directory – be careful!
Copying files and directories
- cp <source> [<source>...] <destination> copies the file(s) <source> [<source>...] to the directory and/or file name <destination>.
- using . (period) as the destination means "here, with the same name"
- -p option says to preserve file modification timestamps
- cp -r <dirname>/ <destination>/ will recursively copy the directory <dirname>/ and all its contents to the directory <destination>/.
- scp <user>@<host>:<remote_source_path> <local_destination_path>
- Works just like cp but copies <remote_source_path> from the remote host machine to the <local_destination_path>
- -p (preserve file times) and -r (recursive) options work the same as cp
- scp <local_source_path> <user>@<host>:<remote_destination_path> is similar, but copies the <local_source_path> to the <remote_destination_path> on the remote host machine.
- A nice scp syntax resource is located here.
- wget <url> fetches a file from a valid URL (e.g. http, https, ftp).
- -O <file> specifies the name for the local file (defaults to the last component of the URL)
- rsync -arvW <source_directory>/ <target_directory>/
rsync -ptlrvP <source_directory>/ <target_directory>/- Recursively copies <source_directory> contents to <target_directory>, but only if <source_directory> files are newer or don't yet exist in <target_directory>
Remote path syntax (<user>@<host>:<absolute_or_home-relative_path>) can be used for either source or target (but not both).
- Always include a trailing slash ( / ) after the source and target directory names!
- -a means "archive" mode (equivalent to -ptl and some other options)
- -r means recursively copy sub-directories
- -v means verbose
- -W means Whole file only
- Normally the rsync algorithm compares the contents of files that need to be copied and only transfers the different portions. This option disables file content comparisons, which are not appropriate for large and/or binary files.
- -p means preserve file permissions
- -t means preserve file times
- -l means copy symbolic links as links (vs -L which means dereference the link and copy the file it refers to)
- -P means show transfer Progress (useful when large files are being transferred)
Miscellaneous commands
- echo <text> prints the specified text on standard output
- evaluation of metacharacters (special characters) inside the text may be performed first
- -e says to enable conversion of backslash escapes such as \t Tab and \n newline to their ASCII character
- -n says not to output the trailing newline
- evaluation of metacharacters (special characters) inside the text may be performed first
- wc -l reports the number of lines (-l) in its input
- wc -c reports the number of characters (-c) in its input
- wc -w reports the number of words (-w) in its input
- wc -c reports the number of characters (-c) in its input
- history lists your command history to the terminal
- redirect to a file to save a history of the commands executed in a shell session
- pipe to grep to search for a particular command
- which <pgm> searches all $PATH directories to find the program/command <pgm> and reports its full pathname
- du <file_or_directory><file_or_directory>..
- shows the disk usage (size) of the specified files/directories
- -h says report the size in human-readable form (e.g. 12M instead of 12201749)
- -s says summarize the directory size for directories
- -c says print a grand total when multiple items are specified
- seq N generates a set of N numbers, 1 through N
- groups - lists the Unix groups you belong to
Advanced commands
cut, sort, uniq
- cut command lets you isolate ranges of data from its input lines
- cut -f <field_number(s)> extracts one or more fields (-f) from each line of its input
- use -d <delim> to change the field delimiter (Tab by default)
- cut -c <character_number(s)> extracts one or more characters (-c) from each line of input
- the <numbers> can be
- a comma-separated list of numbers (e.g. 1,4,7)
- a hyphen-separated range (e.g. 2-5)
- a trailing hyphen says "and all items after that" (e.g. 3,7-)
- cut does not re-order fields, so cut -f 5,3,1 acts like -f 1,3,5
- cut -f <field_number(s)> extracts one or more fields (-f) from each line of its input
- sort sorts its input lines using an efficient algorithm
- by default sorts each line lexically (as strings), low to high
- use -n sort numerically (-n)
- use -V for Version sort (numbers with surrounding text)
- use -r to reverse the sort order
- use one or more -k <start_field_number>,<end_field_number> options to specify a range of "keys" (fields) to sort on
- e.g. -k1,1 -k2,2nr to sort field 1 lexically and field 2 as a number high-to-low
- by default, fields are delimited by whitespace -- one or more spaces or Tabs
- use -t <delim> to change the field delimiter (e.g. -t "\t" for Tab only; ignore spaces)
- by default sorts each line lexically (as strings), low to high
- uniq -c counts groupings of its input (which must be sorted) and reports the text and count for each group
- use cut | sort | uniq -c for a quick-and-dirty histogram
awk
awk is a powerful scripting language that is easily invoked from the command line. Its field-oriented capabilities make it the go-to tool for manipulating table-like delimited lines of text.
- awk '<script>' - the '<script>' is applied to each line of input (generally piped in)
- always enclose '<script>' in single quotes to inhibit shell evaluation, because awk has its own set of metacharacters that are different from the shell's
Example that prints the average of its input numbers (echo -e converts backslash escape characters like newline \n to the ASCII newline character so that the numbers appear on separate lines)
echo -e "1\n2\n3\n4\n5" | awk '
BEGIN{sum=0; ct=0}
{ sum = sum + $1
  ct = ct + 1 }
END{print sum/ct}'
General structure of an awk script:
- BEGIN {<expressions>} – use to initialize variables before any script body lines are executed
- e.g. BEGIN {FS=":"; OFS="\t"; sum=0; ct=0}
- says use colon ( : ) as the input field separator (FS), and Tab ( \t ) as the output field separator (OFS)
- the default input field separator (FS) is whitespace
- one or more spaces or Tabs
- the default output field separator (OFS) is a single space
- the default input field separator (FS) is whitespace
- initializes the variables sum and ct to 0
- says use colon ( : ) as the input field separator (FS), and Tab ( \t ) as the output field separator (OFS)
- e.g. BEGIN {FS=":"; OFS="\t"; sum=0; ct=0}
- {<body expressions>} – expressions to apply to each line of input
- use $1, $2, etc. to pick out specific input fields of each line
- e.g. {sum = sum + $4} adds field 4 of the input to the variable sum
- the built-in variable NF is the number of fields in the current line
- the built-in variable NR is the record (line) number of the current line
- use $1, $2, etc. to pick out specific input fields of each line
- END {<expressions>} – executed after all input is complete
- e.g. END {print sum,ct} prints the final value of the sum and ct variables, separated by the output field separator.
- e.g. END {print sum,ct} prints the final value of the sum and ct variables, separated by the output field separator.
Here is an excellent awk tutorial, very detailed and in-depth
cut versus awk
The basic functions of cut and awk are similar – both are field oriented. Here are the main differences:
- Default field separators
- Tab is the default field separator for cut
- whitespace (one or more spaces or Tabs) is the default field separator for awk
- Re-ordering
- cut cannot re-order fields
- awk can re-order fields, based on the order you specify
- awk is a full-featured programming language while cut is just a single-purpose utility.
grep and regular expressions
- grep -P '<pattern>' searches for <pattern> in its input, and only outputs lines containing it
- always enclose '<pattern>' in single quotes to inhibit shell evaluation!
- pattern-matching metacharacters in grep are very different from those in the shell
- -P says to use Perl patterns, which are much more powerful (and standard) than default grep patterns
- -v (inverse match) – only print lines with no match
- -n (line number) – prefix output with the line number of the match
- -i (case insensitive) – ignore case when matching
- -l says return only the names of files that do contain the pattern match
- -L says return only the names of files that do not contain the pattern match
- -c says just return a count of line matches
- -A <n> (After) and -B <n> (Before) – output <n> number of lines after or before a match
- always enclose '<pattern>' in single quotes to inhibit shell evaluation!
A regular expression (regex) is a pattern of literal characters to search for and metacharacters that control and modify how matching is done.
A regex <pattern> can contain special match metacharacters and modifiers. The ones below are Perl metacharacters, which are the "gold standard", supported by most languages (e.g. grep -P)
- ^ – matches beginning of line
- $ – matches end of line
- . – (period) matches any single character
- * – modifier; place after an expression to match 0 or more occurrences
- + – modifier, place after an expression to match 1 or more occurrences
- ? – modifier, place after an expression to match 0 or 1 occurrences
- \s – matches any whitespace character (\S any non-whitespace)
- \d – matches digits 0-9
- \w – matches any word character: A-Z, a-z, 0-9 and _ (underscore)
- \t matches Tab;
- \n matches linefeed; \r matches carriage return
- [xyz123] – matches any single character (including special characters) among those listed between the brackets [ ]
- this is called a character class.
- use [^xyz123] to match any single character not listed in the class
- (Xyz|Abc) – matches either Xyz or Abc or any text or expressions inside parentheses separated by | characters
- note that parentheses ( ) may also be used to capture matched sub-expressions for later use
Regular expression modules are available in nearly every programming language (Perl, Python, Java, PHP, awk, even R)
- each "flavor" is slightly different
- even bash has multiple regex commands: grep, egrep, fgrep.
There are many good online regular expression tutorials, but be sure to pick one tailored to the language you will use.
- here are some good ones:
- a good general one: https://www.regular-expressions.info/
- Ryan's tutorials on Regular Expressions: http://ryanstutorials.net/regular-expressions-tutorial/
- RegexOne: http://regexone.com
- and a perl regex tutorial: http://perldoc.perl.org/perlretut.html
- perl regular expressions are the "gold standard" used in most other languages
perl pattern matching
If grep pattern matching isn't behaving the way I expect, I turn to perl. While Perl, like awk, is a fully functional programming language, Here's how to invoke regex pattern matching from a command line using perl:
perl -n -e 'print $_ if $_=~/<pattern>/'
sed pattern substitution
The sed (string editor) command can be used to edit text using pattern substitution.
sed 's/<search pattern>/<replacement>/'
While sed is very powerful, the regex syntax for its more advanced features is quite different from "standard" grep or perl regular expressions. As a result, I tend to use it only for very simple substitutions, usually as a component of a multi-pipe expression.
perl pattern substitution
If I have a more complicated pattern, or if sed pattern substitution is not working as I expect (which happens frequently!), I again turn to perl. Here's how to invoke perl pattern substitution from a command line:
perl -p -e '~s/<search pattern>/<replacement>/'
Parentheses ( ) around one or more text sections in the <search pattern> will cause matching text to be captured in built-in perl variables $1, $2, etc., following the order of the parenthesized text. The capture variables can then be used in the <replacement>.
Field delimiter summary
Be aware of the default field delimiter for the various bash utilities, and how to change them:
| utility | default delimiter | how to change | example |
|---|---|---|---|
| cut | Tab | -d or --delimiter option | cut -d ':' -f 1 /etc/passwd |
| sort | whitespace (one or more spaces or Tabs) | -t or --field-separator option | sort -t ':' -k1,1 /etc/passwd |
| awk | whitespace (one or more spaces or Tabs) Note: some older versions of awk do not treat Tabs as field separators. |
|
cat /etc/passwd | awk -F ":" '{print $1}' |
| join | one or more spaces | -t option | |
| perl | whitespace (one or more spaces or Tabs) when auto-splitting input with -a | -F'/<pattern>/' option | cat /etc/fstab | grep -v '^#' | perl -F'/\s+/' -a -n -e 'print "$F[1]\t$F[0]\n";' |
| read | whitespace (one or more spaces or Tabs) | IFS= (input field separator) option | Note that a bare IFS= removes any field separator, so whole lines are read each loop iteration. |
Getting around in the shell
Type as little and as accurately as possible by using keyboard shortcuts!
Command line history and editing
Sometimes you want to repeat a command you've entered before, possibly with some changes.
- The built-in history command lists the commands you've entered, each with a number.
- You can re-execute any command in the history by typing an exclamation point ( ! ) then the number
- e.g. !15 re-executes the 15th command in your history.
- Use Up arrow to retrieve any of the last 50+ commands you've typed, going backwards through your history.
- You can then edit the retrieved line, and hit Enter (even in the middle of the command), and the shell will use that command.
- The Down arrow "scrolls" forward from where you are in the command history.
The command line cursor (small thick bar on the command line) marks where you are on the command line.
- Right arrow and Left arrow move the cursor forward or backward on the current command line.
- Use Ctrl-a (holding down the Control key and a) to jump the cursor to the beginning of the line.
- Use Ctrl-e to jump the cursor to the end of the line.
- Arrow keys are also modified by Ctrl- (Windows) or Option- (Mac)
- Ctrl-right-arrow (Windows) or Option-right-arrow (Mac) will skip by "word" forward
- Ctrl-left-arrow (Windows) or Option-left-arrow (Mac) will skip by "word" backward
Once the cursor is positioned where you want it:
- Just type in any additional text you want
- To delete text after the cursor, use:
- Delete key on Windows
- Function-Delete keys on Macintosh
- To delete text before the cursor, use:
- Backspace key on Windows
- Delete key on Macintosh
- Use Ctrl-k (kill) to delete everything on the line after the cursor
- Use Ctrl-y (yank) to copy the last killed text to where the cursor is
Tab key completion
Hitting Tab when entering command line text invokes shell completion, instructing the shell to try to guess what you're doing and finish the typing for you. It's almost magic!
On most modern Linux shells you use Tab completion by pressing:
- single Tab – completes file or directory name up to any ambiguous part
- if nothing shows up, there is no unambiguous match
- Tab twice – display all possible completions
- you then decide where to go next
- shell completion works for commands too (like python)
Absolute and relative pathname syntax
An absolute pathname lists all components of the full file system hierarchy that describes a file. Absolute paths always start with the forward slash ( / ), which is the root of the file system hierarchy. Directory names are separated by the forward slash ( / ) .
You can also specify a directory relative to where you are using one of the special directory names:
- single period ( . ) means "the current directory"
- two periods ( . . ) means "directory above the current"
- tilde ( ~ ) means "my Home directory"
Avoid special characters in filenames
While it is possible to create file and directory names that have embedded spaces, that creates problems when manipulating them.
To avoid headaches, it is best not to create file/directory names with embedded spaces, or with special characters such as + & # ( )
Pathname wildcards
The shell has shorthand to refer to groups of files by allowing wildcards in file names.
Using these wildcards is sometimes called filename globbing, and the pattern a glob.
- asterisk ( * ) is the most common filename wildcard. It matches any length of any characters
- brackets ( [ ] ) match any character between the brackets
- and you can use a hyphen ( - ) to specify a range of characters (e.g. [A-G])
- braces ( { } ) enclose a list of comma-separated strings to match (e.g. {dog,pony})
For example:
- ls *.bam – lists all files in the current directory that end in .bam
- ls [A-Z]*.bam – does the same, but only if the first character of the file is a capital letter
- ls [ABcd]*.bam – lists all .bam files whose 1st letter is A, B, c or d.
- ls *.{fastq,fq}.gz – lists all .fastq.gz and .fq.gz files.
More Linux concepts
Standard streams and redirection
Most Linux commands write their results to standard output, a built-in stream that is mapped to your Terminal, but that data can be redirected to a file instead.
In fact every Linux command and program has three standard Unix streams: standard input, standard output and standard error. Each has a number, a name, and redirection syntax:
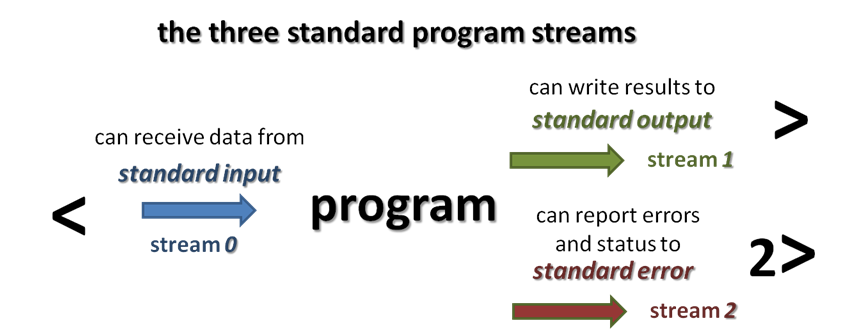
- standard output is stream 1
- redirect standard output to a file with a the > or 1> redirection operator
- a single > or 1> overwrites any existing data in the target file
- a double >> or 1>> appends to any existing data in the target file
- redirect standard output to a file with a the > or 1> redirection operator
- standard error is stream 2
- redirect standard error to a file with a the 2> redirection operator
- a single 2> overwrites any existing data in the target file
- a double 2>> appends to any existing data in the target file
- redirect standard error to a file with a the 2> redirection operator
It is easy to not notice the difference between standard output and standard error when you're in an interactive Terminal session – because both outputs are sent to the Terminal window. But they are separate streams, with different meanings. In particular, programs write error and/or diagnostic messages to standard error, not to standard output.
Here's a command that shows the difference between standard error and standard output:
ls /etc/fstab xxx.txt
Produces this output in your Terminal:
ls: cannot access 'xxx.txt': No such file or directory
/etc/fstab
What is not obvious, since both streams are displayed on the Terminal, is that:
- the diagnostic text "ls: cannot access 'xxx.txt': No such file or directory" is being written to standard error
- the listing of the existing file ("/etc/passwd") is being written to standard output
To see this, redirect standard output and standard error to different files and look at their contents:
ls /etc/fstab xxx.txt 1> stdout.txt 2>stderr.txt
cat stdout.txt   # Displays "/etc/fstab"
cat stderr.txt   # Displays "ls: cannot access 'xxx.txt': No such file or directory"
What if you want both standard output and standard error to go to the same file? You use this somewhat odd 2>&1 redirection syntax:
# Redirect both standard output and standard error to the out.txt file
ls /etc/fstab xxx.txt > out.txt 2>&1

# Display the contents of the out.txt file
cat out.txt

# produces output like this:
ls: cannot access 'xxx.txt': No such file or directory
/etc/fstab
Two final notes.
- When standard output is redirected to a file, the data is not displayed on the Terminal
- If you want the data written to both standard output (the Terminal) and a file, use the tee command
- e.g. ls -l ~ | tee home_dir_listing.log
- There is a special Linux file called /dev/null that serves as a "global trash can" – it just throws away anything you write to it.
- So you can direct standard output and/or standard error to /dev/null to ignore it completely.
When running batch programs and scripts you will want to manipulate standard output and standard error from programs appropriately – especially for 3rd party programs that often produce both results data and diagnostic/progress messages.
Piping
Most programs/commands read input data from some source, then write output to some destination. A data source can be a file, but can also be standard input. Similarly, a data destination can be a file but can also be a stream such as standard output.
The power of the Linux command line is due in no small part to the power of piping. The pipe operator ( | ) connects one program's standard output to the next program's standard input.
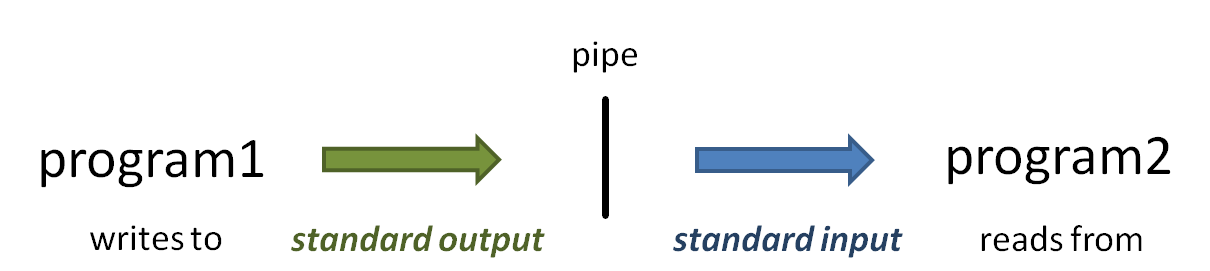
A simple example is piping uncompressed data "on the fly" to count its lines using wc -l (word count command with the lines option).
# zcat is like cat, except that it understands the gz compressed format,
# and uncompresses the data before writing it to standard output.
# So, like cat, you need to be sure to pipe the output to a pager if
# the file is large.
zcat big.fq.gz | wc -l
piping a histogram
But the real power of piping comes when you stitch together a string of commands with pipes – it's incredibly flexible, and fun once you get the hang of it.
For example, here's a simple way to make a histogram of mapping quality values from a subset of BAM file records.
# create a histogram of mapping quality scores for the 1st 1000 mapped bam records
samtools view -F 0x4 small.bam | head -1000 | cut -f 5 | sort -n | uniq -c
- samtools view converts the binary small.bam file to text and writes alignment record lines one at a time to standard output.
- -F 0x4 option says to filter out any records where the 0x4 flag bit is 0 (not set)
- since the 0x4 flag bit is set (1) for unmapped records, this says to only report records where the query sequence did map to the reference
- | head -1000
- the pipe connects the standard output of samtools view to the standard input of head
- the -1000 option says to only write the first 1000 lines of input to standard output
- | cut -f 5
- the pipe connects the standard output of head to the standard input of cut
- the -f 5 option says to only write the 5th field of each input line to standard output (input fields are tab-delimited by default)
- the 5th field of an alignment record is an integer representing the alignment mapping quality
- the resulting output will have one integer per line (and 1000 lines)
- | sort -n
- the pipe connects the standard output of cut to the standard input of sort
- the -n option says to sort input lines according to numeric sort order
- the resulting output will be 1000 numeric values, one per line, sorted from lowest to highest
- | uniq -c
- the pipe connects the standard output of sort to the standard input of uniq
- the -c option option says to just count groups of lines with the same value (that's why they must be sorted) and report the total for each group
- the resulting output will be one line for each group that uniq sees
- each line will have the text for the group (here the unique mapping quality values) and a count of lines in each group
Environment variables
Environment variables are just like variables in a programming language (in fact bash is a complete programming language), they are "pointers" that reference data assigned to them. In bash, you assign an environment variable as shown below:
export varname="Some value, here it's a string"
Careful – do not put spaces around the equals sign when assigning environment variable values.
Also, always surround the value with double quotes ( " " ) if it contains (or might contain) spaces.
You set environment variables using the bare name (varname above).
You then refer to or evaluate an environment variable using a dollar sign ( $ ) evaluation operator before the name:
echo $varname
The export keyword when you're setting ensures that any sub-processes that are invoked will inherit this value. Without the export only the current shell process will have that variable set.
Use the env command to see all the environment variables you currently have set.
Quoting in the shell
What different quote marks mean in the shell and when to use can be quite confusing.
When the shell processes a command line, it first parses the text into tokens ("words"), which are groups of characters separated by whitespace (one or more space characters). Quoting affects how this parsing happens, including how metacharacters are treated and how text is grouped.
There are three types of quoting in the shell:
- single quoting (e.g. 'some text') – this serves two purposes
- It groups together all text inside the quotes into a single token
- It tells the shell not to "look inside" the quotes to perform any evaluations
- all metacharacters inside the single quotes are ignored
- in particular, any environment variables in single-quoted text are not evaluated
- double quoting (e.g. "some text") – also serves two purposes
- it groups together all text inside the quotes into a single token
- it allows environment variable evaluation, but inhibits some metacharcters
- e.g. asterisk ( * ) pathname globbing and some other metacharacters
- e.g. asterisk ( * ) pathname globbing and some other metacharacters
- double quoting also preserves any special characters in the text
- e.g. newlines (\n) or Tabs (\t)
- backtick quoting (e.g. `date`)
- evaluates the expression inside the backtick marks ( ` ` )
- the standard output of the expression replaces the text inside the backtick marks ( ` ` )
- the syntax $( date ) is equivalent
The quote characters themselves ( ' " ` ) are metacharacters that tell the shell to "start a quoting process" then "end a quoting process" when the matching quote is found. Since they are part of the processing, the enclosing quotes are not included in the output.
If you see the greater than ( > ) character after pressing Enter, it can mean that your quotes are not paired, and the shell is waiting for more input to contain the missing quote of the pair (either single or double). Just use Ctrl-c to get back to the prompt.
single and double quotes
The first rule of quoting is: always enclose a command argument in quotes if it contains spaces so that the command sees the quoted text as one item. In particular, always use single ( ' ) or double ( " ) quotes when you define an environment variable whose value contains spaces.
foo='Hello world'   # correct - defines variable "foo" to have value "Hello world"
foo=Hello world     # error - no command called "world"
These two expressions using double quotes or single quotes are different because the single quotes tell the shell to treat the quoted text as a literal, and not to look inside it for metacharacter processing.
# Inside double quotes, the text "$USER" is evaluated and its value substituted
echo "my account name is $USER"

# Inside single quotes, the text "$USER" is left as-is
echo 'the environment variable storing my account name is $USER'
To display a metacharacter as a literal inside double quotes, use the backslash ( \ ) character to escape the following character.
# Inside double quotes, use a backslash ( \ ) to escape the dollar sign ( $ ) metacharacter
echo "the environment variable storing my account name is \$USER"
backtick quoting and sub-shell evaluation
backtick ( ` ` ) evaluation quoting is one of the underappreciated wonders of Unix. The shell:
- evaluates the expression/command inside the backtick marks ( ` ` )
- the standard output of the expression replaces the text inside the backticks
An example, using the date function that just writes the current date and time to standard output, which appears on your Terminal.
date          # Calling the date command just displays date/time information
echo date     # Here "date" is treated as a literal word, and written to standard output
echo `date`   # The date command is evaluated and its standard output replaces `date`
A slightly different syntax, called sub-shell evaluation, also evaluates the expression inside $( ) and replaces it with the expression's standard output.
today=$( date );          echo $today  # environment variable "today" is assigned today's date
today="Today is: `date`"; echo $today  # "today" is assigned a string including today's date
What is text?
So what exactly is text? That is, what is stored in files that the shell interprets as text?
On standard Unix systems, each text character is stored as one byte – eight binary bits – in a format called ASCII (American Standard Code for Information Interchange). Eight bits can store 2^8 = 256 values, numbered 0 - 255.
In its original form values 0 - 127 were used for standard ASCII characters. Now values 128 - 255 comprise an Extended set. See https://www.asciitable.com/
However not all ASCII "characters" are printable -- in fact the "printable" characters start at ASCII 32 (space).
ASCII values 0 - 31 have special meanings. Many were designed for use in early modem protocols, such as EOT (end of transmission) and ACK (acknowledge), or for printers, such as VT (vertical tab) and FF (form feed).
The non-printable ASCII characters we care most about are:
- Tab (decimal 9, hexadecimal 0x9, octal 0o011)
- backslash escape: \t
- Linefeed/Newline (decimal 10, hexadecimal 0xA, octal 0o012)
- backslash escape: \n
- Carriage Return (decimal 13, hexadecimal 0xD, octal 0o015)
- backslash escape: \r
Let's use the hexdump command (really an alias, defined in your ~/.bashrc login script) to look at the actual ASCII codes stored in a file:
tail ~/.bashrc | hexdump
This will produce output something like this:
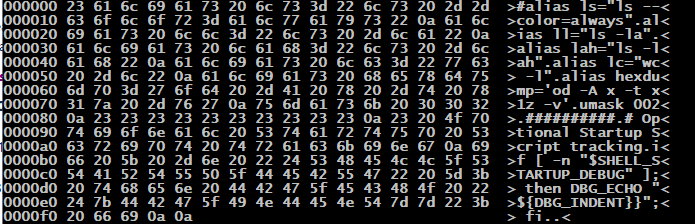
Each line here describes 16 characters, in three display areas:
- The numeric offset of the 16-character line, in hexadecimal (base 16)
- 16 decimal is 0x10 hex
- The numeric value (ASCII code) for each character, again in hexadecimal
- each 2-digit hex number represents one 8-bit byte/character
- The translated text, written between a greater than ( > ) and less than ( < ) sign
- The display character associated with each ASCII code, or a period ( . ) for non-printable characters
Notice that spaces are ASCII 0x20 (decimal 32), and the newline characters appear as 0x0a (decimal 10).
Why hexadecimal? Programmers like hexadecimal (base 16) because it is easy to translate hex digits to binary, which is how everything is represented in computers. And it can sometimes be important to know which binary bits are 1s and which are 0s. (Read more about Decimal and Hexadecimal)
Writing multiple text lines
There are several ways to output multi-line text. You can:
- Start the text with a single quote or a double quote
- press Enter when you want to start a new line
- keep entering text and Enter until you're satisfied
- supply the matching single quote or a double quote then Enter
example:
echo 'My
name is
Anna'
- Use echo -e
- The -e option tells echo to replace some special backslash escapes characters that represent non-printable characters with their associated ASCII codes
- So \n will be replaced by a newline (linefeed) character and \t will be replaced by a Tab.
example:
- The -e option tells echo to replace some special backslash escapes characters that represent non-printable characters with their associated ASCII codes
echo -e "My\nname is\nAnna"
heredoc
Another method for writing multi-line text that can be useful for composing a large block of text in a script, is the heredoc syntax, where a block of text is specified between two user-supplied block delimiters, and that text block is sent to a command. The general form of a heredoc is:
COMMAND << DELIMITER
..text...
..text...
DELIMITER
The 2nd (ending) block delimiter you specify for a heredoc must appear at the start of a new line.
For example, using the (arbitrary) delimiter EOF and the cat command:
cat << EOF
This text will be output
And this USER environment variable will be evaluated: $USER
EOF
Here the block of text provided to cat is just displayed on the Terminal. To write it to a file just use the 1> or > redirection syntax in the cat command:
cat 1> out.txt << EOF
This text will be output
And this USER environment variable will be evaluated: $USER
EOF
The out.txt file will then contain this text:
This text will be output
And this USER environment variable will be evaluated: student01
Bash control flow
the bash for loop
As in many programming languages, a for loop performs a series of expressions on one or more item in the for's argument list.
The bash for loop has the general structure:
for <variable_name> in <list of space-separated items>
do <something>
<somthing else>
done
The <items> should be (or evaluate to) for's argument list: a space-separated list of items (e.g. 1 2 3 4 or `ls -1 *.gz` ).
for num in `seq 4`
do
  echo $num
done

# or, since bash lets you put multiple commands on one line
# if they are each separated by a semicolon ( ; )
for num in `seq 4`; do echo $num; done
Gory details:
- The `seq 4` expression uses backtick evaluation to generate a set of 4 numbers: 1 2 3 4.
- The do/done block expressions are executed once for each of the items in the list
- Each time through the loop (the do/done block) the variable named num is assigned one of the values in the list
- Then the value can be used by referencing the variable using $num
- The variable name num is arbitrary – it can be any name we choose
processing multiple files in a for loop
One common use of for loops is to process multiple files, where the set of files to process is obtained by pathname wildcarding. For example, the code below counts the number of reads in a set of compressed FASTQ files:
for fname in *.gz; do
   echo "$fname has $((`zcat $fname | wc -l` / 4)) sequences"
done
quotes matter
We saw how double quotes allow the shell to evaluate certain metacharacters in the quoted text.
But more importantly when assigning multiple lines of text to a variable, quoting the evaluated variable preserves any special characters in the variable value's text such as Tab or newline characters.
Consider this case where a captured string contains newlines, as illustrated below.
txt=$( echo -e "aa\nbb\ncc" )
echo "$txt"   # inside double quotes, newlines preserved
echo $txt     # without double quotes, newlines are converted to spaces
This difference is very important!
- you do want to preserve newlines when processing one line of text at a time
- you do not want to preserve newlines when specifying the list of values a for loop processes (which must all be on one line)
See the difference:
nums=$( seq 5 )
echo $nums
echo "$nums"

echo $nums| wc -l     # newlines converted to spaces, so only one line
echo "$nums" | wc -l  # newlines preserved, so reports 5

# This loop prints a line for each of the files
for n in $nums; do
  echo "the number is: '$n'"
done

# But this loop prints only one line
for n in "$nums"; do
  echo "the number is: '$n'"
done
the if statement
The general form of an if/then/else statement in bash is:
if [ <test expression> ]
then <expression> [ expression... ]
else <expression> [ expression... ]
fi
Where
- The <test expression> is any expression that evaluates to true or false
- In the shell, the number 0 (or an empty value) is false
- Anything else is true
- There must be at least one space around the <test expression> separating it from the enclosing bracket [ ].
- Double brackets [[ ]] can also be used to enclose the <test expression>
- When the <test expression> is true the then expressions are evaluated.
- When the <test expression> is false the else expressions are evaluated.
A simple example:
for val in 5 0 "27" "$emptyvar" abc '0'; do
  if [ "$val" ]
    then echo "Value '$val' is true"
    else echo "Value '$val' is false"
  fi
done
A good reference on the many built-in bash conditionals: https://www.gnu.org/software/bash/manual/html_node/Bash-Conditional-Expressions.html
reading file lines with while
The read function can be used to read input one line at a time, in a bash while loop.
While the full details of the read commad are complicated (see https://unix.stackexchange.com/questions/209123/understanding-ifs-read-r-line) this read-a-line-at-a-time idiom works nicely.
while IFS= read line; do
  echo "Line: '$line'"
done < ~/.bashrc
- The IFS= clears all of read's default input field separators, which is normally whitespace (one or more spaces or Tabs).
- This is needed so that read will set the line variable to exactly the contents of the input line, and not strip leading whitespace from it.
- The lines are redirected from ~/.bashrc to the standard input of the while loop by the < ~/.bashrc expression after the done keyword.
If the input data is well structured, its fields can be read directly into variables. Notice we can pipe all the output to more – or could redirect it to a file.
tail /etc/passwd | while IFS=':' read account x uid gid name shell
do
  echo $account $name
done | more
File attributes
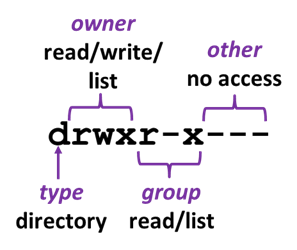
Consider a long listing of our Home directory.

There are 9 whitespace-separated columns in this long listing:
- file permissions - a 10-character field
- number of sub-components associated with a directory - rarely important
- account name of the file owner
- Unix group associated with the file
- file size
- last modification month
- last modification day
- last modification year, or last modification hour/minute if within the last year
- file name
Notice I call everything a file, even directories. That's because directories are just a special kind of file – one that contains information about the directory's contents.
Owner and Group
A file's owner is the Unix account that created the file (here abattenh, me). That account belongs to one or more Unix groups, and the group associated with a file is listed in field 4.
The owner will always be a member of the Unix group associated with a file, and other accounts may also be members of the same group. G-801021 is one of the Unix groups I belong to at TACC. To see the Unix groups you belong to, just type the groups command.
Permissions
File permissions and information about the file type are encoded in that 1st 10-character field. Permissions govern who can access a file, and what actions they are allowed.
- character 1 describes the file type (d for directory, - for regular file, l for symbolic link)
- the remaining 9 characters are 3 sets of 3-character designations
- characters 2-4: what the owning user account can do
- characters 5-7: what other members of the associated Unix group can do
- characters 8-19: what other non-group members (everyone) can do
Each of the 3-character sets describes if read ( r ) write ( w ) and execute ( x or s ) actions are allowed, or not allowed ( - ).
- read ( r ) access means file contents can be read, and copied
- write ( w ) access means a file's contents can be changed, and directory contents can be modified (files added or deleted)
- execute ( x or s )
- for files, execute ( x ) means it is a program that can be called/executed
- e.g. /usr/bin/ls, the file that performs the ls command
- for directories, execute ( x ) means directory operations may be performed/executed
- the directory can be listed and changed into
- for files, execute ( x ) means it is a program that can be called/executed
Examples:
ls -l ~/.bash_history
| haiku.txt | description |
|---|---|
|
|

ls -l /usr/bin/ls
| /usr/bin/ls | description |
|---|---|
|
|

ls -l -d ~/local (-d says to list directory information, not directory contents)
| docs | description |
|---|---|
|
|
Copying files between TACC and your laptop
Assume you want to copy the TACC file $SCRATCH/core_ngs/fastq_prep/small_fastqc.html back to your laptop/local computer. You must initiate the copy operation from your local computer rather than at TACC. Why? because the TACC servers have host names and IP addresses that are public in the Internet's Distributed Name Service (DNS) directory. But your local computer (in nearly all cases) does not have a published name and address.
First, on the TACC server figure out what the appropriate absolute path (a.k.a. full pathname) is.
cd $SCRATCH/core_ngs/fastq/prep
pwd -P
This will display something like /scratch/01063/abattenh/core_ngs/fastq_prep
For folks with Mac or Linux laptops or Windows 10+ users with scp available in the Command Prompt program (or Windows subsystem for Linux):
- Open a Terminal window on your local computer
- cd to the directory where you want the files
- Type something like the following, substituting your user name and absolute path:
scp abattenh@ls6.tacc.utexas.edu:/scratch/01063/abattenh/core_ngs/fastq_prep/small_fastqc.html .
Windows users can use the free WinSCP program (https://winscp.net/eng/index.php) if their Windows version does not support scp.
Editing files
There are three main approaches to editing Unix files:
- Use a command-line program that lets you enter/edit text in a Terminal window (e.g. nano, vi/vim, emacs)
- nano is extremely simple and is a good choice as a first local text editor
- warning: nano has a tendency to break long single lines into multiple lines
- vi and emacs are extremely powerful but also quite complex
- emacs reference sheet: https://www.gnu.org/software/emacs/refcards/pdf/refcard.pdf
- vi reference sheet: http://www.atmos.albany.edu/daes/atmclasses/atm350/vi_cheat_sheet.pdf
- nano is extremely simple and is a good choice as a first local text editor
- Use a text editor or IDE (Integrated Development Environment) program that runs on your local computer but has an SFTP (secure FTP) interface that lets you connect to a remote computer
- E.g., Komodo IDE (Windows & Mac) or Notepad++ (Windows). Both are no-cost.
- Once you connect to the remote host, you can navigate its directory structure and edit files.
- When you open a file, its contents are brought over the network into the text editor's edit window, then saved back when you save the file.
- E.g., Komodo IDE (Windows & Mac) or Notepad++ (Windows). Both are no-cost.
- Use software or protocols that allow you to "mount" remote server directories
- Once mounted, the remote storage appears as a local volume/drive.
- Then, you can use any text editor or IDE on your local computer to open/edit/save remote files.
- Software programs that can mount remote data include ExpanDrive for Windows or Mac (costs $$, but has a free trial), TextWrangler for Mac.
- Remote file system protocols include Samba (Windows, Mac) and NFS (Linux)
- Once mounted, the remote storage appears as a local volume/drive.
Knowing the basics of at least one Linux command-line text editor is useful for creating/editing small files, and we'll explore nano in this class. For editing larger files, you may find options #2 or #3 more useful.
nano
nano is a very simple editor available on most Linux systems. If you are able to ssh into a remote system, you can use nano there.
To invoke nano to edit a new or existing file just type nano <filename>. For example:
nano newfile.txt
You'll see the name of the file (if you supplied one) on the top line of the Terminal window.
Navigation and operations in nano are similar to those we discussed in Command line editing
You can just type in text, and navigate around using arrow keys (up/down/left/right). A couple of other navigation shortcuts:
- Ctrl-a - go to start of line
- Ctrl-e - go to end of line
- Arrow keys are also modified by Ctrl- (Windows) or Option- (Mac)
- Ctrl-right-arrow (Windows) or Option-right-arrow (Mac) will skip by "word" forward
- Ctrl-left-arrow (Windows) or Option-left-arrow (Mac) will skip by "word" backward
Once you've positioned the cursor where you want it, just type in your text.
Be careful with long lines – sometimes nano will split long lines into more than one line, which can cause problems in a commands file where each task must be specified on a single line.
To remove text:
- To delete text after the cursor, use:
- Delete key on Windows
- Function-Delete keys on Macintosh
- To delete text before the cursor, use:
- Backspace key on Windows
- Delete key on Macintosh
- Use Ctrl-k (kill) to delete everything on the line
- This is different from Ctrl-k on the command line where it deletes everything after the cursor
- Use Ctrl-u (uncut) to paste the just-killed text at the cursor
- Recall this operation is Ctrl-y (yank) for command line editing
Once you're satisfied with your edits:
- use Ctrl-o - write out the file
- use Ctrl-x - exit nano
These and other important nano operations are displayed in a menu at the bottom of the Terminal window. Note that the ^ character means Ctrl- in this menu.
emacs
emacs is a complex, full-featured editor available on most Linux systems.
To invoke emacs to edit a new or existing file just type:
emacs <filename>
Here's a reference sheet that list many commands: https://www.gnu.org/software/emacs/refcards/pdf/refcard.pdf. The most important are:
- Ctrl-x/Ctrl-s - write out the file
- Ctrl-x/Ctrl-c - exit emacs
You can just type in text, and navigate around using arrow keys. A couple of other navigation shortcuts:
- Ctrl-a - go to start of line
- Ctrl-e - go to end of line
Be careful when pasting text into an emacs buffer – it takes a few seconds before emacs is ready to accept pasted text.
Double-check that the 1st line of pasted test is correct – emacs can clip the 1st few characters if the paste is done too soon.
Line ending nightmares
The dirty little secret of the computer world is that the three main "families" of computers – Macs, Windows and Linux/Unix – use different, mutually incompatible line endings.
- Linux/Unix uses linefeed ( \n )
- Windows uses carriage return followed by linefeed ( \r\n )
- some Mac programs use carriage return only ( \r )
And guess what? Most Linux programs don't work with files that have Windows or Mac line endings, and what's worse they give you bizarre error messages that don't give you a clue what's going on!
So whatever non-Linux text editor you use, be sure to adjust its "line endings" setting – and it better have one somewhere!
Komodo Edit for Mac and Windows
Komodo Edit is a free, full-featured text editor with syntax coloring for many programming languages and a remote file editing interface. It has versions for both Macintosh and Windows. Download the appropriate install image here.
Once installed, start Komodo Edit and follow these steps to configure it:
- Configure the default line separator for Unix
- On the Edit menu select Preferences
- Select the New Files Category
- For Specify the end-of-line (EOL) indicator for newly created files select UNIX (\n)
- Select OK
- Configure a connection to TACC
- On the Edit menu select Preferences
- Select the Servers Category
- For Server type select SFTP
- Give this profile the Name of lonestar6
- For Hostname enter ls6.tacc.utexas.edu
- Enter your TACC user ID for Username
- Leave Port and Default path blank
- Select OK
When you want to open an existing file at lonestar6, do the following:
- Select the File menu -> Open -> Remote File
- Select your lonestar6 profile from the top Server drop-down menu
- Once you log in, it should show you all the files and directories in your lonestar6 $HOME directory
- Navigate to the file you want and open it
- Often you will use your ~/work or ~/scratch directory links to help you here
To create and save a new file, do the following:
- From the Komodo Edit Start Page, select New File
- Select the file type (Text is good for commands files)
- Edit the contents
- Select the File menu -> Save As Other -> Remote File
- Select your lonestar6 profile from the Server drop-down menu
- Once you log in, it should show you all the files and directories in your lonestar6 $HOME directory
- Navigate to where you want the put the file and save it
- Often you will use your ~/work or ~/scratch directory links to help you here
Rather than having to navigate around TACC's complex file system tree, it helps to use the symbolic links to those areas that we created in your Home directory.
Notepad++ for Windows
Notepad++ is an open source, full-featured text editor for Windows PCs (not Macs). It has syntax coloring for many programming languages (python, perl, bash), and a remote file editing interface.
If you're on a Windows PC download the installer here.
Once it has been installed, start Notepad++ and follow these steps to configure it:
- Configure the default line separator for Unix
- In the Settings menu, select Preferences
- In the Preferences dialog, select the New Document/Default Directory tab.
- Select Unix in the Format section
- Close
- Configure a connection to TACC
- In the Plugins menu, select NppFTP, then select Focus NppFTP Window. The top bar of the NppFTP panel should become blue.
- Click the Settings icon (looks like a gear), then select Profile Settings
- In the Profile settings dialog click Add new
- Call the new profile lonestar6
- Fill in Hostname (ls6.tacc.utexas.edu) and your TACC user ID
- Connection type must be SFTP
- Close
To open the connection, click the blue (Dis)connect icon then select your lonestar6 connection. It should prompt for your password. Once you've authenticated, a directory tree ending in your Home directory will be visible in the NppFTP window. You can click the the (Dis)connect icon again to Disconnect when you're done.
Rather than having to navigate around TACC's complex file system tree, it helps to use the symbolic links to those areas that we created in your Home directory (~/work or ~/scratch).
Other bash resources
- Greg's Bash Guide
- Ryan's Tutorials on Bash Scripting: http://ryanstutorials.net/bash-scripting-tutorial/
- CBRS short course workshop wikis (developed by Anna)
- Introduction to Unix: https://wikis.utexas.edu/display/CbrsIntroUnix
- Intermediate Unix: https://wikis.utexas.edu/display/CbrsIntermUnix
- You won't have access to the small compute cluster they use, but you can download the example files and manipulate them in your own Linux or Unix environment.