This is a summary of normal IGRINS use for observers at the McDonald 2.7m telescope
Beginning of night Procedure, should be done at least an hour before opening:
- Get yourself some IGRINS Log Sheets
- On Atlas
- Log in with IGRINS account
- Ask for username and password if you do not already know it
- Open night log on Atlas
- Open a terminal and type "dr"
- Fill out observer name(s)
- Set instrument to IGRINS
- Check for any notes from the McDonald Observatory staff
- Open TCS GUI on Atlas
- Open a terminal and type "tcsgui"
- Startup the weather station GUI (optional)
- Go to a terminal, type > wx_gui
- Open monitoring cameras
- Open firefox and go to http://nexus.as.utexas.edu
- Click "Observing support"
- Click "monitoring cameras"
- Right click "MONET Sky Camera" and open in new window
- Right click "2.7m Tube camera" and open in new window
- Right click "2.7m Dome interior" and open in new window
- You can shrink size of 2.7m Dome Interior camera image by clicking "1x"
- You can shrink size of 2.7m Dome Interior camera image by clicking "1x"
- Rearrange monitoring camera windows on the Atlas screens to your preference
- Log in with IGRINS account
- Start up the Instrument Control Computer (ICC)
- Wake up the Instrument Control Computer (ICC), the iMac on the left of the control console.
- Close windows that are not needed by you (HKP, DTP, SCP, QLP, IGRINS Hub) on the Desktop if they happen to be open. HKP and the IGRINS Hub should have been open, make sure to close them now. Do not touch any terminals that have hk2firebase.sh (likely in a blue terminal) and mntrun running, just in case they happen to be visible. It is currently set up with three blue terminals that help guide you to the scripts you need.
- Open IGRINS Proxy
- Likely previously run in one of the blue terminals, you should find which one. Otherwise, open a terminal
- > cd ~/igrins_admin
- > sh run_tcsproxy.sh
- Open IGRINS Hub
- Likely previously run in one of the blue terminals, you should find which one. Otherwise, open a terminal or another tab
- > cd ~/igrins_admin
- > sh run_icshub.sh
- In the IGRINS Hub...
- Click on 'Update Obsdate'. Make sure Update Obsdate is now the correct (civil) date
- Click on 'Check Mount'. If it fails, then mntrun was probably closed (This is what mounts the detector harddrives). Start it up by...
- Open a terminal window or tab
- > cd ~/igrins_admin
- > bash mntrun
- Start up the Housekeeping Package (HKP) by clicking "Run HKP" in the IGRINS Hub
- In the HKP...
- click "Periodic Monitoring"
- Make sure "Set Alert (T > 30)" box is checked
- In the HKP...
- Check terminal windows to see if run_hk2firebase.sh is running (This is what updates the website monitoring IGRINS)
- If it is not running, then start it up by...
- Open a terminal window or tab
- > cd ~/igrins_admin
- > sh run_hk2firebase.sh
- If it is not running, then start it up by...
- Start up the Slitview Camera Package (SCP) by clicking "Run SCP" in the IGRINS Hub
- Check if you are receiving the TCS information or not (blue values on the upper right, including RA, Dec).
- In the Status box, the following lines should appear:
- “[time] NFS connection succeeded”
- “[time] Detector Status Check”
- “[time] Detector is Ready”
- Start up the Data Taking Package (DTP) by clicking "Run DTP" in the IGRINS Hub
- In the Status box, the following lines should appear for both the H and K detectors:
- “[time] NFS connection succeeded”
- “[time] Detector Status Check”
- “[time] Detector is Ready”
- Change the observer name to your Last Name. No single quotes or special characters. Commas are ok.
- In the Status box, the following lines should appear for both the H and K detectors:
- Open the Quick Look Package (QLP) – optional.
- Open a terminal window or tab
- > cd igrins/igrins_admin
- > sh run_qlp.sh
- This will open two different windows (each H and K).
- In the K window, click 'OPEN' and go to the 'obs_data' directory (this folder is conveniently found in the window that opens on the top left) and find the K image that you want. Do the same with H.
- Checking the "fits" button will enable you to look at a specific image, or alternatively, the "Auto Refresh" button will update with each newly obtained spectra.
- Click on the thumbnail image on the right (a yellow box overlay will appear). Adjust the scale, etc. as needed and hit apply, but you must click again on the thumbnail image to update the larger image.
- Take test exposures to check to make sure readout of detectors with the ICC are working
- On the SCP...
- Uncheck "Automatically Save"
- Check to that exposure time is set to 1.63 seconds and Fowler Sampling Number is 1
- Click "Single" to take a single test exposure
- If you see noise pattern or low-resolution image, repeat the short exposures or contact observing support
- Hopefully it will work fine
- On the DTP....
- Uncheck "Automatically Save"
- Set exposure time to 1.63 seconds
- Set Fowler Sampling Number to 1
- Make sure Repeat Number is set to 1
- Click "Single" to take a single test exposure
- Hopefully both detectors will read out fine, you should hear the computer say "H finished" and "K finished"
- If you see noise pattern or low-resolution image, repeat the short exposures or contact observing support
- When finished, check "Automatically Save" so you don't forget to save your calibration frames
- On the SCP...
- The ICC should now be set up for the night. Now onto taking calibrations.
- Starting up the Telescope and Taking Calibrations
- Go out in the dome
- Go to the old control room and press each of these buttons:
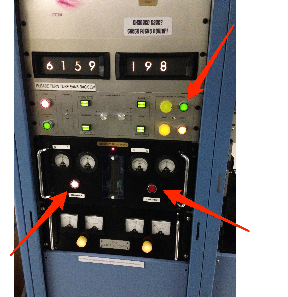
- Go to the console and press "Reset". You will here a click as the breaks preventing the telescope from moving are released. There should be no messages on the TCS now.

- Point the telescope to zenith
- Go to TCS, click the "Next" menu, click "Zenith", and click "Yes" on the warning message that pops up
- Click "Go Next" at the top of the TCS window
- Push the Autoslew button to move the telescope to the zenith
- Set up IGRINS and telescope for taking calibrations
- Raise the east platform so you can reach the top of IGRINS
- Check console to make sure telescope mirror cover is closed for taking darks
- Make sure the shutter on top of IGRINS is closed for taking darks

- Unravel the Flat lamp power cord tied to side of telescope by undoing bungee cable and the two velcro ties

- Test that the Flat lamps are working by plugging in the power cord. The flat lamps should turn on.

- Unplug power cord to turn flat lamps off for now because we will start by taking Darks
- Turn off dome and passage lights on the console for taking Darks
- You can leave the east platform raised while taking calibrations
- Taking Darks
- Go back to the control room
- In the DTP on the ICC...
- Make sure "Save Exposure" is checked at the bottom of the DTP. You want to be sure you are saving your calibration frames.
- Make sure "H-band", "K-band", and "Sync" are all checked
- Set object name to DARK
- Set object type to DARK
- Set exposure time to 5/30 seconds
- Set Fowler Sample number to 3/16
- Set repeat number to 10
- Click "Start Exposure" to start taking your Dark frames
- Dark frames should take about 10 minutes to complete. Computer will say "H finished" and "K finished" when they are done.
- Be sure to record all frames taken in your observation logs
- Get ready for flats
- Go out to the telescope dome and turn on the lights
- Open the shutter on top of IGRINS for taking flat frames


- Go to the console and open the telescope mirror cover, DO NOT FORGET TO DO THIS! IT NEEDS TO BE OPEN FOR FLATS
Lower the platform
- Point the telescope at the Flat position
- Go to TCS, click the "Next" menu, click "Flat", and click "Yes" on the warning message that pops up
- Click "Go Next" at the top of the TCS window
- Push the Autoslew button to move the telescope to the Flat position
- Use the yellow hand-paddle to move the upper windscreen all the way down to reveal the full flat screen.

- Use the hand-paddle to manually move the dome to the Flat position so the black and clear tape on the east side of the dome match up. Typically you want to slow down the dome movement rate to ~50% when doing this


- Taking Flat Offs
- Go back into the control room
- In the DTP on the ICC...
- Set object name to FLAT OFF
- Set object type to FLAT OFF
- Make sure exposure time to 5/30 seconds
- Make sure Fowler Sample number is set to 3/16
- Make sure repeat number is set to 10
- Click "Start Exposure" to start taking your Flat Off frames
- Flat Off frames should take about 10 minutes to complete. Computer will say "H finished" and "K finished" when they are done.
- Taking Flat Ons
- Go out to the telescope dome
- Plug in the power cable for the flat lamps to turn the lamps on
- Go back in the control room
- In the DTP on the ICC...
- Set object name to FLAT ON
- Set object type to FLAT ON
- Make sure exposure time to 5/30 seconds
- Make sure Fowler Sample number is set to 3/16
- Make sure repeat number is set to 10
- Click "Start Exposure" to start taking your Flat On frames
- Flat On frames should take about 10 minutes to complete. Computer will say "H finished" and "K finished" when they are done.
- After calibration frames are done being taken...
- Go out to the telescope dome and turn on lights
- Unplug the power cable to turn the flat lamps off
- Raise the platform to reach IGRINS
- Wrap flat lamp power cable back onto the side of the telescope and secure it tightly with the bungee cord and velcro ties so that it won't fall off the telescope as the telescope is moved around
- Close the telescope mirror cover on the console so nothing falls on the mirror when moving the upper wind screen
- Move the upper wind screen back to its original position using the hand-paddle
- If you are ready to open....
- lower the platform
- go to Dome Opening Procedure
- If you are going to dinner or not going to open for a while...
- close the IGRINS shutter, the same way that you opened it
- lower the platform
- Move the telescope to Stow (follow the same procedure as Zenith and Flat positions)
- Press E-Stop to power down the telescope motors.
- Later when you are ready to open, go to Dome Opening Procedure. Do not forget to go to zenith, raise the platform, and open the IGRINS shutter.
Note: If you leave the Proxy and Hub running all day, you can start the next night by clicking 'Update Obsdate' and then click down the list of Hub buttons.
Note: RA and DEC that are saved in the digital log, from the DTP screen are the 'Next' coordinates on the TCS. The coordinates displayed in the SCP are the current epoch coordinates and these propagate the the FITS headers.
Note: Unless absolutely required for your science, please disable the autosave feature on the slit camera viewer. This will save 30GB of space each night.
Note: When keeping logs, track the A or B location of your frames. Your data reduction will be better in cases where you manually change the nod location or have bad frames.
Note: When guiding, 'send AG offsets to TCS' must be selected for offset commands to be sent to the telescope.
Note: You need at least one 300s sky frame each night for the PLP to work correctly. If you will not get one of these for your science, then get one to help with reductions.
Note: The A and B box positions need to be verified each night because the slit moves in its holder up to 5 pixels between observing runs.
Glossary
ICC: Instrument Control Computer
HKP: House Keeping Package
DTP: Data Taking Package
SCP: Slitview Camera Package
QLP: Quick Look Package
DCC: Detector Control Computer
Dome Opening Procedure
- To startup the telescope follow the dome opening procedure.
Start of Night
- Check and zero the telescope pointing
- Check telescope focus
- TO DO
- Record seeing in the night log on Atlas. Do this four times per night (if possible).