Using Breakout Rooms
Closed Captioning and Live Transcription
Here is a link to Zoom's instructions for enabling and using closed captioning and live transcription
To enable Closed Captioning or Live Transcription for a Meeting
- Click the CC/Live Transcript button on the toolbar of your meeting window and select your desired option. Note: If you do not see the CC/Live Transcript button on your toolbar, Click on the ellipsis (...) to access the functions
![]()
- If you do not see the CC/Live Transcript button on your toolbar or in the ellipsis (...) tab please ensure that the function has been enabled in your Zoom web portal settings.
- Log into your UT Zoom account at https://utexas.zoom.us
- Click on the "Settings" tab in the left column of your Zoom account and scroll down to the "In Meeting/Advanced" section
- Toggle the button on next to "Closed Captioning" and save

Closed Captioning
Closed caption allows the host, another meeting attendee assigned by the host, or an integrated third-party closed captioning service (Zoom Help Center link) to add closed captioning in a meeting. In a webinar, closed captioning can be typed by the host, co-host, a panelist assigned by the host, or an integrated third-party closed captioning service. Closed captioning can also be viewed while in Zoom Rooms.
Live Transcription
If you are unable to provide captioning, Zoom also provides AI-powered live transcription for all paid accounts. This can be enabled by the host, and any participants can view the captioning as needed. Live transcription only supports English and it is recommended that you speak clearly for best results.
Zoom Interpretation Functionality
If you want to host a Zoom meeting in which you are planning to hire an interpreter, using Zoom’s built in interpreter function can help facilitate the interpretation of the message to the desired participants. Here is a link to instructions for setting up interpretation functionality.
Tracking Student Attendance & Attention in Zoom
Using Dual Monitors with Zoom
- https://support.zoom.us/hc/en-us/articles/201362583-Using-Dual-Monitors-with-the-Zoom-Desktop-Client
Making Cloud Recordings Publicly Viewable
Follow these steps to make all cloud recording links publicly accessible
- Login to your UTexas Zoom account with your web browser at utexas.zoom.us. In the Settings tab under Recording, scroll down and ensure that ‘Allow cloud recording sharing’ is selected

- Scroll down again and deselect (if it is selected) ‘Require users to authenticate…’
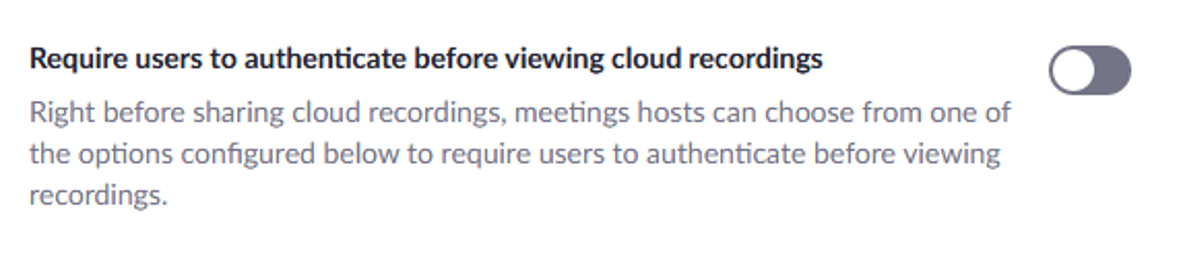
These settings will allow anyone who obtains the link for any recordings made from the host account viewable. This is not recommended for all circumstances but can allow for access to remote students or UT affiliates.
Any questions or concerns can be submitted to vc-trouble@mccombs.utexas.edu for further clarification.
Still need help?
For McCombs faculty, please contact Media Services via email or phone:
- Email ZoomHelp@mccombs.utexas.edu
- Call 512-232-6679 (GSB/CBA) and 512-232-4646 (RRH)
For all other UT faculty, please contact your respective college or school