SET UP NEW OUTLOOK PROFILE - MAC OSX

SET UP NEW EMAIL PROFILE
Notes:
- To clear up some confusion: As per the notes in Before You Start section (above), it is CRITICAL that you create a NEW Profile and NOT just add a new account to an existing Profile - This will not work for the Migration. However, AFTER you create the new profile you will THEN add your account to the (new) profile (see step 18).
- If you are using Outlook 2011, skip down to Step 11.
- Exit Outlook completely.
- From Finder, open the Applications folder.

- Scroll down and find

- Hover over Microsoft Outlook and do a Ctrl+click (or right-click if your mouse/track pad is configured for it - either way works).
- Click Show Package Contents.

- It is entirely possible that you may inadvertently open up Microsoft Outlook at this point. No big deal. Simply close out of it and go back to Step 1.
- At the next window (after you've successfully opened 'Show Package Contents') - Open Contents > SharedSupport, and then double-click Outlook Profile Manager.

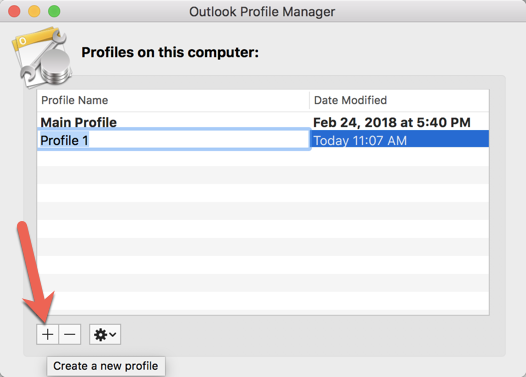
- Click the Create a new profile '+'button.
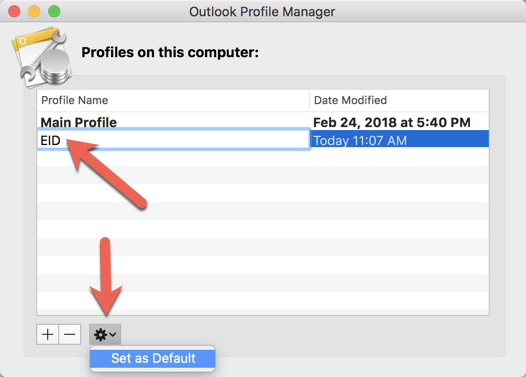
- Enter the name for the new profile (EID) and then at the bottom a the 'cog' icon, click Set the default profile. Close the window.
- Restart Outlook for this change to take effect.
- If you are using Outlook 2011 - things are set up a little different. Profiles are called an Identity
- Go to your Applications folder and open the folder named Microsoft Office 2011.
- Then click on Office > Microsoft Database Utility.
- From here the steps should be more or less the same as above (note: graphics may be a bit different)
- You will want to add a new Identity.
- Restart Outlook for this change to take effect.
- Outlook will now appear empty until you add your Account.
- A dialogue box will open. You can either click on Add Email Account or click on the '+' at the lower left.

- If you are not prompted to enter your account information, click Tools Tab > Accounts

- Enter your McCombs email address (firstname.lastname@mccombs.utexas.edu OR firstname.lastname@mba19.mccombs.utexas.edu) Click Continue.

- That should connect you to the Exchange Server and configure you automatically. If that occurs, then you have successfully added the new Profile and Account.
- If you are prompted with a Set Up Your Email dialogue box, at 'DOMAIN\username or email' enter your McCombs email address (firstname.lastname@mccombs.utexas.edu OR firstname.lastname@mba19.mccombs.utexas.edu) and then your EID Password. Click Add Account.

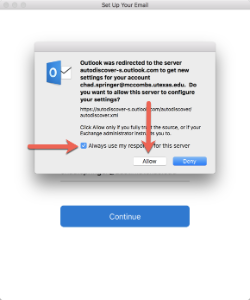
- You might see a redirection message. If so, check Always use my response for this server > Allow.
FAQ
SUPPORT
HOME