Admitting Guests and Guest Speakers into a Zoom Meeting
NOTE: To improve the security of online courses, all UT Zoom meetings will now only allow UT licensed Zoom accounts into the meeting unless you follow the steps below to manually admit a guest. Please ensure that your students are joining class from their UT Zoom Account. If they have any questions please direct them to Zoom Sign-in Verification
Pre-Requisites
You can only allow UT Zoom users or other registered Zoom users into meetings. Make sure that your guest speaker has signed up for at least a free Zoom account prior to attempting to join a UT meeting/class. If they do not have an account ask them create a free one at https://zoom.us
Admitting Guests to a Scheduled Zoom Meeting
Note: If this method fails you can always have the guest speaker call into the meeting using the phone number included in the Zoom meeting invitation email
Steps to admit a guest or guest speaker who does not have a UT licensed Zoom account into a meeting:
- First make sure that your guest has a Zoom account and is signed into Zoom. If needed, they can sign up for a free account at http://zoom.us
- To admit a guest into a meeting that you have previously scheduled in Canvas or the Zoom Portal you must first edit the Meeting Options for your Zoom meeting through the Zoom web portal
- Sign into https://utexas.zoom.us and using the "Meetings" tab on the left side of the screen, locate the meeting that you would like to admit your guest to
Select "Edit"
- Note: If you are editing a recurring meeting, it is recommended to add your guest ONLY to the meeting that they will be attending by choosing "Edit This Occurrence"

- It is recommended to have "Waiting Room" activated and "UT Austin" as the required authentication.
Next to the "Authentication Exception" you can click "Add" to add the name and email address of your guest speaker to grant them permission to enter your meeting
- Fill in your guest's name and email address that is associated with their Zoom account. You can add multiple guest if you need to by clicking on the "Add Participant" link. When you are finished, click "Save"

You will now see your guest name and email listed as an Authentication Exception
- Scroll to the bottom of the page and click "Save" to save all of these changes
- After you have begun the Meeting any guest participants will be placed in the Waiting Room (if you have that security turned on) and you will need to manually admit them to the meeting through the Manage Participants window. If you DO NOT have the "Waiting Room" turned on, your guest will be let into the meeting automatically.
Do You Need to Make Your Guest Speaker a "Co-Host"?
- Not necessarily. If you only need them to share their screen to display slides or even utilize the whiteboard for annotation, they can do that by default as a "Participant". The only value of being the co-host is that you can do things like mute/unmute people, lower hands that are raised, or even remove people from the class. Consider whether you even want to put the management of the class on the guest or if you or your TA should manage calling on people and muting microphones.
- Only consider making people who help manage the class (e.g. chat monitor, TA) a co-host.
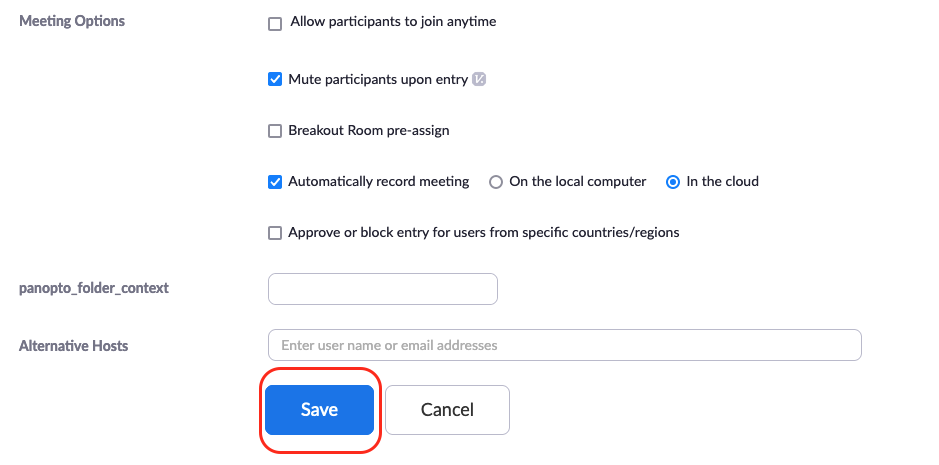
- Also if you think you aren't able to attend a class that has a guest speaker, then you can set them, your teaching backup, or a TA up as an alternative host which will allow them to start the meeting without you. This feature is at the bottom of the Schedule a Meeting page in Canvas. See below.
- NOTE: Zoom doesn’t make it very clear on which email address you need to enter. First, you will need the UT EID of the person you wish to make alternative host. Then, enter them into the field with the format of - AlternativeHostEID@eid.utexas.edu
(i.e. abc1232@eid.utexas.edu)

Troubleshooting: Guest Speaker's Camera & Mic Doesn't Work
- When the guest arrives, it's possible (especially for Mac users) that when they try to use their mic or camera, it doesn't work or prompts them to enable the mic/camera
If your guest gets this, click on Go To Settings button | Check the zoom.us.app to allow Microphone or Camerica to be accessible by Zoom | Guests will be forced to quit the Zoom app and log back into the session before these changes take effect. |
|
|
|


- KEY TIP: Practice before the class, having your guest login to a meeting, test their mic, camera, and ability to share their screen.
Troubleshooting: Guest Speaker Can't Share Their Screen
- This is usually due to security protection built into Macs. If your guest runs into this issue they may need to give Zoom permission to access their screen.
When the guest tries to share their desktop to show slides they may get prompted to open their system preferences. Have them do so | Guest will need to check the zoom.us.app to grant access to Zoom and then will need to quit the Zoom app and log back into the session before these changes take effect. | Lastly they may also have to Open System Preferences to approve Zoom to record their session. Again, have guest open system pref and do this. |
|   |
|


- KEY TIP: Practice before the class, having your guest login to a meeting, test their mic, camera, and ability to share their screen.
Still need help?
For McCombs faculty, please contact Media Services via email or phone:
Email ZoomHelp@mccombs.utexas.edu
Call 512-232-6679 (GSB/CBA) and 512-232-4646 (RRH)
For all other UT faculty, please contact your respective college or school