Below is a list of recommendations and tips that Liz Moliski put together to improve your online class experience and student engagement. Start by 1) reviewing all info on this page first and then 2) consider what tips you want to implement. Note, there are many tips you should or could implement. Focus on what you think will bring the most value to your class. If you have questions please direct them to ZoomHelp@mccombs.utexas.edu.
How to avoid issues inside a Zoom Room equipped classroom
Zoom Rooms - Instructions on Connecting to McCombs Zoom Rooms
We have attempted to make using Zoom in our rooms as simple as possible for Hybrid teaching. This room is equipped with a "Zoom Room" computer. The Zoom Room will use the room's tracking camera, the room's ceiling microphone and/or optional wireless microphone, and any content - the document camera, or your Laptop connected through an HDMI cable or AirMedia - you are sharing on the projector.
 Quick Start
Here is the basic set up to launch a Zoom session in a room There are two options to Launch the meeting;
Important: There is no reason to additionally launch zoom on your laptop. Your screen and computer audio is being shared with other Zoom participants if it is displayed on the projector. This will start your Zoom Meeting. If the meeting is set to record, you will hear a voice over the speakers say, "Recording in progress." If you would like to regularly record classes, we recommend that you use Panopto instead of Zoom. You can use Zoom and Panopto in tandem - so you can have a guest lecturer over Zoom without having to worry about adjusting your Zoom settings. You can learn more about Panopto in the Lecture Capture tab above! |
Scheduling Zoom in Canvas
While you may have scheduled Zoom meetings in the past through the Zoom application on your laptop or phone, we encourage that you schedule your Zoom meetings through your course in Canvas. You can find those instructions on our wiki, Zoom/Canvas Integration. After you schedule your Zoom meeting through Canvas, you will need to follow our Zoom Room Scheduling instructions. |
 Confidence Monitor
All of our Zoom Rooms are now equiped with a confidence monitor. It could be a TV at the front or back of the room, or an additional small screen at the lectern. The confidence monitor will always show what you are sharing, so you able to teach with confidence. Once you connnect to a Zoom meeting, a new dialog will show on the room's touch panel, which gives the confidence monitor new sharing options.
|
If you would like to test the room's functionality prior to your first day of class, we recommend scheduling a Demo with Media Services. These are typically 15-30 minutes, depending on what the room has to offer and how much you would like to know.
Plan to be on camera
- Pick an appropriate teaching background, such as a bookcase or office, while hosting
- Look at the camera, just as you would look at students in the class
- Zoom is optimized for video communication
- Make sure your audio is on and you use appropriate tone (not too soft or too loud)
- Dual screen setups let you share one desktop with students and keep Zoom controls on the other one. You can use your TV or another monitor as the second screen. It works just like plugging into a classroom projector. You have to set this up in your monitor preferences while you are connected to your second screen. Click here to learn more...
- Be careful of what you have on your desktop if you plan to share the entire desktop so that students can see multiple applications at once (i.e., slides and Excel) but not things you don’t want them to see (i.e. text message from your friend about lunch)
- Slides should be simple, without animations if possible. Connection lags can affect animations and screen shares. Consider PDF format for sharing slides since this taxes bandwidth less.
- Monitoring bandwidth usage - If you get slowness check out Slow Internet Connection Tips and be aware that the more you share (i.e. camera on, sharing screens) the more likely latency can occur.
- Use a solid network, such as your home internet or a hardwired internet connection.
- Consider using a headset (particularly if you are using PC. Macs tend to have fewer issues, in general)
How to Facilitate classroom control with appropriate Zoom settings
- Sign in to utexas.zoom.us with your eid and eid password and look under Settings to find your controls

- The following are default settings to be aware of and we recommend you consider leaving ON:
- Have students enter with mics muted and video off.
- Enable breakout rooms and/or Zoom polling if you plan to use them. Disable if you don't plan to use.
- Enable multiple hosts if you have a TA or are planning group presentations
- Allow hosts to remove students - in the cases of large classes possibly or when you have a disruptive student.
- Other options you could consider turning ON:
- Turn on auto record if you are forgetful about recording. Always record your class!
- This can be set from each meeting’s controls as well
- Ability to kick students out permanently - If you have a disruptive student, you can remove them, but they're allowed to rejoin the session. You can disable this default setting so when you remove a student, they are removed permanently and can't rejoin
- Turn on auto record if you are forgetful about recording. Always record your class!
The following is a default setting we recommend turning OFF:
- Disable private chats unless you plan to use it for quick group work.
- In a large group setting, private chats would allow students to ask you a question that the whole class won't see.
- We recommend that private questions are handled through email or whatever communication tool you use in class while chats are open to the group.
- Disable private chats unless you plan to use it for quick group work.
- One more tip if you have more than 40-50 students
- Ask your TA to attend the online session to help with answering questions in chat and managing students (i.e. muting, unmuting, noticing questions)
- Ask your TA to attend the online session to help with answering questions in chat and managing students (i.e. muting, unmuting, noticing questions)
Set participation expectations for students before class
- Several days before your first class, send students an email telling them that this will be a Zoom class and that you will be using video and audio.
- NOTE: A default email goes out when you create a meeting in Canvas.
- Advanced Option: You can edit it in settings or write a custom email if you create your meeting from within utexas.zoom.us versus Canvas.
- Encourage students to have cameras and mics available. Most newer (less than 5 years old) laptops come with these features
- Tell students that they should be on a reliable network, such as a home, UT, or business network. Public wifi usually works, but it is not as reliable. In a pinch, cell phones can be used as mobile hotspots
- There is a Zoom phone app, which works reasonably well, but the screen is small and students on phones cannot use breakout rooms, which are problematic for group work and in-class exercises.
Zoom Meeting Security
- Zoom Class meetings: Students that are signed into Zoom with their UT Zoom licensed account will be admitted to class meetings immediately. Students signed into Zoom with personal or free accounts are restricted from immediately joining class meetings and will be placed in the Waiting Room
- New Security Measures: As of April 8th, Zoom has started implementing new security measures. Here is a message that outlines them: https://blog.zoom.us/wordpress/2020/04/08/zoom-product-updates-new-security-toolbar-icon-for-hosts-meeting-id-hidden/
- Zoom Office Hours meetings: Here is a tutorial for Using Zoom Breakout Rooms for Office Hours
Remove a Participant from a Zoom Meeting
Click on the Security icon on the bottom control bar.
- Click Remove Participant and the Remove Participant window will appear
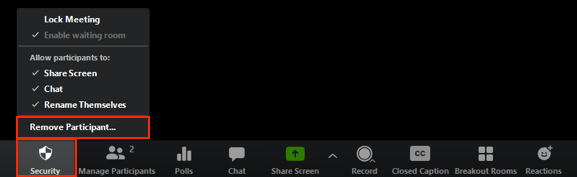
- In the Remove Participant window click Remove next to the participant

The participant cannot re-join the meeting unless Allow removed participants to rejoin is enabled in Meeting settings.
To enable this feature:
- Sign in to the Zoom web portal at https://utexas.zoom.us
- Click the Settings tab on the sidebar
- Scroll down to “Allow removed participants to rejoin” and switch the toggle on

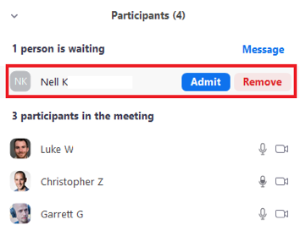
If you have begun a meeting and find an unwanted attendee has joined you can also remove them from the Participants panel. If the Participants panel is not visible, click Manage Participants on the control bar at the bottom of the Zoom window.
- Next to the person you want to remove, click More
- From the list that appears, click Remove
Admitting Guests and Guest Speakers Without a UT Zoom License
- If your guest has a Zoom account but not a UT licensed account you will need to follow these instructions to admit them to your Zoom meeting: Guest Speakers
Giving Permission to Students to View Zoom Recordings
To allow students to view and download Zoom recordings:
- Sign in to Zoom at https://utexas.zoom.us (you will not be able to access these setting in Canvas)
- Click on the Recordings tab
- Navigate to the cloud recording of your meeting
- Click the title of your desired video and you will see a window that looks like the image below
- Click the Share button in the top right corner of the window

- Clicking Share will bring up the window below.
- Toggle Share this recording on and students will be able to view it
- NOTE: You're able to allow students to download but consider the implications of this as it relates to FERPA and if students would be just okay just viewing the video.
- You can either leave Password Protect off, or turn it on and provide your students with a password that you have chosen
- Click Save and Close

Office Hours in Zoom
- Here is a tutorial for Using Zoom Breakout Rooms for Office Hours
Establish procedures at the start of the first class
- Explain that default settings for all students participants will mute their mics and have their cameras off.
- Students by default can unmute themselves if needed.
- Faculty have the privilege to "mute all" participants in the Participant Window in a Zoom session
- Check your audio before you start the meeting and remind students to do the same before they enter.
- To do this click "Test Speaker and Microphone" when prompted. See below

- To do this click "Test Speaker and Microphone" when prompted. See below
- To aid in the use of Zoom, we recommend you and students consider always have your Zoom controls visible. To turn on this feature
- Log into https://utexas.zoom.us/profile
- Navigate to Settings (https://utexas.zoom.us/profile/setting)
- Select the option for "In Meeting (Basic)" settings
- Make sure the option to "Always show meeting control toolbar" is turned on

- All (students and teachers) should keep the Chat window and Participants (or Manage Participant window for faculty) window open when you start a session on Zoom. These will be on the Zoom controls at the bottom of the Zoom session. Remember to teach students to use the participant window and the chat window
- If you need to "Mute All" participants or start to hear audio distortion, you cut off all mics except yours using the participant window mute button. You should be able have a number (5 or 6 is easy) of open mics at once in Zoom

- If you need to "Mute All" participants or start to hear audio distortion, you cut off all mics except yours using the participant window mute button. You should be able have a number (5 or 6 is easy) of open mics at once in Zoom
- Teach students how to use the buttons under more in the participant window. The break time button is very important if they step away so that you don’t call on someone who isn’t there

- Call on students in one of two ways:
- Students can raise hand digitally in Participant Window using these instructions. Raised hands will bubble to the top of the host's Participant window in order that they were raised
- You can also try having students actually raise their hands in front of their camera (assuming your group is small and you're not sharing slides). Experiment with what works and doesn't and be flexible.
- Last class procedure tip! Send students a handout (maybe just the revised syllabus) via the chat window when your start your first class back so that they know how to download files you send out. This is on the lower right, in the chat window
Guidelines for larger (i.e., n > 40) classes
- The better behaved your class is, the larger you can handle without a TA, but at first, even 15 students will feel like a lot.
- "60 is about my limit alone even with years of experience and a TA still makes that much easier" -Liz Moliski
- Make the TA (and any student chat managers) your co-hosts by hovering over their names in the Participant window and using the menu dropdown
- The setting for default alternative hosts is currently disabled in Canvas
- Have the TA manage the chat and participants so that you don’t become distracted
- The TA can answer questions and raise a hand or come on mic if a student has a question that you should answer.
- In the rare worst case, the TA can warn and/or eject students who are excessively distracting
Zoom Etiquette
Because there will be so many people on these Zoom meetings, here are some best practices to pass on to your students.
- Mute yourself unless you are speaking. This will cut down on background noise and limit any distractions.
- Be mindful of your surroundings when on camera. We want to make sure we avoid as much distraction as possible.
- Turn your camera off if you are leaving the meeting temporarily.
- Try to keep questions and comments brief. With a large classroom, there are many people to get through and many questions to move through. Try to limit remarks as much as possible.
- Minimize repetition.
- If the video or audio is choppy, try turning off your video.
- Please always use reliable private or enterprise WIFI.
Here are some links to further your Zoom etiquette:
- https://blog.zoom.us/wordpress/2019/11/27/video-meeting-etiquette-tips/
- https://blog.zoom.us/wordpress/2013/08/20/video-conference-etiquette/
- https://blog.zoom.us/wordpress/2015/04/21/9-oft-forgot-meeting-tips/
The Participant Window
- Access this via the link in the Zoom toolbar at the bottom of your live Zoom session.
- This window will list the names of attendees and allows students to raise their hands and react without having their camera on.
- Remember that students with raised hands are moved to the top of the window
- You will have to scroll to see your whole class
- It allows you to easily change a student’s settings (audio, video, host privileges, send to break out room, temporarily remove from class)
- TIP: This is where you can access the handy "Mute All" function in case people's mics are on and causing distractions
The Chat Window
- Access this via the link in the Zoom toolbar at the bottom of your live Zoom session.
- In this window, students can ask and answer each other’s questions in a chat thread
- TIP: Chat can be distracting when you are teaching so have a TA manage it if possible otherwise just check it and answer questions occasionally in batches
- TIP: Besides answering questions in chat, a TA can monitor questions and raise their hand to bring important questions to your attention
- Private chat can be helpful for quick group work, but it can also lead to chaos
- Chat can be saved
- The UT default is not to allow students to save chat
Breakout Rooms for Group Work
To learn more about using the Breakout Rooms feature please go here.
Zoom Meeting and Phone Statistics
Meeting statistics allow you to view various diagnostic information during a meeting. This allows you to gauge whether you are experiencing a network, audio, or video issue during your meeting. Please visit this Zoom article for more information:
Practice with Zoom controls so that you are comfortable!
- Create practice classrooms in utexas.zoom.us because every class that you create in Canvas results in an email being sent to the people in that class.
- Colleagues, TAs, and even friends, and family can be your test students
- Have your TA attend class at least until you are fully comfortable.
- A dual monitor setup is very nice because you can share one desktop with the class and use the other for Zoom controls.
Zoom Teaching Support
- The first line of support is the Zoom manuals. There are very helpful short videos and directions accessible under Video Tutorials in your utexas.zoom.us account.

- Canvas also has Zoom tutorials available under the Get Help button

If you have reviewed all the above tips, please MOVE ON TO STEP 4
Still need help?
For McCombs faculty, please contact Media Services via email or phone:
- Email ZoomHelp@mccombs.utexas.edu
- Call 512-232-6679 (GSB/CBA) and 512-232-4646 (RRH)
For all other UT faculty, please contact your respective college or school
1 Comment
J Kyle Rosenblad
NON-BUSINESS FACULTY - Please refer to this documentation: How to schedule a Zoom recording (non-business).pdf