What is UTBackup?
UTBackup is a backup service that uses a software client called CrashPlan Pro to backup data to UT servers. It copies selected folders and files every 10 minutes to UT Servers, encrypting in accordance to Category I data standards. A user may then restore files from the desktop software or web browser.
This is not a file synchronization system (like Dropbox), but a program to backup existing files. The purpose is to backup information that may be lost in the event of a disaster or accident (i.e. computer hard drive crash or damaged, recovering a file that you deleted.)
UTBackup deployed through McCombs is maintained by Service Desk located in CBA 1.324.
Special Notes
- One license (one computer) per user
- 10GB storage limit
- Additional licenses and/or storage may be purchased separately
Request UTBackup
For McCombs faculty and staff, please request UTBackup from the Service Desk. You may request it through these four easy ways:
- Recommended! Create a support ticket, here (on the right side of the page)
- Call (512) 232-6616
- Email ServiceDesk@mccombs.utexas.edu
- Stop by CBA 1.324 (first floor of McCombs)
Guidelines for filling out the ticket
- Summary: Request UTBackup
- Type of Incident: Request
- Impact: Normal
- Urgency: Normal
- Detail: Install UTBackup on my computer,insert Computer Name
- EID: bb123
- Email: bevo.bucks@mccombs.utexas.edu
- First Name: Bevo
- LastName: Bucks
- Computer UT Tag (enter Computer Name): 00000001
Important: be sure to include your EID and put your computer name in the UT Tag field.
How to Configure CrashPlan Pro
Create your Account
- Navigate to the Start menu and find CrashPlan.
- Now create an account by typing in your name, EID, and password. (Figure 1.1)
If you have previously created a Crash Plan account, select the "Existing Account" radio button and click sign in.
(Figure 1.1)
What files to backup?
Please backup documents that contain teaching instructions or student, faculty, staff information. These include Word, Excel, Access, PowerPoint files. UTBackup is not a good place to backup your PST File (email archive or offline email). UTBackup should be used primarily for documents. It should not be used for large amounts of pictures or videos.
How to select your files
Select which files you would like to backup.
- Navigate to the Backup tab.
- Click the “Change” button under the “Files to Backup” section. (Figure 1.2)
(Figure 1.2)

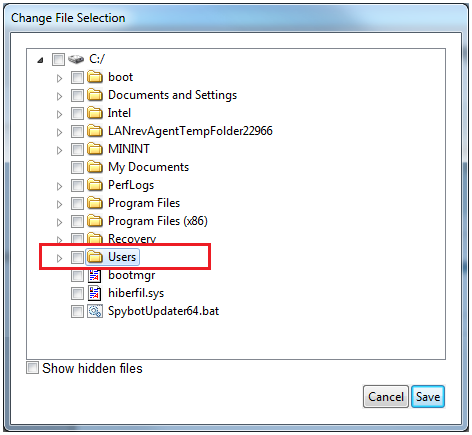
Click the triangle to the left of the “C:/” and expand the file structure. (Figure 1.3)
- Click the triangle to the left of the "Users" and expand the file structure. (Figure 1.3)
- Find your User Profile folder (i.e. last name first initial) (Figure 1.4)
- Check the box "Show hidden files" at the bottom left.
- Select your User Profile folder and select which folders you would like to backup.
- Usually you want to check: AppData, Desktop, Documents, Downloads, Favorites, Music, Pictures, Videos.
- You can select any other folders you might have that are in a different location such as on the root of the C drive.
- Click “Save”.
- Your folder should now be backed up. (Figure 1.5)
- Click the "Start Backup" button to begin.
(Figure 1.3)
(Figure 1.4)

(Figure 1.5)

* The backup will continue even if you close the application.
* If your computer goes to sleep, the backup will continue when it wakes up.
To maximize backup efficiency the initial seeding of a backup set should be allowed to complete while the computer is attached to a wired UT Campus Network.
Restoring Files
You may restore files from UTBackup through two ways, using the CrashPlan software on your computer or using Web Restore. Web Restore is only limited to restoring a few files and has a limit of 250MB per restore. Web Restore only serves as a “quick fix” and should not be used consistently.
Restoring from your PC
- Login to CrashPlan with your EID and password.
- Click on the Restore tab on the left column.
- Check the boxes to the left of the files or folders you would like to restore.
- For restoring a specific file, click the little triangles in the file tree until you reach the file and then check the box to the left of that specific file.
- Choose to restore files from UTBackup-Master if it is not defaulted to it.
- Click Restore.
Restoring from the web browser
- Login to the web portal.
- In the top navigation bar, click on My Computer.
- You will then see your computer name under Name. Click on the computer name (it should be underlined in blue).
- Click Restore Files (last item) in the left column.
- You will be brought to a screen with a file tree. Select the files you would like to download.
- Once you have finished your selection, click on the blue link that says Click here to download your restored files.
Uninstalling CrashPlan from your Computer
Caution: May result in the deletion of back up data!
When uninstalling the CrashPlan client from your computer, you will be asked whether or not you would like to retain your data that you have backed up on the server! Please be sure to select the correct option. Deleted data cannot be recovered!
Note: Deleting the data does not mean that you will be deleting files from your computer, but that the files that you have backed up to the server will be removed. This means that you cannot restore previously restored data to a new computer.
Changing Computers
If you currently have UTBackup and are switching computers, simply return your computer to the Service Desk. Once you have received your new computer, request UTBackup. You may login with your original login information and download the files that you have previously saved.
For any additional or in-depth instructions, please visit ITS’s wiki pages. https://wikis.utexas.edu/display/utbackup/How+to+Configure+UTBackup+-+Windows