Circuit Overview:
The team developed a mechatronic system in order to minimize the effort required for the customer to use the product. A servomotor was utilized to provide the torque necessary to engage and disengage the cam cleat. The servomotor was a Power HD High-Torque Servo 1501MG purchased from Pololu and capable of generating 17kg-cm of torque. A hall-effect sensor was utilized to signal the servomotor to engage or disengage the cam cleat. The hall-effect sensor was integrated into the base of the prototype so that it would be shielded from elements such as water which could short out the sensor or cause interference. Input from the hall-effect sensor and output to the servo motor was controlled by an Arduino Uno, which was provided as part of the RMD Supplies kit.The full circuit is shown below in Figure 1. In order to implement this circuit successfully, a pull-up resistor would be required between the output of the Hall effect sensor and ground. In addition, resistors should be selected to appropriately bias the transistors such that they are operating in the saturation region. Finally, a momentary switch would have to be implemented to momentarily short the collector and emitter of Q2 in order to power on the Arduino.
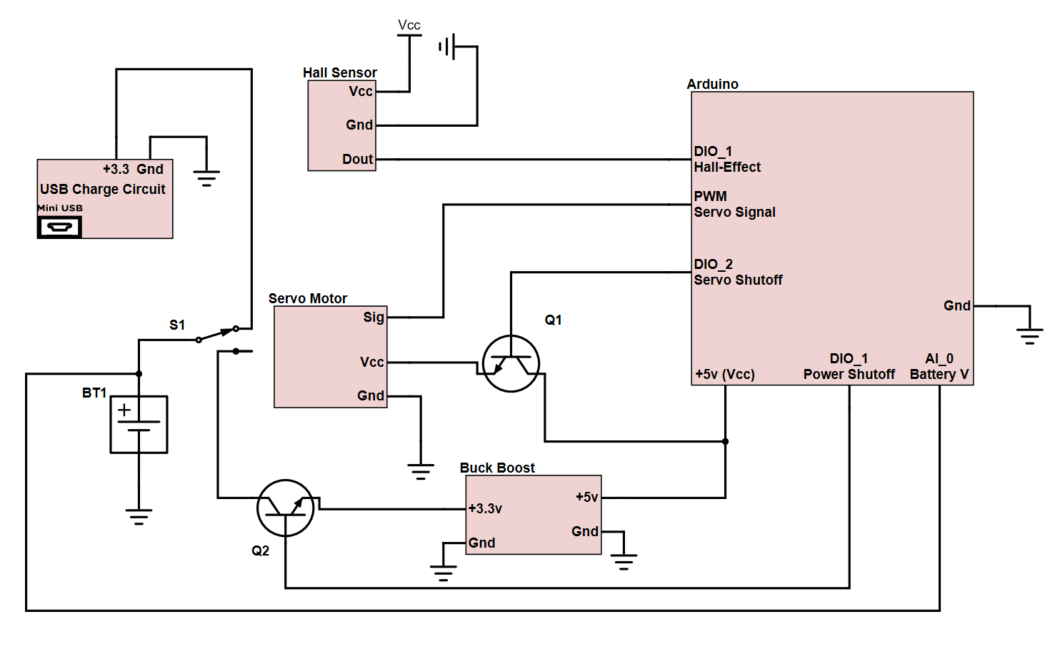
Figure 1: Circuit Schematic
Battery Considerations:
A high-density lithium polymer battery sourced from a Samsung Galaxy smartphone was selected to provide power to the system. The battery was chosen for its unparalleled energy density which allowed for an estimated four hours of continuous use in a package that could easily be contained within the base of the prototype. A buck-boost DC-DC converter was used to step up the voltage from 3.3v to the 5v required to run the servo motor, hall-effect sensor, and Arduino. The battery was charged via a simple lipo charge circuit. Out of concern for safety,a battery voltage monitoring scheme was designed such that it utilized a NPN transistor as a switch to maintain voltage to the buck-boost converter. In this design, battery voltage was monitored by the arduino and shut off if voltage became low on the battery.
Arduino Code
The team utilized an Arduino Uno to control the mechatronic components of the system. In the main loop of the code shown below, the Aduino first checks the state of the Hall effect sensor. When the user puts a magnet in proximity to the Hall effect sensor, its state changes from high to low. When the magnet is removed from the sensor the state changes from low to high. Upon a transistion from low to high, the code checks the servo position and commands the servo to toggle to a different position. The first time a magnet is brought close to the sensor and removed the gripper mechanism will close. If the process is repeated the mechanism will open. We utilized this logic so that the user only has to tap the side of the device with a magnet to get the gripper to open or close. The code shown below was compiled to the Arduino to demonstrate the prototype, and a more robust code that includes voltage monitoring is in progress.
#include <Servo.h>
Servo myservo;  // create servo object to control a servo
int val = 0;    // variable to store the servo position
int openPos=180;
int closePos=0;
char reader=0;
const int hallPin = 2;
const int servoPin = 10;
const int ledPin = 13;
const int closedVal=120; // define servo open position in degrees
const int openVal=20; //define servo closed position in degrees
int hallState=0;
int lastState=1;
bool servoPosition=LOW;
void setup() {
  myservo.attach(9);  // attaches the servo on pin 9 to the servo object
    // initialize the LED pin as an output:
  pinMode(hallPin, INPUT);
  pinMode(servoPin, OUTPUT);
  pinMode(ledPin, OUTPUT);
}
void loop() {
  hallState = digitalRead(hallPin);

  if (hallState == LOW && lastState == HIGH){
    if (servoPosition == HIGH){
      servoPosition = LOW;
      digitalWrite(servoPin, HIGH);
      digitalWrite(ledPin, HIGH);
      myservo.write(closedVal);
      delay(1000);
      digitalWrite(servoPin, LOW);
      digitalWrite(ledPin, LOW);
    }

  else{
          servoPosition = HIGH;
          digitalWrite(servoPin, HIGH);
          digitalWrite(ledPin, HIGH);
          myservo.write(openVal);
          delay(1000);
          digitalWrite(servoPin, LOW);
          digitalWrite(ledPin, LOW);
      }
  }
  else{}
  lastState = hallState;
}