Step-by-step guide
- On the workstation adjacent to the laser cutter, open your cutting linework in your vector-drawing program of choice, and confirm that you have followed the suggested file preparation steps
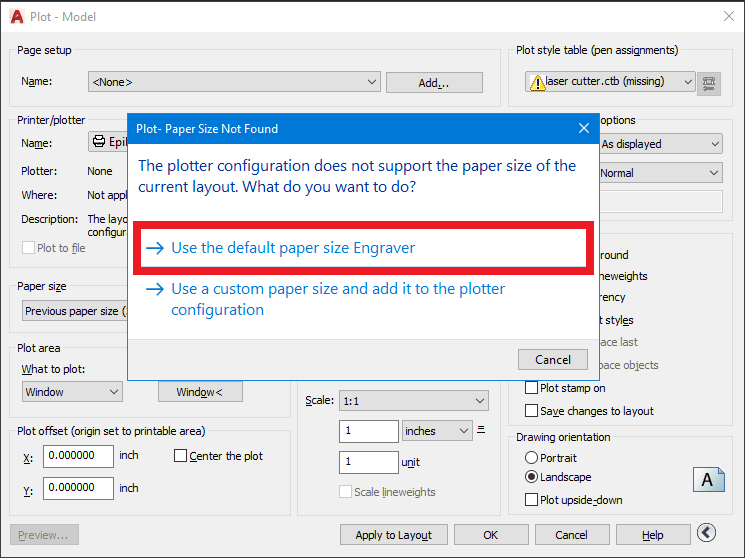
- Next, print only your cutting linework (using the 'Window' option under 'What to Plot' in AutoCAD, or equivalent) to the 'Epilog Engraver' printer, accepting the 'default paper size' dialog that comes up:
- The positioning of the linework within the cut bed and relative to your material happens in the next step
- When your print dialog looks like this, exactly, hit 'OK':
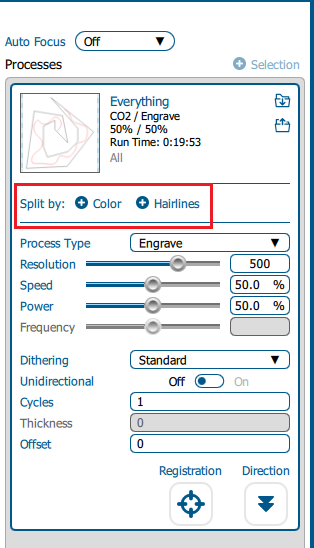
- Within the Epilog Dashboard, you will be met with a live feed of the cut bed, with your already positioned material, and the "Processes" panel along the right side with an image of the linework you just 'plotted':
- If your linework consists of different colors or layers, the Epilog driver will likely create a process for each. If your cuts will all use the same settings, you can merge them. If the driver doesn't automatically separate them for you, you can split the process either by Color or Hairlines (line-weight).
- If you properly separated your linework in your drawing program, this should result in several sub-processes corresponding to the number of layers.
- In each of these processes, you will need to specify the "process type": Vector (cutting or etching linework), Engrave (for raster art), or Off (to skip cutting). You'll use Vector for most of your cutting jobs.
- Using the Suggested Material Settings as a baseline, input the proper settings for your material: Speed, Power, and DPI/Frequency. Please note these are merely suggestions – it is required to do a material test to find the proper settings for your material
- Next, specify or confirm the Cut Process Order by dragging the different process windows up or down the process panel. The job will cut the top process first and continue down.
- Lastly, drag and rotate your linework within the live feed window to align it with your material. Once you are satisfied with the placement of the linework, click the 'Print' button at the bottom of the window.


Note: If you are using Method 2 (Thickness) to focus the laser, enter the thickness in all of the processes before clicking 'Print'.
You will likely be using Vector processes exclusively during your time at SOA.
Related articles