Creating a Video in VirtualDub
Step-by-Step: Creating the Video
1. Open VirtualDub from the All Programs section of the Start Menu.
NOTE: VirtualDub is a free program available at VirtualDub.org
2. Click on File... in the menu bar and select Open Video File... from the list.
3. Browse to the folder where your individual frames are stored.
4. Select the very first frame in the folder. This file should end with "0000.bmp" (i.e. 3DS Max Project-0000.bmp). Click Open.
5. VirtualDub should automatically find and load the other frames in your sequence. When finished you should see the first frame of your video appear.
6. Click the Play button (second button along the bottom) to see what your video will look like once it is complete. 
- If it looks good, you are ready to continue.
- If not, then you may need to delete your source folder containing the BMP frame files and start over!
7. Click on Video in the menu bar and ensure that Full processing mode is selected.
(NOTE: YOU MUST COMPRESS THE VIDEO IN THE INSTRUCTED MANNER)
8. Then, select the Video pulldown, Compression. from the list to open the Select video compression dialog box.
9. Select Microsoft Windows Media Video 12 from the list of available codecs.
10. Click OK at the bottom of the Select video compression window to return to VirtualDub's main window.
11. If you do not wish to include any audio with the video, proceed to step 14!
- YOU MUST COMPRESS THE AUDIO IN THE INSTRUCTED MANNER, IF YOU USE AUDIO
- Click on Audio in the menu bar and ensure that Full processing mode is selected.
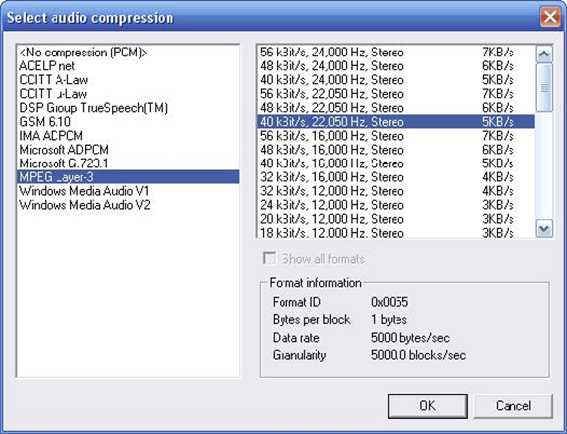
- Then, select Compression... from the list to open the Select audio compression window.
- In the left pane, select the MPEG Layer-3 codec. After that, select "40 Kbit/s, 22,050 Hz, Stereo - 5KB/s" for good stereo audio.
- Otherwise, choose a lesser-quality option for reduced file size. For example, most audio pieces sound just as good when played as mono (both L & R in both ears). If chosen, a "mono" compression option can reduce your audio size by half!
- Click OK when finished.
12. Now go back to Audio in the menu bar and select the Wave Audio... option.
- Browse to and select the WAV file you wish to play with the video.
- The audio MUST be a WAV file, an MP3 will not work!
- If you have an MP3, use WavePad to save the MP3 as a WAV file or ask tech support for help before proceeding.
- Click Open to open your audio file and have it attached to your music.
(NOTE: Your audio file will start with frame one and suddenly end when the video does! You may want to use WavePad, Adobe Soundbooth, or Adobe Audition to edit your WAV file before attaching it to your video)
13. You're almost done!
- Preview your video once more by clicking the Play button at the bottom of VirtualDub's main window.
- Make sure everything is perfect!
NOTES:
- Your audio may sound "jittery"! I promise that it will not sound like this once compressed. Just make sure the audio begins and ends when you want it to.
- See Removing Jitter or Shaking with VirtualDUB & Deshaker for more about eliminating Jitter and Shaking from your video.
14. Finally, click File in the menu bar and select Save as AVI... from the list.
- Browse to a folder where you'd like to save your final video and type a file name in the File name: field (i.e. 3DS Project.avi).
- Click the Save button to begin processing your video.
15. When the compression is complete, simply exit VirtualDub, find the final AVI you just saved, and play it from start to finish to be sure it completed successfully. Also, check to be sure the audio plays (if applicable).
16. DELETE YOUR SOURCE FILES if you are finished with your video! The source BMP files take up a LOT of disk space and are unnecessary once the video is complete. Besides, you can always re-render them later if needed.
What Now?
Rendering: Single Computer Method