Introduction
breseq is a tool developed by the Barrick lab intended for analyzing genome re-sequencing data for bacteria. It is primarily used to analyze laboratory evolution experiments with microbes. In these experiments, there is usually a high-quality reference genome for the ancestral strain, and one is interested in exhaustively finding all of the mutations that occurred during the evolution experiment. Then one might want to construct a phylogenetic tree of individuals samples from a single population or determine whether the same gene is mutated in many independent evolution experiments in an environment.
Input data / expectations:
- Haploid reference genome
- Relatively small (<20 Mb) reference genome
- Input FASTQ reads can be from any sequencing technology
- Average genomic coverage > 30-fold
- Less than ~1,000 mutations expected
- Detects SNVs and SVs from single-end reads (does not use paired-end distance information)
- Produces annotated HTML output
You can learn a great deal more about breseq by reading the Online Documentation.
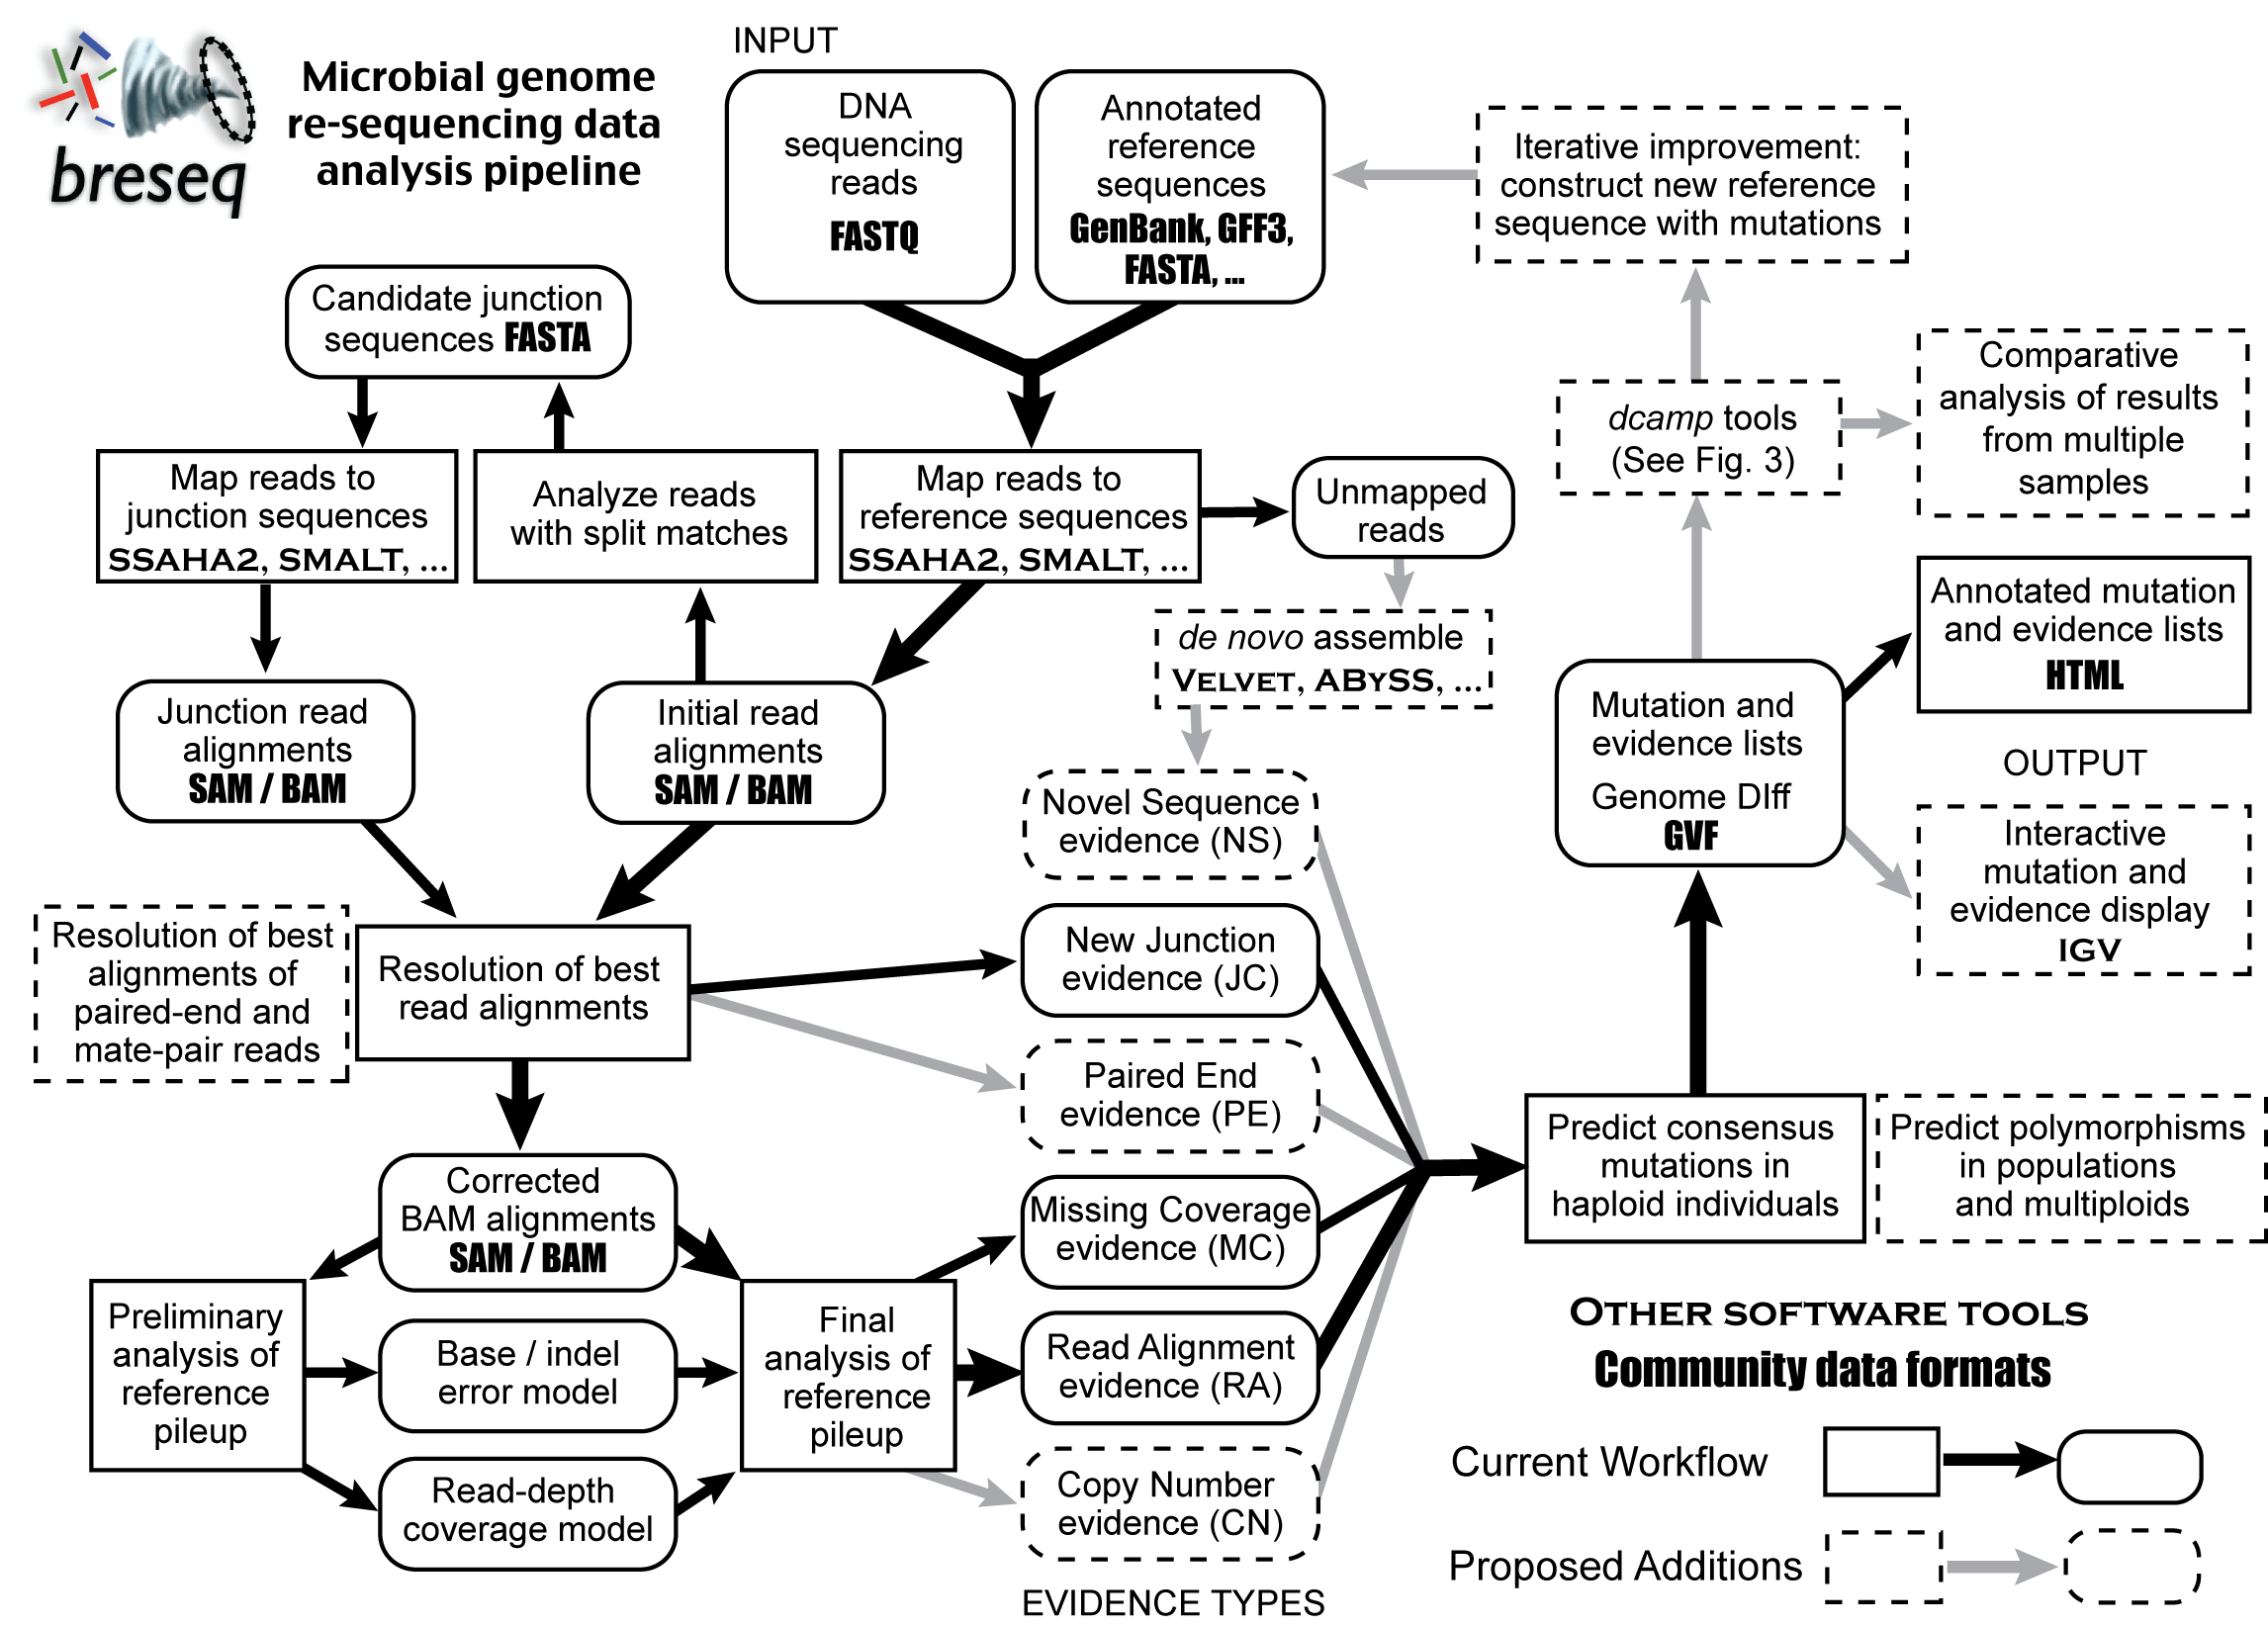
Here is a rough outline of the workflow in breseq with proposed additions.
This tutorial was reformatted from the most recent version found here. Our thanks to the previous instructors.
Objectives:
- Use a very self contained/automated pipeline to identify mutations.
- Explain the types of mutations found in a complete manner before using methods better suited for higher order organisms.
Example 1: Bacteriophage lambda data set
First, we'll run breseq on a small data set to be sure that it is installed correctly, and to get a taste for what the output looks like. This sample is a mixed population of bacteriophage lambda that was co-evolved in lab with its E. coli hosts.
Environment
In order to run breseq, we need to add "module load bowtie/2.2.6" to your .bashrc file.
cdh  # move to your home directory
nano .bashrc  # open your .bashrc file for editing
# scroll down to section 1 where modules are being loaded and add the following command making sure to include the leading spaces to match the formatting.
  module load bowtie/2.2.6
ctl-o # exit nano
ctl-x  # exit nano
source .bashrc  # this is the equivalent of logging out of lonestar and logging back in
breseq should now run using the breseq command. There are 2 key ways to check if a program is working/installed how you expect it to be: the which command, and the command itself. The which command searches through your PATH variable looking for the name of the command or file that comes after it. In the case of 'which breseq' you should see /work/<NUMBER>/<USER>/lonestar/src/BioITeam/breseq/bin/breseq . breseq by itself meanwhile will show you what the command expectations are. Not all programs are configured to tell you what it expects just from typing the name of it. Some require the name of the command followed by one of the following: -h or --help or ? while others require preceding the command name with "man" (short for manual). If all that fails google is your friend for all programs not named "R" ... google is still your best bet, but it won't be your friend. In the specific case of R, adding the word stat somewhere to the search will greatly help things.
Data
The data files for all the class tutorials are located in following location:
/corral-repl/utexas/BioITeam/ngs_course
Copy this directory to a new directory called GVA2016 in your work directory.
Now that we have all of the data that we want in our work directory, lets move the lambda phage data to scratch so we can begin using it. The following 2 files are in the lambda_mixed_pop/data directory inside of your newly created GVA2016 directory:
File Name | Description | Sample |
|---|---|---|
| Single-end Illumina 36-bp reads | Evolved lambda bacteriophage mixed population genome sequencing |
| Reference Genome | Bacteriophage lambda |
See if you can figure out how to copy them to a new directory on $SCRATCH called BDIB_breseq_tutorial_1.
Running breseq
Because this data set is relatively small (roughly 100x coverage of a 48,000 bp genome), a breseq run will take < 5 minutes, but it is computationally intense enough that it should not be run on the head node. In our setup/linux tutorial earlier today we showed you how to use launcher_creator.py to generate the slurm file necessary to run on the compute nodes, but the compute nodes can take some time to reach the front of the line and actually start running. Instead, we are going to use a priority access reservation set up special for the BDIB summer school that you normally would not have access to but should guarantee immediate starting of your idev session. Copy and paste the following 2 commands
idev  -m 240 -r CCBB_Bio_Summer_School_2016_Day1 -A UT-2015-05-18 -N 2 -n 8

# This should return the following:
#  We found an ACTIVE reservation request for you, named CCBB_Bio_Summer_School_2016_Day1.
#  Do you want to use it for your interactive session?
#  Enter y/n [default y]:


# If for any reason you don't see the above message let us know by raising your hand.

# Your answer should be y, which should return the following:
#  Reservation      : --reservation=CCBB_Bio_Summer_School_2016_Day1 (ACTIVE)

# Some of you may see a new prompt stating something like the following:
# We need a project to charge for interactive use.
# We will be using a dummy job submission to determine your project(s).
# We will store your (selected) project $HOME/.idevrc file.
# Please select the NUMBER of the project you want to charge.\n
# 1 OTHER_PROJECTS
# 2 UT-2015-05-18
# Please type the NUMBER(default=1) and hit return:

# If you see this message, again let us know.

# You will then see something similar to the following:
# job status:  PD
# job status:  R
# --> Job is now running on masternode= nid00032...OK
# --> Sleeping for 7 seconds...OK
# --> Checking to make sure your job has initialized an env for you....OK
# --> Creating interactive terminal session (login) on master node nid00032.

# If this takes more than 1 minute get our attention, otherwise continue with the following
cd $SCRATCH/BDIB_breseq_tutorial_1
module load intel
module load Rstats
breseq -j 48 -r lambda.gbk lambda_mixed_population.fastq &> log.txt &
A bunch of progress messages will stream by during the breseq run which would clutter the screen if not for the redirection to the log.txt file. The & at the end of the line tells the system to run the previous command in the background which will enable you to still type and execute other commands while breseq runs. The output text details several steps in a pipeline that combines the steps of mapping (using SSAHA2), variant calling, annotating mutations, etc. You can examine them by peeking in the log.txt file as your job runs using tail -f log.txt. The -f option means to "follow" the file and keep giving you output from it as it gets bigger. To stop the tailing command hit ctrl-c which is the keyboard interrupt signal. While breseq is running lets look at what the different parts of the command are actually doing:
| part | puprose |
|---|---|
| -j 48 | Use 48 processors (the max available on lonestar5 nodes) |
| -r lambda.gbk | Use the lambda.gbk file as the reference to identify specific mutations |
| lambda_mixed_population.fastq | breseq assumes any argument not preceded by a - option to be an input fastq file to be used for mapping |
| &> log.txt | redirect the output and error to the file log.txt |
| & | run the preceding command in the background |
This will finish very quickly (likely before you begin reading this) with a final line of "Creating index HTML table...". Before we start looking at what mutations were actually identified, we are going to start the second example so that it can be running while we investigate it making better use of our time.
Example 2: E. coli data sets
Now we'll try running breseq on some Escherichia coli genomes from an evolution experiment. These files are larger.
Data
The data files for this example are in the following path. Go ahead and copy them to a new folder in your $SCRATCH directory called BDIB_breseq_tutorial_2:
$WORK/GVA2016/ecoli_clones/data
if everything worked correctly, you should see the following files. We've provided a bit more context to what those files actually are:
File Name | Description | Sample |
|---|---|---|
| Paired-end Illumina 36-bp reads | 0K generation evolved E. coli strain |
| Paired-end Illumina 36-bp reads | 2K generation evolved E. coli strain |
| Paired-end Illumina 36-bp reads | 5K generation evolved E. coli strain |
| Paired-end Illumina 36-bp reads | 10K generation evolved E. coli strain |
| Paired-end Illumina 36-bp reads | 15K generation evolved E. coli strain |
| Paired-end Illumina 36-bp reads | 20K generation evolved E. coli strain |
| Paired-end Illumina 36-bp reads | 40K generation evolved E. coli strain |
| Reference Genome | E. coli B str. REL606 |
Running breseq on TACC
breseq will take a little longer to run on these sequences, so this give us an opportunity to run several commands at the same time making use of the multiple cores on a single processor. You'll want each command (line) in the commands file to look something like this:
breseq -j 12 -r NC_012967.1.gbk -o output_<XX>K SRR030252_1.fastq SRR030252_2.fastq &> <XX>K.log.txt
Notice we've added some additional options:
| part | puprose |
|---|---|
| &> <XX>00K.log.txt | Redirect both the standard output and the standard error streams to a file called <XX>00k.log.txt. It is important that you replace the <XX> to send it to different files, but KEEP the &> as those are telling the command line to send the streams to that file. |
| -o output_<xx>00k | all of those output directories should be put in the specified directory, instead of the current directory. If we don't include this (and change the <XX>), then we will end up writing the output from all of the runs on top of one other. The program will undoubtedly get confused, possibly crash, and generally it will be a mess. |
Looking at breseq predictions
breseq produced a lot of directories beginning 01_sequence_conversion, 02_reference_alignment, ... Each of these contains intermediate files that can be deleted when the run completes, or explored if you are interested in the inner guts of what is going on. More importantly, breseq will also produce two directories called: data and output which contain files used to create .html output files and .html output files respectively. The most interesting files are the .html files which can't be viewed directly on lonestar. Therefore we first need to copy the output directory back to your desktop computer. Go back to the first tutorial (BDIB_breseq_tutorial_1) and transfer the contents of the output directory back to your local computer.
Navigate to the output directory in the finder and open the a file called index.html. This will open the results in a web browser window that you can click through different mutations and other information and see the evidence supporting it. The summary page provides useful information about the percent of reads mapping to the genome as well as the overall coverage of the genome. The Mutation Predictions page is where most of the analysis time is spent in determining which mutations are important (and more rarely inaccurate).
Click around through the different mutations and examine their evidence to see what kinds of mutations you can identify. Interact with your instructors, and show us what different types of mutations you are able to identify, or ask us what mutations you don't understand. Periodically check the 2nd example and when it is done, transfer that data back and begin to look at the data as well. Additional information on analyzing the output can be found at the following reference:
- Deatherage, D.E., Barrick, J.E.. (2014) Identification of mutations in laboratory-evolved microbes from next-generation sequencing data using breseq. Methods Mol. Biol. 1151:165-188. «PubMed»
Examining breseq results
Exercise: Can you figure out how to archive all of the output directories and copy only those files (and not all of the very large intermediate files) back to your machine? - without deleting any files?
Click around in the results and see the different types of mutations you can detect.