Summary:
All things FileMaker
To gain access to a remotely administered Filemaker server.
Important
Examples identified note how to access the CNS-managed server. You must have permission to gain access to the server before completing the steps. VPN is also required to access the server. Please be sure to initiate a VPN connection before proceeding with the steps below.
Required Steps:
To configure your access as a favorite:
In the FileMaker Pro App, Choose File → Open

In the popup window, navigate to and click the Hosts button

Click the + symbol next to the Search Hosts box

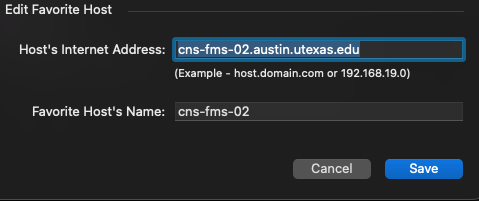
In the Edit Favorite Host window, type in the following:
If you are connecting to the Cat1 secured server, define the server settings using the information below:

If you are connecting to the non-Cat1 server, define the server settings using the information below:
A login request window will appear.
For the Cat 1 server, use your EID to access the database list
For the non-Cat1 server, use the local account issued to you by the db developer
NOTE: We recommend storing and sharing these local credentials in stache: https://stache.utexas.edu
You will now see a list of Dbs that you have access to. Select the one you wish to open and click ok.
Info
Filemaker server is upgraded regularly. Please be sure to update your client to the latest. Filemaker apps are updated once a year. You can identify the latest version here: https://www.claris.com/filemaker/
For Assistance:
https://community.claris.com/en/s/new-to-claris-filemaker?step=Learn
Documentation:
https://www.claris.com/resources/documentation/
Known Issues and Bugs
Windows machines may have connectivity trouble sometimes. Please contact CNS IT at help@cns.utexas.edu
Don't have filemaker and you need to access the cns filemaker servers? Contact CNS IT at help@cns.utexas.edu to gain access to the application.
Related articles
Content by label
There is no content with the specified labels
Overview
Content Tools