Sequence Audio Format
Your sequence has an audio format, specified in the Audio Mixer. You indicate your sequence's audio format using the Sequence Mix Format button and you indicate your hardware output from the Mix Mode Selection button.
| The drop down menu on the left is the Sequence Mix Format button. |  | |||||||||||||||||||||
| Your sequence can be Stereo, 5.1, or 7.1. You should choose 5.1 or else you would not be reading this wiki. |  | |||||||||||||||||||||
The drop down menu on the right is the Mix Mode Select button. Audio Mix Mode and Monitoring Options To hear a surround sound mix, you need surround sound hardware. If you don't have the hardware, the mix options will be grayed out. The hardware connects to the speakers through which your surround sound mix will play. Media Composer can use a third-party sound hardware, or you can use the Avid Artist I DNxIO hardware, which has an HDMI connector capable of transmitting surround sound to a receiver. The mix mode sets your speaker layout so Media Composer sends the correct signals to the associated outputs on your hardware. The mix mode addresses the following questions : • Do you have two, four , six, or eight speakers? • How are your surround sound speakers connected to your hardware? • How does a stereo sequence play back when you have 7.1 surround speakers? • How does a 5.1 sequence play back when you only have two speakers? (This is probably you) Monitor Mix button Controls how your system interprets audio values during playback: • Stereo: Stereo sequences are output in stereo as expected. Surround sequences are folded down to stereo, rear and side channels are mixed at -3dB into the corresponding front left and right, center and LFE channels are panned to center. If you have four or more physical outputs, you can choose the output channel pair in Audio Project Settings. • Mono: Pans all the currently monitored tracks to center and ignores pan effects. • 4-channel LRCLfe - The four channels are Left, Right, Center, and Lfe (Low Frequency Effects) in that order. L, R, C, and Lfe are sent directly to their corresponding channels. Rear and side channels are mixed at -3dB into front left and right. Four-channel modes cannot be reassigned. Even if you have eight outputs, the four channel modes are always the first four. • 4-channel LRCS - The four channels are Lef,t, Right, Center, and Surround, which is a single rear loudspeaker L, R, and C are sent directly to their corresponding channels. Lfe is mixed at -3dB into front left and right Rear channels panned into the single rear center. Side channels (side centers in a 7.1 mix) are panned between the single rear channel and the corresponding front channel. • 4-channel Quadraphonic - The four channels are in four corners of the listening space, L, R, Ls Rs. Left, Right, Left Rear, and Right Rear are sent directly to their corresponding channels. Center, Left Center, and Right Center are panned to the centers of their corresponding speaker pairs. Lfe is mixed at -3dB into front left and right. • 6-channel 5.1 Pro Tools, (L C R Ls Rs Lfe), and 5.1 SMPTE (L R C Lfe Ls Rs) Stereo sequences are output only to L and R, in the selected channel order. Surround 5.1 sequences have channels re-ordered to match the selected channel order. Surround 7.1 sequences, have their center side channels are panned to the center of their corresponding speaker pairs. If you have more than eight or more audio outputs, you can choose to start the 5.1 mix at position 1 or position 3 of any 8-channel group. See “Surround Monitoring” on page 584. • 8-channel 7.1 Pro Tools, (L C R Lss Rss Lsr Rsr Lfe), and 7.1 EXT (L R C Lfe Lsr Rsr Lss Rss), and 7.1 SMPTE DS (L R C Lfe Lss Rss Lsr Rsr). Note Lsr and Rsr and left and right “surround rear”, Lss and Rss are left and right “surround side”. Stereo sequences are output only to L and R, in the selected channel order. Surround 5.1 and 7.1 sequences have channels re-ordered to match the selected channel order. Lss and Rss remain silent when playing 5.1 sequences. If you have 16 outputs, you can choose to start the 7.1 mix at position 1 or position 8. See “Surround Monitoring” on page 584. • Direct out, Panning and master fader effects are ignored. Each track is mixed into one or more outputs according to the output assignments in the Audio Project Settings output pane. Stereo and surround tracks will be sent to multiple adjacent outputs, and the channels within surround tracks are re-ordered according to SMPTE or Pro Tools channel order conventions as selected. |  | |||||||||||||||||||||
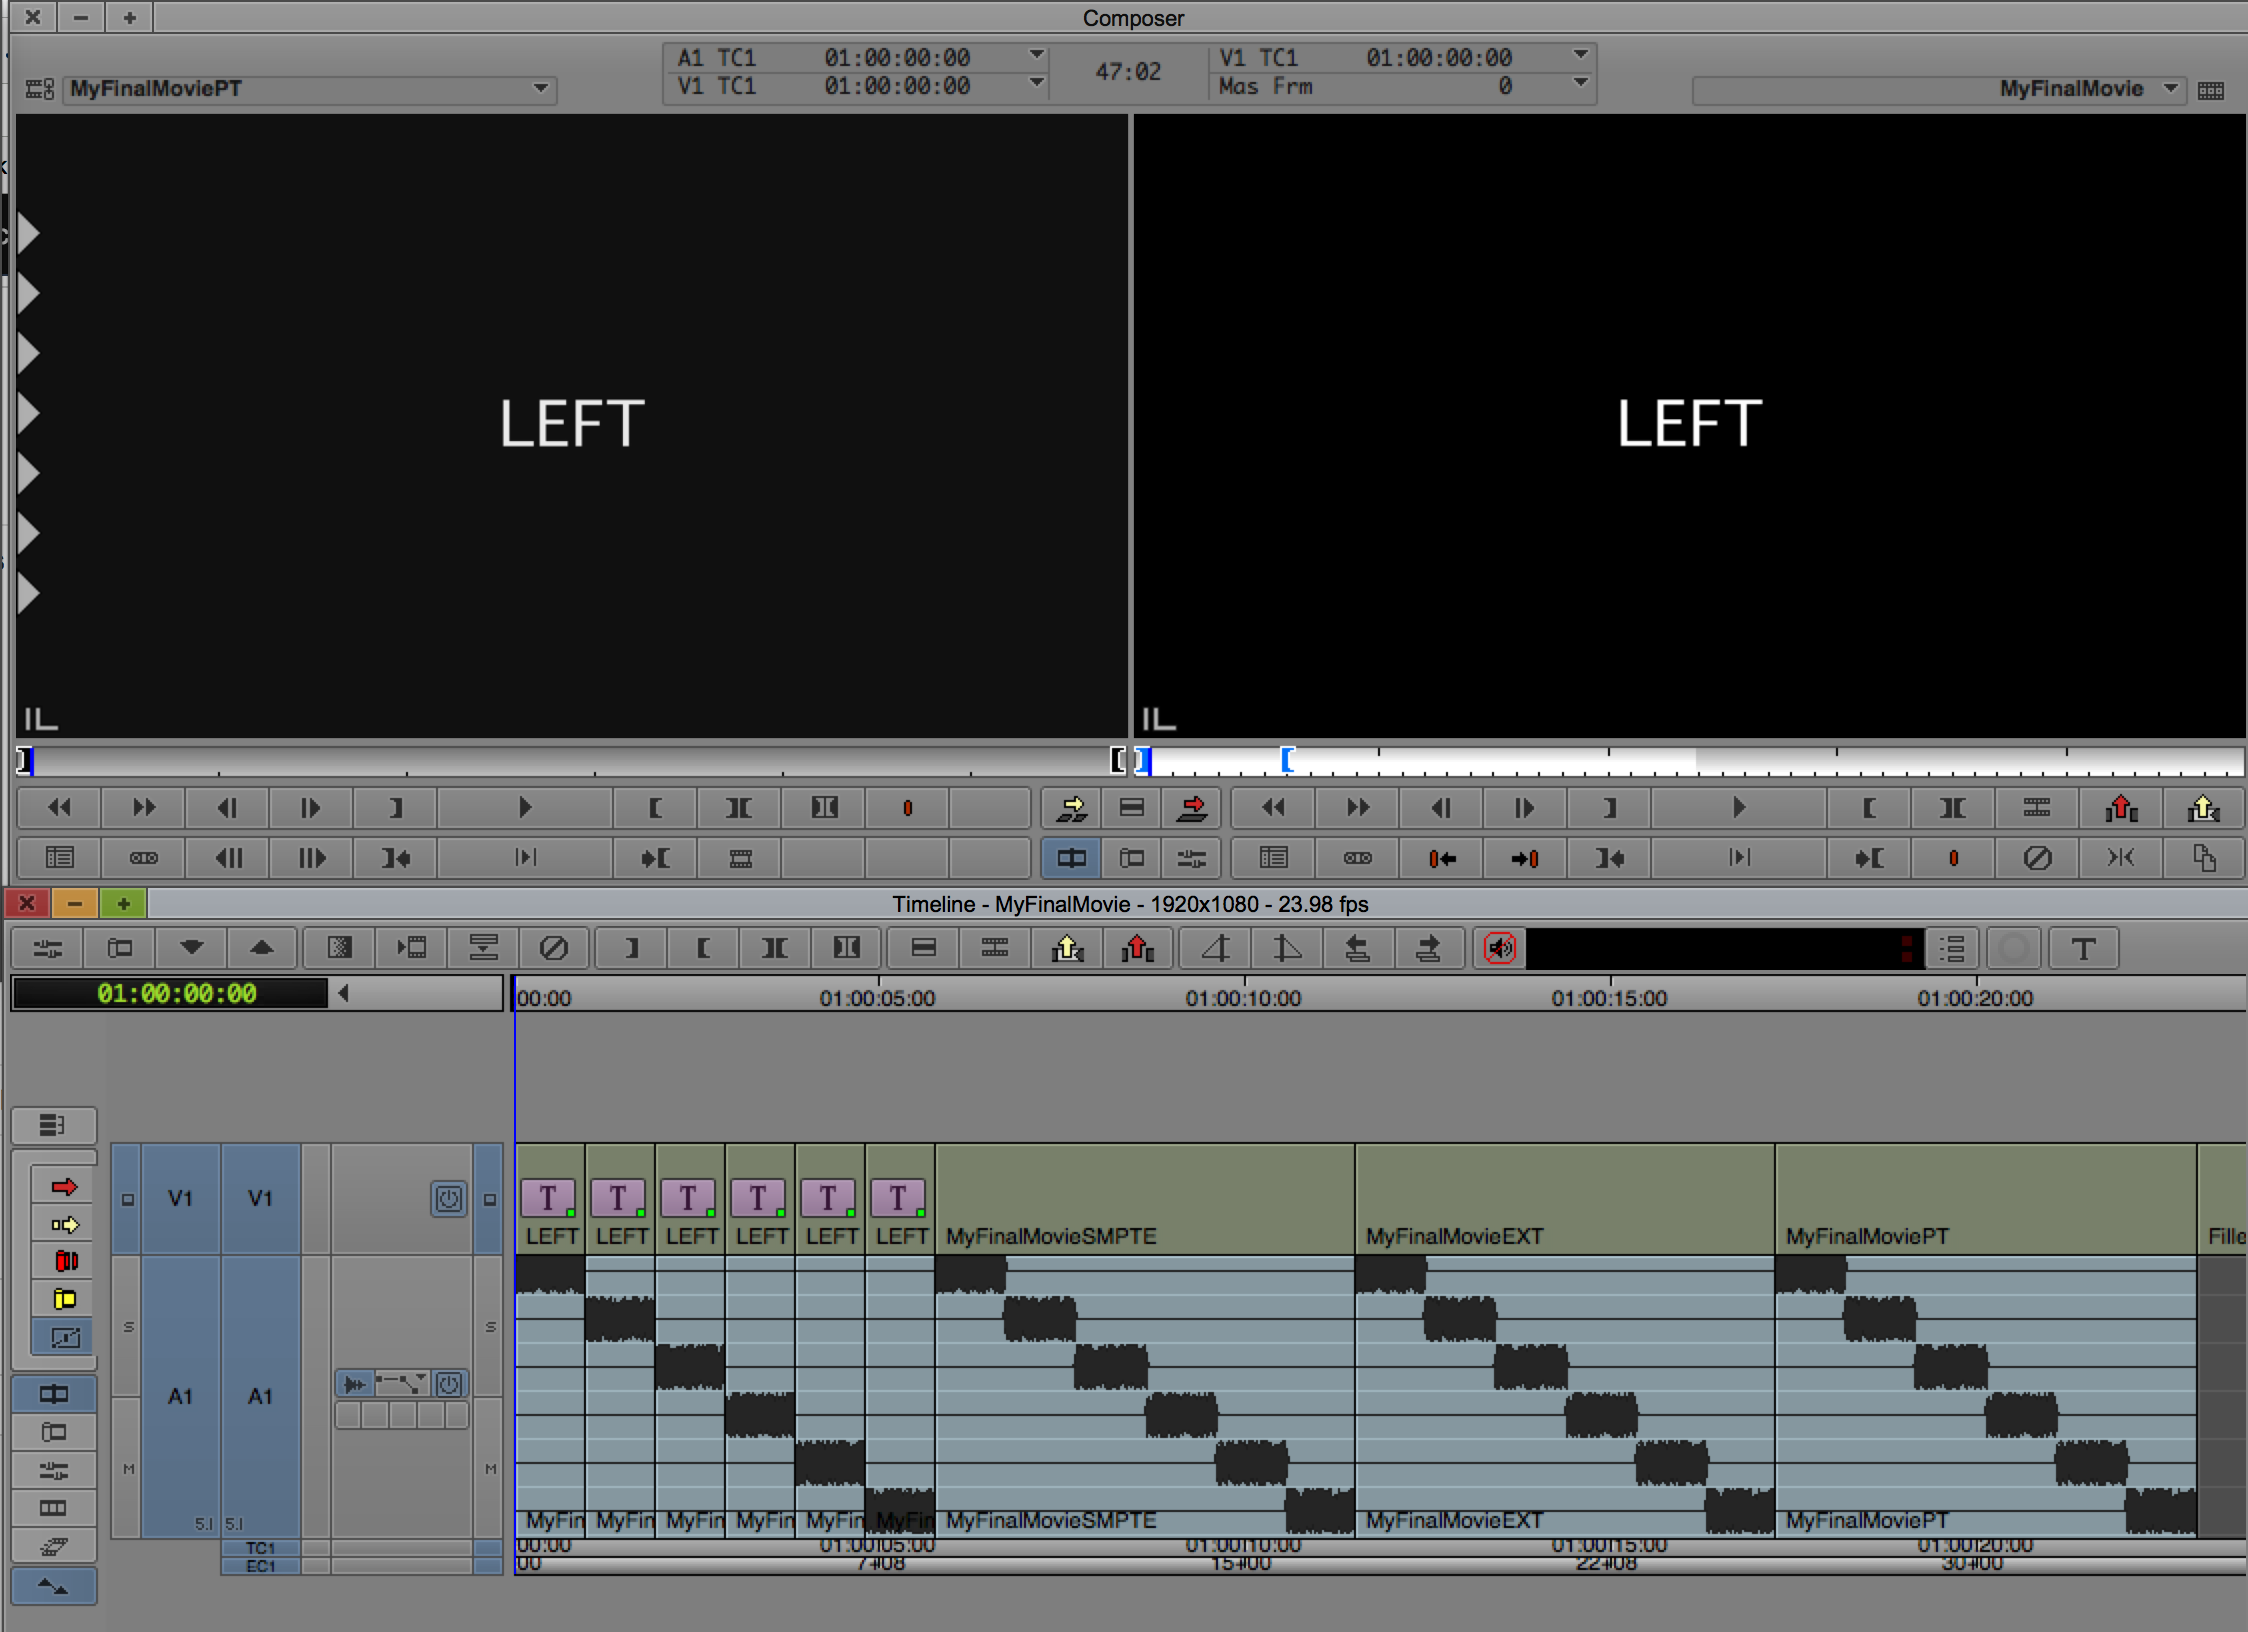
When your sequence mix format is set to either 5.1 or 7.1, you will see that the Master output switches to display 6 or 8 audio meters. The order that these meters show the different output channels is set in the Audio Settings (found under the Settings tab of the Project Window). Since Media Composer v8.6 you can choose to monitor in ProTools or SMPTE order. We recommend SMPTE order (L, R, C, LFE, Ls, Rs) |  | |||||||||||||||||||||
Comparison of 5.1 Film and 5.1 SMPTE Mix Modes
| ||||||||||||||||||||||
| Now that you're familiar with the audio settings, lets export a 5.1 QuickTime movie. | ||||||||||||||||||||||
1. Open the SETTINGS TAB, and create a new Export setting by duplicating an existing one and renaming it "Audio 5.1 in QT" for example. Don't know how to duplicate an export setting? Simply highlight any other export setting and press Command + D. Don't know how to rename an export setting? Simply click on it's name and type.
| 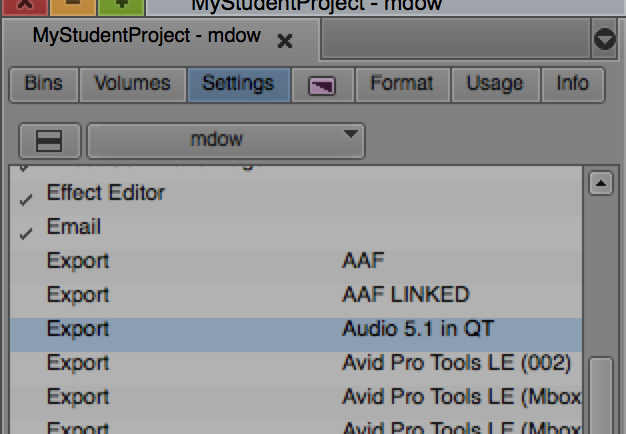 | |||||||||||||||||||||
| 2. Open your custom export setting (hopefully called "Audio 5.1 in QT" by now) by double clicking on the word Export next to your custom setting name. | ||||||||||||||||||||||
3. Configure it as shown: Video Format 1920x1080 Size to Fit Scale from Legal to Full Range Audio Format 5.1 Movie Settings Video Compression Type: Avid DNxHD Codec Color Levels: RGB Levels Resolutions: 1080p/23.976 DNxHD 115 8-bit Audio Format: Linear PCM Channels 5.1 (L R C LFE Ls Rs) Rate: 48.000 Quality: Best Sample size: 24 Little Endian |   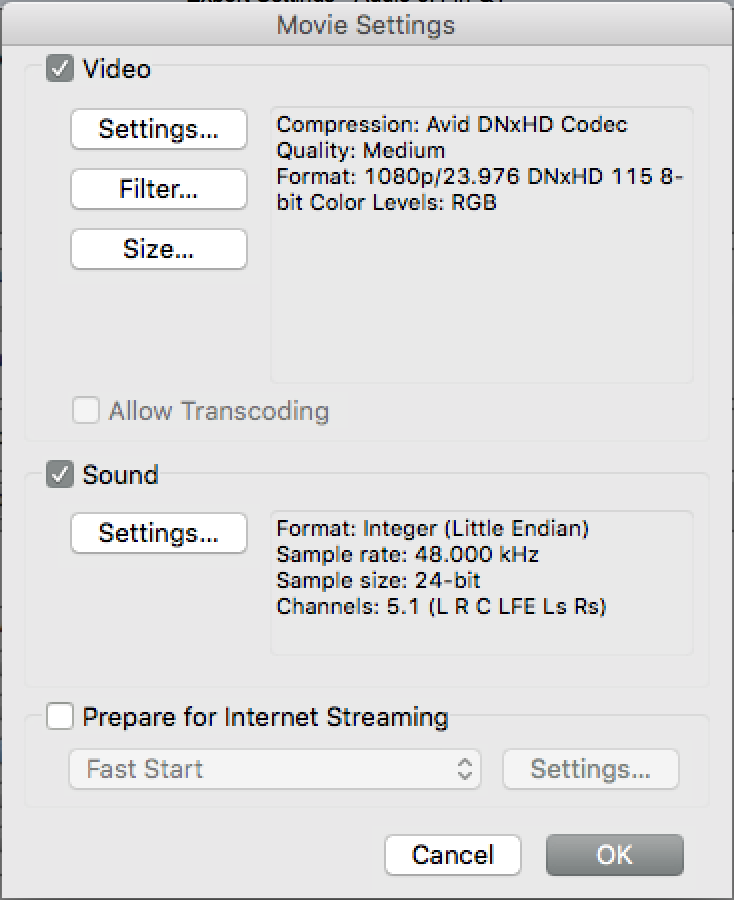   | |||||||||||||||||||||
4. Click OK to close all the windows. | ||||||||||||||||||||||
5. Now in the bin, select the sequence, right-dick and choose OUTPUT> EXPORT TO FILE . | 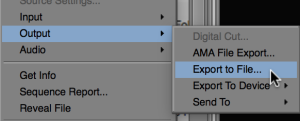 | |||||||||||||||||||||
6. Choose the Export setting you just created and a destination (the desktop for example). |  | |||||||||||||||||||||
7. Perform the export. You have now created a surround movie as a Quick Time format. If you play it, you will see (or perhaps hear) surround, but how do you know it is a surround movie? Well the answer is to re-import it. | ||||||||||||||||||||||
TO RE-IMPORT Link to the file you just exported. |  | |||||||||||||||||||||
| Right click on that linked file in the bin and choose Modify > Modify Clip... | 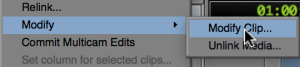 | |||||||||||||||||||||
| Choose Set Multichannel Audio from the drop down |  | |||||||||||||||||||||
| Choose 5.1 SMPTE: L R C Lfe Ls Rs |  | |||||||||||||||||||||
| Click OK and edit back into a duplicate timeline to check. |
|

Overview
Content Tools