Recording | |
After you login into the computer, click on the apple icon on the top left of your screen. Select System Preferences |
|
Select Sound Icon |
|
On the Output tab, select HD Native Thunderbolt |
|
On the Input tab, select Pro Tools Aggregate I/O Then, close preferences window |
|
Open the Adobe Audition Application |
|
On the top navigation bar, click Adobe Audition > Preferences > Audio Hardware |
|
For Default input, select Pro Tools Aggregate I/O For Default Output, select HD Native Thunderbolt Select Ok |
|
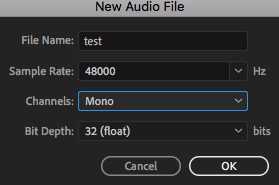
A. On the top navigation bar, click File > New > Audio File |
|
B. Press OK to accept the default settings. |
|
| C. Check the mic level by looking under the desk for the HD Native Thunderbolt. Make sure mic is selected green and turn up the preamp knob. Adjust as needed by testing and previewing the mic level in Audition. |
|
D. Press the red record button to begin your recording. | |
E. Press the red record button again to stop your recording. | |
To record again, repeat the above A through E steps. Remember to save your work!! | |
Playback | |
Located to the left of your computer, you can control the volume of playback by turning the knobs on the mixer DO NOT TURN OFF OR ALL THE WAY DOWN |
|
Make sure mute button is deselected and monitor level should remain at 01. |
|


Overview
Content Tools