This document addresses several methods of performing audio recording of the human voice for narration, audilogical testing, books on tape, etc. While aimed at researchers in our CSD program, these instructions could be used for recording voice interviews or narration for a film.
The workflow below outlines several methods for recording a series of long audio files followed by editing techniques. Finally, the workflow identifies a method of using markers to batch export a series of audio files from the 1 long master audio file. These individual audio files could be a single word, a sentence, a chapter, etc. Since all editing is performed on the 1 long master audio file, this workflow ensures consistency between all the individual output files.
Sections of this Document
Overview
1. Choose a Recording Method & Record your Audio | ||||||
| ||||||
2. Edit & Export Audio FilesAudio will be recorded as a single (or a very few) long take. Any necessary processing will be applied uniformly to all samples. Using markers to identify start & stop points in the long take, audio will be exported as individual files. | ||||||


Option A: Record your Audio in CMA 4.140 Voice Booth
Skip this section if you are going to check out recording equipment
| Refer to Instructions: How to record audio in the CMA 4.140 Radio Room | |
When presented options for New Audio File settings, choose: Sample Rate: 44100 Hz Channels: Stereo Bit Depth: 16 | |
When presented options for export format, choose .WAV. | |
| Save your files to a fileserver location, USB stick, or portable harddrive. |
Option B: Check out Studio Mic & Field Recorder to Record your Audio
Skip this section if you are going to record in CMA 4.140 Voice Booth.
| Refer to Instructions: How to record narration audio using the Tascam DR-70D with phantom-powered AKG studio microphone |
Option C: Check out USB Studio Mic to Record your Audio to your comptuer
Skip this section if you are going to record in CMA 4.140 Voice Booth.
| Refer to Instructions: xxxxx |
Edit your Audio
This workflow identifies how to edit your audio using Adobe Audition or Audacity. Both of these programs are available on most PC & Mac lab workstations in the Moody College of Communication. If you wish to edit using your own computer, Audacity is the more cost effective solution as it is free, open-source software.
| Adobe Audition | Audacity | |
|---|---|---|
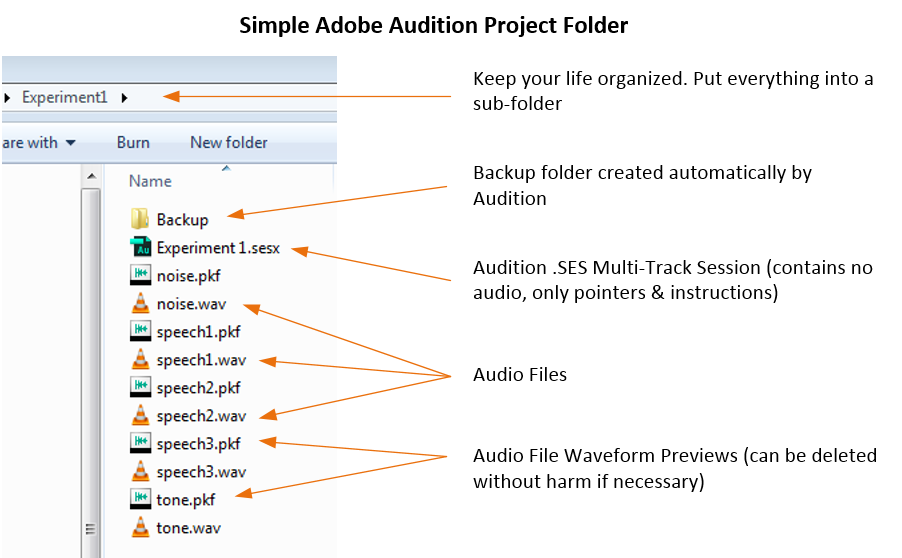
Collect your audio files for your project into 1 folder. To access the audiology library, navigate to: L:\Classmedia\CSD_Audiology. Copy the files you need from the library to your experiment sub-folder. This will ensure that your experiment is portable and will be playable at offsite locations. To make your research project easily portable, you need to collect all your digital assets into 1 folder. Create a new sub-folder for your experiment in your research folder on fileserver (refer Using the COMM Shares Server) (if you need a new research folder on fileserver, refer Moody College File Server and Shares). Your new sub-folder will hold a variety of files including the audio files (typically .WAV, .MP3, or .FLAC extension) as well as the Multi-track Session file (.SES or SESX extension). The session file doesn't contain any audio data – only pointers and instructions to the audio files.
If you have lots of digital assets, feel free to organize using subfolders.
| ||
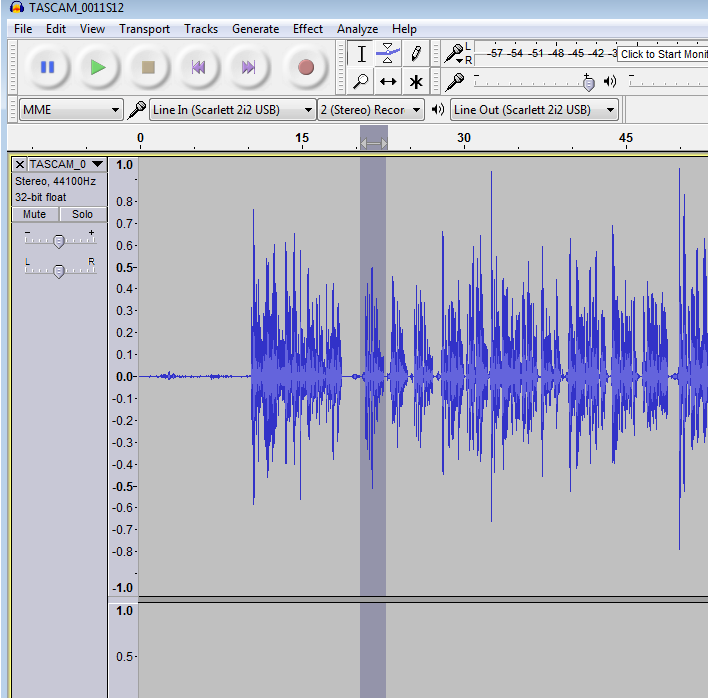
Open your file(s). Navigate to the folder containing your audio files. | Adobe Audition is an audio editing tool which has 2 views: waveform (aka stereo editor) & multi-track. When Audition is opened initially, you will see the stereo view. To switch between wafeform and multi-track views, click the appropriate button in the top left.
Switch to the waveform view then click File > Open. Navigate to the folder containing your audio files, select them, and choose Open. | Click File > Open. Navigate to the folder containing your audio files, select them, and choose Open. If prompted, choose to import via Copy.
|
| Save Project | Switch to the Multitrack view. When prompted to make a new Multitrack Session, Type a name, navigate to the folder containing your audio files, set Sampe Rate to 44100 Hz, Set Bit Depth to 16 bits, Set Master to Stereo.
| File > Save Project Navigate to your project folder, type a name for your project, then click Save. |
| Copy Left Channel to Right Channel | Switch to the Waveform view. Toggle off the Right Channel using the Channel Toggle Buttons
Click Edit > Select > Select All (CTRL-A). Click Edit > Copy (CTRL-C) Toggle the Left Channel off and the Right Channel On using the Channel Toggle Buttons. Click Edit > Paste (CTRL-V) to paste the content from the Left Channel to the Right Channel.
Toggle the Left Channel On | Click the down arrow next to the track name then choose "Split Stereo to Mono"
Click to the right of the end of your recording in Track 1. Drag to the left to select all the audio on that track.
Click Edit > Copy. Click anywhere to the right again, this time in Track 2.
Click Edit > Paste. Click the down arrow next to the track name of Track 1 then choose "Make Stereo Track"
|
| Keep Wanted Portions | Switch to the Waveform view. Click & drag to highlight a wanted section of the recording. Right-Click > Insert Into Multitrack > (your session name)
Your view will automatically switch to the multitrack. Click on a clip in the multitrack to select it. Right-Click > Rename to assign a name to the clip. | |
| Delete unwanted portions | Switch to the multitrack view. Ensure the Move tool is selected.
Position the cursor over the left or right edge of the clip. The edge‑dragging icon Pro-Tip: use CTRL-MouseWheel to zoom in and out of the mouse pointer's postion. | Click & drag to highlight unwanted section. Pro-Tip: use CTRL-MouseWheel to zoom in and out of the mouse pointer's postion.
Press Delete to remove. |
| Move portions | Switch to the multitrack view. Ensure the Move tool is selected.
Click on a clip in the multi-track to select it. Left-Click and drag to move it in time or between tracks.
| Click & drag to highlight section. Click Edit > Cut. Place cursor where the cut section should go. Click Edit > Paste. |
| Export the Multitrack | Switch to the multitrack view. Click File > Export > Multitrack Mixdown > Entire Session
Type a name for your mixdown. Set the folder path to your project folder. Set the format to .WAV. Set the sample type to Same as Source. Set the Format Settings to Wave Uncompressed, 16-bit Integer Ensure Include Markers & Other metadata is selected Ensure Open files after export is selected. Click OK.
| not part of this Audactiy workflow |
| Normalize the entire timeline | Switch to the Waveform view. If it isn't open, open the mixdown you just created. Click Edit > Select > Select All (CTRL-A). Click Effects > Amplitude & Compression > Normalize Normalize to -1dB Normalize all channels equally Choose to adjust DC Bias to 0% Click Apply.
| Click Effect > Normalize. Choose to Remove DC offset Normalize to -1dB Do not normalize stereo channels independently. Click OK
|
| Export/Save the edited master | Click File > Save | Click File > Export Audio Navigate to your project folder, type a new name for your final edited file (for example Edited Master.WAV), then click Save. |


Optional: Set Markers & Export to Separate Files
After your long audio file is edited, you may wish to export it as many separate files (for example, 1 file per word or 1 file per sentence).
| Adobe Audition | Audacity | |
|---|---|---|
| Set Markers | Switch to the waveform view. Open your exported multitrack file. Click to place your cursor at the beginning of a segment which should ultimately be a new file. Pro-Tip: use CTRL-MouseWheel to zoom in and out of the mouse pointer's postion. Pro-Tip: click & drag the Blue indicator at the top of the cursor line to scrub audio back & forth  Select the Markers Tab. Click the New Marker Button
Double-click the newly-created marker in the Markers Tab to rename it. Pro-Tip: There is no option to number your files on export so if you need the output files to be in a particular order which isn't alphabetical, be sure to number them in the marker names (ex: 1-Circus, 2-Diadem, 3-Apple). | Click Tracks > Add New > Label Track Click to place your cursor at the beginning of a segment which should ultimately be a new file. Pro-Tip: use CTRL-MouseWheel to zoom in and out of the mouse pointer's postion.
Click Tracks > Add Label at Selection (or press CTRL-B). Type a name for the Label and press Enter
Continue adding Labels for each segment which should be a new file.
|
| Set End Marker & Merge Markers | Place a marker at the end of the last section. Name this marker END. Click on the first marker in the Markers Tab. Shift-Click on the last marker in the Markers Tab. Then click the "Merge Selected Markers" button
| not part of this Audactiy workflow |
| Export Files | Click File > Export > Audio Within Range Markers...
Choose to use marker names in filenames. Set the folder path to your project folder. Set the format to .WAV. Set the sample type to 44100 Hz, Stereo, 16-bit. Set the Format Settings to Wave Uncompressed, 16-bit Integer Click Export.
| Once all the labels are added, click File > Export Multiple. Set the folder path to your project folder. Pro-Tip: create a new folder inside your project folder called "EXPORTS". Choose to split files based on Labels. If you have a label prior to the first section of audio, you don't need to include audio before first label. Choose to name files based upon Label Name. Pro-Tip: If the files need to stay in order after export, choose to name files based upon Numbering before Label Name. Click Export.
|


reviewed 10/9/17 - Cox
Overview
Content Tools