This document explains a method of performing audio recording of the human voice for narration, audilogical testing, books on tape, etc.
Sections of this document
Check out Equipment & Record your Audio
Checkout Equipment
Check out the following equipment from CMA 3.104 equipment checkout:
| |
| Equipment checkout reservations can be made online here: http://checkout.communication.utexas.edu |  |
Set up Equipment
Insert media card on rear of Tascam DR-70D recorder (#4 at right). For this workflow, it is recommended that you use the USB power supply and do not use batteries so you don't have to worry about battery life. If you must use batteries, insert them on the rear of the recorder. |
|
On left side of the Tascam DR-70D, connect the USB power supply to the recorder (#25 at right). Connect headphones to the recorder (#30 at right).
|
|
On the right side of the recorder, connect the XLR mic cable to input 1 (#21 at right).
|
|
Set up microphone stand. Mount microphone spider suspension mount to stand. |  |
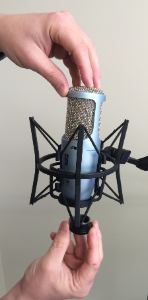
Mount microphone to suspension. Set the mic into the suspension. Continue to hold the microphone while screwing the mounting ring into the bottom of the mic.
|
|
Connect XLR cable to microphone. Install pop filter on microphone. |    |


Configure Tascam DR-70D Recorder
Turn on RecorderOn the right side of the recorder, slide the
To turn the unit off, slide the |  |
If you are using the USB power supply, the recorder will present this USB select screen asking you want to use the USB connection for power or data storage:
Since we're using it for power, turn the DATA dial (# 6 at right) to select "BUS POWER" then press the DATA dial to select it. |  |
If the recorder has been stored without batteries, it may prompt you for the date & time.
|  |
If the SD card is new or has been formatted for another device, the recorder may display an error message upon startup. Press the DATA dial to start formatting. Remember, formatting will erase all data on the card. If this is a card that you've previously used in your digital camera, etc, be sure you have a backup before you format it. |  |
The AKG studio microphone requires phantom power in order to operate. If the Tascam DR-70D recorder previously had phantom power engaged, upon startup the recorder will prompt you if you still wish it to be turned on. Press the DATA dial to confirm yes, phantom power should be engaged. Note that the recorder will ask you separately for any of the 4 channels which previously had phantom engaged so you might see a screen like this as many as 4 times upon starting the recorder.
|  |
Adjust Basic Menu SettingsPress Menu then turn the DATA dial to select "BASIC" then press the DATA dial to select this submenu. Set Ch 1 as follows:
The Ch 2 - 4 settings don't matter for this workflow since we aren't using those inputs. Press Menu to return to the submenu list.
note: if you see Wide instead of Pan in this menu, turn off MS Mode 1/2 in the "MIC" submenu. |  |
Adjust Monitor Menu SettingsFrom the main menu's submenu list, turn the DATA dial to select "MONITOR" then press the DATA dial to select this submenu.
The remaining options on this menu don't matter for this workflow. Press Menu to return to the submenu list.
|  |
Adjust Input Menu SettingsFrom the main menu's submenu list, turn the DATA dial to select "INPUT" then press the DATA dial to select this submenu. Set Ch 1 as follows:
The Ch 2 - 4 settings don't matter for this workflow since we aren't using those inputs.
Setting the input gain option to Mic+Phantom is an odd user experience. When you press the DATA dial to select Input Gain, you have 3 choices:
The first 2 options (LIne & Mic) behave as you would expect when rolling the DATA dial - rolling the dial changes the text which is displayed. However, when you roll the DATA dial to the 3rd option, prior to seeing any text, the screen immediately pops up a warning page confirming that you want to turn on Phantom power. Since you never saw the text "Mic + Phantom" appear as an option, this popup can be confusing. When in the Input Menu, the proper method of setting Input Gain to "Mic + Phantom" is to press the DATA dial to select Input Gain, then roll the DATA dial clockwise several clicks until the "Ch1 Phantom On" popup appears. Press the DATA dial to confirm that yes, phantom power should be on. Upon confirming Yes, you will be returned to the Input Menu.
Press Menu to return to the submenu list.
|
|
Adjust Record Menu SettingsFrom the main menu's submenu list, turn the DATA dial to select "RECORD" then press the DATA dial to select this submenu.
While you may be tempted to set the recording quality to the highest possible settings, such resolution is not typically required for this workflow. These settings are "CD quality" which is acceptable for most needs, keeps file sizes relatively small, and guarantees compatibility with all research software with which these files may be used.
Press Menu to return to the submenu list.
At CD quality, a stereo recording consumes about 600 MB (.6 TB) per hour. Below are the storage capacities for the Tascam DR-70D recorder (CD quality is highlighted in yellow):
|  |
| No adjustments are necessary on the "SLATE" submenu | |
Adjust Mic Menu SettingsFrom the main menu's submenu list, turn the DATA dial to select "MIC" then press the DATA dial to select this submenu.
Changing the Phantom Voltage from 24v to 48v will prompt you to confirm the change. Once confirmed, the recorder will ask you separately to confirm that phantom should be sent to any of the 4 channels which previously had phantom engaged so you might see a screen like this as many as 4 times upon starting the recorder. When prompted, phantom SHOULD be engaged for Ch 1. The remaining channels don't matter for this workflow. Note that technically, the AKG studio microphone will work with 24v or 48v phantom power. 48v is preferred as it will provide slightly improved dynamic range and better SPL capacity. This shouldn't matter for recording voice, but would if you were recording drums or explosions.
Press Menu to return to the submenu list.
|
|
| No adjustments are necessary on the "BROWSE" nor "OTHERS" submenus | |
| Press Menu again to exit the menus and return to the default (home) recording screen. |  |
Adjust & Test MicrophoneSet the bass cut switch to rolled-off and the pad to 0dB
The front of the mic is the side with the AKG logo. Place your mouth about 5 inches from the front of the mic and speak into it. NEVER BLOW INTO THE MIC - you can destroy the element! To help reduce plosives (breath pops from "P's" & "Th's" in your speech), try speaking slightly across the front of the mic rather than directly into the front element. |  |
Adjust LevelsWatch the levels on the recorder and adjust the Ch 1 knob. Try to get the levels to average around the mark which is under the "C" in TASCAM. |  |
Adjust HeadphonesPut on your headphones and adjust the headphone volume (#31 at right) to a comfortable volume. It is important that you use the headphones the entire time you are recording to ensure everything is working properly. |  |
Record your audioPress the REC button to begin recording. Confirm that the REC light is lit and that the recording time is progressing when recording. Press the REC button again to stop recording. Press it again to begin a new recording in a new file.
It is best to record long sessions into a few files rather than repeatedly starting & stopping the recording. Storage space is cheap – just let the recorder run. This will make editing easier and makes it less likely that you fail to remember to restart the recorder. Watch your levels. If you see the meter hit the right of the meter or you see the PEAK light flashing, turn down the Ch 1 gain knob and start your recording over. Don't be afraid to leave yourself verbal notes like "that was pretty good, but I'm going to try it again a little bit faster". |
|
Back up your dataAfter you are finished recording, copy your files to a fileserver location, USB stick, or portable harddrive. Connect the recorder to your computer. The recorder will present this USB select screen asking you want to use the USB connection for power or data storage:
Since we want to use it to transfer files, turn the DATA dial (# 6 at right) to select "STORAGE" then press the DATA dial to select it. Click the DR-70D drive on your computer screen and then navigate to the Music folder. Copy the files from this folder to your backup destination. If you see identically sized files suffixed with 12 and 34, you only need to copy the file which ends with 12 (the recording from inputs 1 & 2). The other file is a recording from inputs 3 & 4 and in this workflow does not contain any audio.
|  |


Overview
Content Tools