Only studio lights should be on...no work lights. |
|
These buttons designate what KEY or AUX bus your controlling. |
|
| For example, this is controlling KEY BUS 2 |
|
| and this is controlling KEY BUS 3 |
|
When setting up chroma key, you do not want these buttons lit up...not even Aux1-3. It should look exactly like this. If it looks like this, then you are controlling Key bus 1, which is the only bus that has chroma key. |
|
| Once your controlling Key bus 1, press the CHR KEY button...it should look like this. |
|
| Now press CAM 1 on the KEY/AUX bus. It should look like this |
|
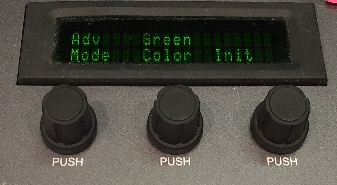
Twirl these knobs until The 1st one says "Adv Mode" The 2nd one says "Green Color" You can twirl the 3rd one all you want, nothing will happen. |
|
| Press the KEY 1 TRANS button |
|
Set up your shot. We didn't have a person, so we used the MONITOR cart as a stand in...you can do this too if you also don't have a person. |
|
| Remove the cart/person/stand in. |
|
| In a perfect world your scopes would look like this when pointed at the green screen |
|
| It will probably look more like this. |
|
| Press the 3rd knob over with "Init" in the screen above it, down like it is a button. |
|
What ever is punched up on your program bus will now show through. For us in this example it is REMOTE, which happens to have a weather map showing. |
|
Now move your stand in back into place. Now you can do the weather! |
|


Overview
Content Tools