Safety Precautions
- You must complete required lab safety training before starting this procedure.
- You must complete required animal use training and listed on IACUC protocol before starting this procedure.
- If this is your first time doing this procedure, ask to be trained by an experienced lab member. If you have not done this in a while, you should ask for a refresher.
- Also review the following material:
- Kuwajima M, Mendenhall JM, Harris KM (2013) Large-Volume Reconstruction of Brain Tissue from High-Resolution Serial Section Images Acquired by SEM-Based Scanning Transmission Electron Microscopy. Methods Mol Biol (Nanoimaging: Methods and Protocols) 950:253-73. (PDF)
- Further reading:
- Hayat MA (1981) Fixation for electron microscopy. Academic Press
- Karnovsky MJ (1965) A formaldehyde-glutaraldehyde fixative of high osmolality for use in electron microscopy. J Cell Biol 27:137A-138A. (PDF)
- Tao-Cheng JH et al. (2007) Structural changes at synapses after delayed perfusion fixation in different regions of the mouse brain. J Comp Neurol 501:731-740. (PDF)
- Dehghani A et al. (2018) Nuclear expansion and pore opening are instant signs of neuronal hypoxia and can identify poorly fixed brains. Sci Rep 8:14770. (PDF)
- Before starting, even if you have done this procedure before,
- read this protocol entirely.
- If you are using adult rats, review the instruction movie on the tracheotomy procedure.
- review relevant Safety Data Sheets and Harris Lab SOP (also see below).
- ensure you have all reagents and supplies listed below.
- ensure all equipment is in good working order.
- Isoflurane vaporizer must be serviced annually; check tubing, surgical instruments, etc.
- have all waste containers ready (also see Clean-up).
- plan your schedule well so that you wouldn’t be rushed to complete the procedure.
- Review SDS and Harris Lab SOP for the following hazardous chemicals used in this procedure:
- Ethanol: flammable; irritant (eye)
- Formaldehyde
- Glutaraldehyde
- Hydrochloric acid
- Isoflurane
- Sodium cacodylate: carcinogen; irritant (skin, eye); skin permeator
- Sodium hydroxide
- Other hazards associated with this procedure include:
- Physical: compressed gas cylinder (O2/CO2)
- Sharps: Surgical scissors, scalpel, needles
- Biological: Live rats/mice, blood, animal waste and soiled cage bedding
- The following Personal Protective Equipment is required for this procedure:
- Lab coat
- Nitrile gloves (double-layer required; regularly check for holes)
- Eye goggles
- Mask
- Face shield
- Place a piece of absorbent sheet on the work surface before starting the procedure. When done, discard into the “Solid Waste – No UA” bag
Reagents, Supplies, Equipment
Personnel Protective Equipment
- Eye goggles, face shield
- Gloves (nitrile)
- Lab coat
- Mask
- Plastic Apron (optional)
Assorted tubing, connectors, and clamps
- Barbed fittings from Cole-Parmer
- Luer kits from World Precision Instrument
- Silicon rubber tubing for anesthesia line
- Vacuum line for waste collection system
- IV line with clamp and flow regulator for perfusate lines
- Perfusate lines should be transparent enough to be able to see air bubbles.
- Tygon tubing for general use
Air Pressure System
- Sphygmomanometer with a hand pump (cut off the cuff)
- Use hand pump in the absence of an air pump.
- Air pump: Perfusion Two (Leica Biosystems 39471010)
- This pump is designed to deliver constant air pressure at 300 mmHg. To be able to adjust pressure, we added a regulator (Air Logic R-7010-2B2B-W/K) between "Air Tank" and "Perfusion Pressure" switches (See Figures 2-4).
- Air filter (Parker Hannifin 9933-05-AAQ)
- 1-L glass bottle (Kimax, or equivalent) × 1
- This can be substituted by a plastic air tank (e.g., Clippard AVT-PP-35).
- #6 two-hole stopper × 1
Oxygenation System
- O2/CO2 (95%/5%) cylinder with regulator and support
Anesthesia System
- Isoflurane (Animal Health International 19632158; stored at RT in well-ventilated area)
- Medical grade O2 cylinder with regulator and support (Can be replaced by O2/CO2 or an oxygen concentrator)
- Large glass desiccator, wad of 4-5 Kimwipes, Pasteur pipet
- Matrx VIP3000 Isoflurane Vaporizer (Stoelting)
- This apparatus must be serviced annually.
- For Central Texas area: William Connery, Handlebar Anesthesia, (512) 423-7668, handlebaranesthesia@yahoo.com
- A small animal ventilator (Harvard Apparatus Model 683, or equivalent)
- Nose cone (e.g., Stoelting; Kent Scientific)
- endotracheal tube (a modified 16-gauge hypodermic needle) with Y-connector
- Optional: Plexiglas anesthesia induction chamber (e.g., Stoelting; Kent Scientific)
Perfusate System
- Deep water bath (e.g., VWR Digital Unstirred Water Bath, L×W×D = 127/8"×1113/16"×529/32"; VWR 89032-216)
- Lead donuts × 2
- #6 stoppers: three-hole × 1, two hole × 1
- 3-way valve × 1
- Flow regulator × 1
- 13-gauge needle with 60° bevel with cork disk ½ inch from tip (to restrict depth of penetration; use a16-gauge for juvenile rats)
- Air stone × 1
Waste Collection System
- 4-L vacuum flask (preferably plastic-coated) × 1
- #11½ one-hole stopper × 1
- Vacuum line filter (Whatman VACU-GUARD, VWR 28137-858), 1 per day of perfusions
Dissection/surgical instruments
Scissors and knife etc. should be sharpened periodically.
- Stainless steel dissection tray with Styrofoam board cut to fit snugly lengthwise in the tray with ~1-inch space on one side.
- Pins to secure animal to Styrofoam board
- Scalpel and blades
- Assorted dissecting scissors
- Forceps
- Hemostats
- Retractors
- Knife (to decapitate rat)
- Bone Rongers
- Spatulas
- Silk suture (or cotton tread from fabric store can be used instead)
- Gauze pads
- Applicator sticks

For Preparation of Perfusates
All reagents are stored at RT unless otherwise noted.
- Calcium chloride dihydrate (CaCl2·2H2O; Sigma-Aldrich 223506)
- d-Glucose (Sigma-Aldrich G7528)
- Formaldehyde (20% aqueous solution in 100 ml bottles; Ladd Research 20304)
- Glutaraldehyde (50% aquieous solution in 100 ml bottles; Ladd Research 20211; stored at 4°C)
- Hydrochloric acid (HCl; 1 M aqueous solution; for adjusting pH)
- Magnesium sulfate heptahydrate (MgSO4·7H2O; Sigma-Aldrich M5921)
- Potassium chloride (KCl; Sigma-Aldrich P9333)
- Sodium bicarbonate (NaHCO3; Sigma-Aldrich S6297)
- Sodium cacodylate trihydrate (Ladd Research 20305)
- Sodium carbonate (Na2CO3; Sigma-Aldrich 223530)
- Sodium chloride (NaCl; Sigma-Aldrich S7653)
- Sodium hydroxide (NaOH; 1 M aqueous solution; for adjusting pH)
- Purified water
- double-distilled, ASTM type I, WFI (water for injection), or equivalent; e.g., Fisher 91-502-5
- ASTM type I water can be made with a properly maintained water filtration system (e.g., Milli-Q® Type 1 Ultrapure Water System )
- 2- or 4-L glass beaker × 2
- Magnetic stirrer × 2
- 100-ml glass beaker and a disposable pipet (for dissolving sodium carbonate [Na2CO3])
- 1- or 2-L graduated cylinder (depending on the final volume)
- pH meter (and calibration standards)
- 1- or 2-L glass bottle (Kimax, or equivalent) × 2
- Vacuum filtration system (pore size = 0.22 µm; e.g., VWR 10040-468 – this one screws onto Kimax glass bottles)
- WESCOR VAPRO 5520 Osmometer (with calibration standards, filter paper disks, pipet, and pipet tips)
Record Keeping
- Timer (in count-up mode)
- Worksheet
Perfusion Apparatus Assembly
The perfusion apparatus consists of five sub-systems (Fig. 2): 1) air pressure (Green), 2) perfusate (Blue), 3) oxygenation (Red), 4) anesthesia (Pink), and 5) waste collection (Brown).

Air Pressure System
The air pressure system (Figs. 2 and 3) consists of a modified "Perfusion Two" air pump, air tank, and a modified sphygmomanometer.
Modification of Perfusion Two pump
Perfusion Two pump is designed to generate a constant pressure at 300 mmHg. Because this procedure requires the pressure to be varied from 180 to 80 mmHg (or lower), we have added a small regulator to be able to control the output pressure. Figure 4 shows the inside of the pump after modification: the regulator is placed such that the compressed air flows into it from the Air Tank switch and out to the Perfusion Pressure switch. This configuration allows the modified pump to be used in a way analogous to a cylindar of compressed air with a 2-stage regulator.
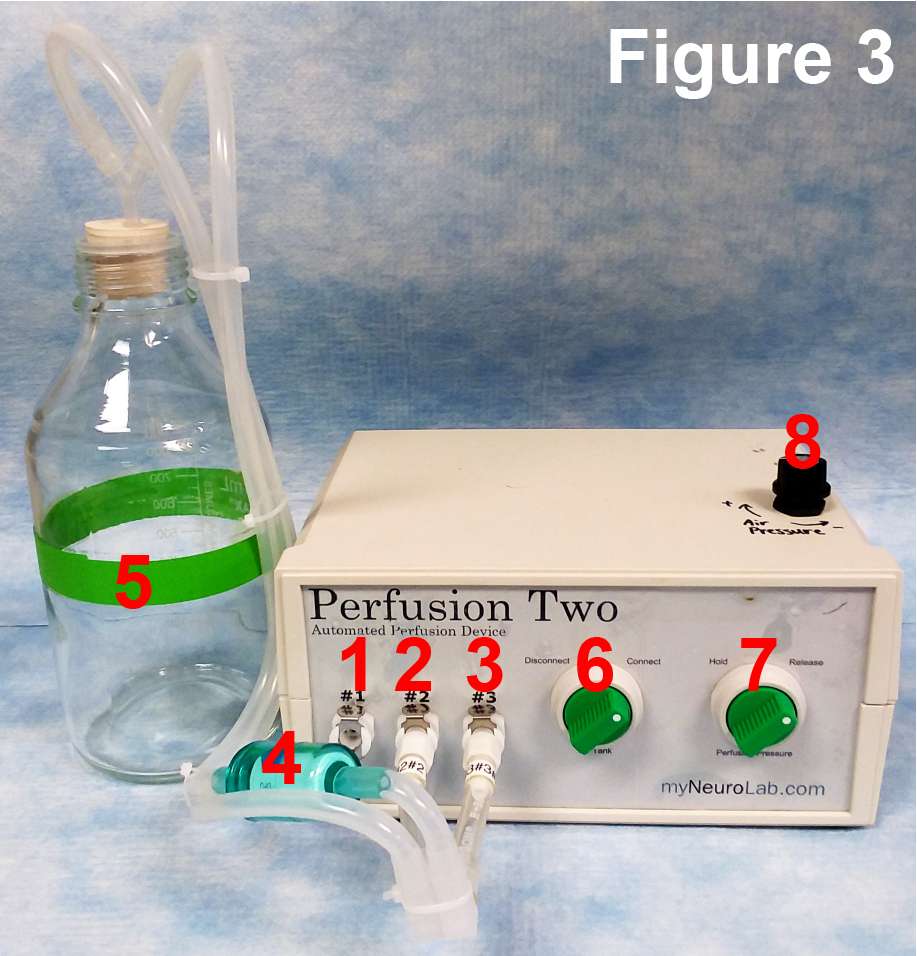

Air tank and a modified sphygmomanometer
The air tank (1-L Kimax bottle; 5 in Fig. 3) is sealed with a #6 stopper. A Y- (or T-) connector is attached to a hole in the stopper, to which two pieces of tubing are attached to connect the air tank to #2 and #3 ports of the Perfusion Two air pump (2 and 3 in Fig. 3, respectively). Between the #3 port and the air tank, an in-line air filter (4 in Fig. 3) is connected to prevent compressor oil from getting into the perfusate bottles. #1 port of the air pump (1 in Fig. 3) is connected to a hand pump (the bulb detached from the cuff of a sphygmomanometer), the sphygmomanometer (7 in Fig. 4), and perfusate bottles (see below). If the "Perfusion Two" pump is not available, simply connect a hand pump and sphygmomanometer to the perfusate system.
Perfusate System
The perfusate system (Figs. 2, 5-8) consists of a water bath, two 2-L bottles (one for KRC and the other for the fixative), perfusion needle, assortment of tubing, connectors, clamps, and valves.
Lead donuts (5 in Fig. 5) are placed around the necks of the bottles to keep them from floating and tipping over in the water bath as the fluid in them is exhausted. The fixative and the KRC bottles are sealed with #6 stoppers (1 in Figs. 6 and 7). The holes are used to connect the bottles with (1) air pressure system, (2) oxygenation system (KRC only), and (3) a 3-way switch and tubing leading to the perfusion needle. KRC and fixative are driven during perfusion by the air pressure system (see above). It is very important that the stoppers and the inside of the neck of the bottles be completely dry before inserting the stoppers to prevent the stoppers from blowing out under pressure. When the apparatus is assembled prior to each perfusion, it should be tested for the pressure of up to 200 mmHg to ensure the connections throughout the system will withstand pressure and not blow apart. Superglue is used to secure joints between different sized tubing.


Assembling the Apparatus
Connecting the perfusate bottles to the air pressure system:
Attach the long end of Y-connector into one of the three holes in the stoppers (2 in Figs. 6 and 7). Use a short piece of Tygon tubing on one side of Y-connector (2a in Figs. 6 and 7) to connect the two perfusate bottles. On one of the stoppers, another piece of tubing (2b in Fig. 6) is attached to the unused side of the Y-connector to connect the sphygmomanometer (6 in Fig. 5), hand pump (7 in Fig. 5), and the #1 port of Perfusion Two air pump (8 in Fig. 5 connects to 1 in Fig. 3) via a 4-way connector. On the other stopper, a short piece of tubing is attached to the unused side of the Y-connector for use as a pressure relief vent while KRC and fixative are gassed with O2/CO2 (2b in Fig. 7 and 4 in Fig. 5). This pressure relief tubing is folded over and clamped with a tubing clamp when pressure is applied by the air pump during the perfusion.
Connecting the perfusate bottles to the perfusion needle:
Through the second hole of the bottle stoppers, run a piece of Tygon tubing (3 in Figs. 5-7; must be long enough to reach the bottom of the bottles), which is then connected to the three-way valve (1 in Fig. 8). If the tubing is curled too much and its end is raised from bottom of the bottle, an elbow connector can be attached (Figs. 6 and 7). In this case, the unused end of the connector should be beveled and pointed towards the bottom to facilitate perfusate flow. The third connector on the three-way valve is connected via a luer-lock connector to IV tubing, to which the perfusion needle (4 in Fig. 8) is attached. A flow regulator (3 in Fig. 8) and clamp (2 in Fig. 8) is installed on this segment of the tubing. The length of the IV tubing from the bottles to valve and then the needle should be kept as short as practical: the longer the distance between the water bath and the animal the greater the drop in temperature of the perfusates. Adjust the temperature of the water bath in order to deliver fixative at 37°C at tip of the needle. A cork disk (cut from a small cork stopper; 5 in Fig. 8) is attached to the needle with superglue to prevent it from piercing through the heart.

Connecting the perfusate bottles to the oxygenation system:
Through third hole in the stoppers, run a piece of Tygon tubing (4 in Fig. 6; long enough to reach the bottom of the bottle). Attach air stones (2 in Fig. 5 and 5 in Fig. 6) on the bottle side of the tubing. The other side of tubing is connected to O2/CO2 cylinder-regulator, with a clamp in between (1 in Fig. 5; clamp not shown).
Connecting the oxygenation system to the anesthesia system:
The anesthesia system (Figs. 2, 9, and 10) consists of an isoflurane vaporizer driven by an O2 cylinder (or the O2/CO2 cylinder from above), a nose cone, endotracheal tube, and a ventilator to ventilate the anesthetized animal during the dissection and the initial stages of perfusion. The vaporizer and ventilator will not be used for mice or juvenile rats. A large glass desiccator is used to anesthetize the animal prior to putting on the nose cone (an optional small Plexiglas chamber connected to the vaporizer can be used for this purpose). For juvenile rats and mice, a 15-ml conical tube with gauze pads containing ~1 ml isoflurane is used as the nose cone.
Connect O2 regulator to the O2 input on the back panel of vaporizer (behind the O2 flow control; 1 in Fig. 9). Connect the isoflurane output (2 in Fig. 9) to a Y-connector. One side of the Y-connector is attached to a piece of silicone rubber tubing (3 in Fig. 9) leading to the nose cone (1 in Fig. 10). Use another piece of silicone rubber tubing to connect the other side of the Y-connector to air intake of the ventilator (4 in Fig. 9). Output from the ventilator (5 in Fig. 9 and 2 in Fig. 10) is connected to the endotracheal tube (3 in Fig. 10; a blunted and polished 16-gauge needle) via a Y-connector. Exhaust line from the endotracheal tube (4 in Fig. 8) connects back to the exhaust port of the ventilator (6 in Fig. 9). Make sure to label the exhaust line.


Waste Collection System
The waste collection system (Figs. 2, 10 and 11) is used to remove blood and perfusate from the dissection tray as it accumulates, and consists of a plastic-coated 4-L vacuum flask attached to vacuum line. A #11½ one-hole stopper is used to seal the flask (Fig. 11). Through the hole, attach a short segment of a plastic serological pipet (long enough to pass the vacuum port of the flask), to which Tygon tubing is connected (1 in Fig. 9). Place the other end of this tubing to the dissection tray (5 in Fig. 10). The flask is connected to vacuum line via heavy rubber vacuum tube (3 in Fig. 11). An in-line filter (2 in Fig. 11) is placed to prevent waste liquid from getting into vacuum line. Replace the in-line filter after each day of perfusions, or whenever it gets wet and occluded. After the procedure contents of the vacuum flask are transferred to appropriate disposal containers in accordance with local institutional policies.

Test-run
A newly assembled perfusion apparatus (air pressure, perfusate, oxygenation, and waste subsystems) needs to be tested for:
- air pump operation
- air and fluid leaks
- air pressure up to 200 mmHg
- perfusate temperature (37°C at the needle tip)
- waste suction line
This test does not involve the anesthesia system. The isoflurane vaporizer should be tested by a qualified vendor at least once a year.
Test Procedure
- Fully assemble the apparatus with the bottles filled with RO water. Place them in water bath for at least 30 min before starting. Get a thermometer.
- 3-way switch should have the fixative line in OFF position (1 in Fig. 8). Close all clamps (see Fig. 2). Perfusate line should be closed at this point. On the Perfusion Two pump, turn off Air Tank and Perfusion Pressure switches.
- Do you know how to operate the regulator on O2/CO2 tank?
- If yes, proceed to the next step.
- If not, you should be trained for it ASAP.
- Open air vent (clamp 2 in Fig. 2) and O2/CO2 line (clamp 3 in Fig. 2). Slowly open O2/CO2 regulator. Do you see bubbles coming out of the air stone?
- If yes, make sure you have enough O2/CO2 for the next round of perfusion and close the regulator. Clamp O2/CO2 line (clamp 3 in Fig. 2). O2/CO2 tank and its regulator can be removed at this point. Proceed to the next step.
- If no, check O2/CO2 line to see it it is blocked or leaking.
- Close air vent (clamp 2 in Fig. 2). Open clamp 1 in Fig 2.
- Open vacuum line. Is suction on?
- If yes, proceed to the next step.
- If no, check to see if the waste suction line is blocked. Also check the in-line filter (2 in Fig. 11).
- Turn on the Perfusion Two pump. Do you hear low buzzing noise of air compressor coming from the pump? It should stop when pressure in the air tank reaches ~300 mmHg (although this is not measured by the manometer).
- If yes, proceed to the next step.
- If no, make sure the power cable is connected. Still doesn't work? You might have to replace the fuse next to the main switch.
- Check for air leaks. If no leaks, hold for several min to see if the stopper on the air tank bottle remain closed.
- If still intact, proceed to the next step.
- If it blows out, turn off the pump and re-assemble the air tank.
- On the pump, turn on Air Tank switch, and then Perfusion Pressure switch. Open the perfusate lines (clamps 4 and 5 in Fig. 2; 2 and 3 in Fig. 8). Check for leaks along the KRC line. Does water from KRC bottle come out at needle tip?
- If yes, proceed to the next step.
- If no, check KRC line for any blockage. Also, turn the regulator knob clockwise several times.
- Is the waste suction line picking up water released from the needle?
- If yes, proceed to the next step.
- If no, check to see if the waste suction line is blocked. Also check the in-line filter (2 in Fig. 11).
- Check the temperature of water at the needle tip. Is it 37°C?
- If yes, proceed to the next step.
- If no, close the perfusate line, adjust the temperature of the water bath, wait for 30 min to equibrate before testing again.
- With water running, turn the regulator knob on the pump. Clockwise to increase, counter-clockwise to decrease. Does the pressure change?
- If yes, get yourself familiar with how many turns translate into pressure changes. Proceed to the next step.
- If not, check the regulator's connections (see Fig. 4).
- Turn the regulator clockwise until the pressure reaches 200 mmHg. Close the flow regulator (3 in Fig. 8). Hold for several min to see if the stoppers on the KRC and fixative bottles remain closed.
- If still intact, proceed to the next step.
- If it blows out, turn off the pump. Wipe dry the stoppers and the mouth of the bottles. Replace the stoppers.
- Turn the 3-way switch so that the KRC line is in OFF position. Open the flow regulator (3 in Fig. 8). Reduce the pressure to 180 mmHg. Check for leaks along the fixative line. Does water from fixative bottle come out at needle tip?
- If yes, proceed to the next step.
- If no, check fixative line for any blockage.
- Turn off the pump. Release pressure by opening vent on the hand pump (7 in Fig. 5).
- Congrtulations! Test is now complete and your apparatus is ready for action. Proceed to cleanup.
- Remove O2/CO2 tank and its regulator.
- Empty the bottles and replace the stoppers.
- Close the hand pump vent.
- Turn on the pump again to run air through the perfusate line.
- Turn off the pump. Remove air pressure line from Port #1 of the pump (1 in Fig. 3).
- Remove the needle from perfusate line.
- Remove the stoppers and perfusate lines from the bottles and pump to hang dry. Keep all clamps open.
- Clean the bottles and store all equipment.
- Water collected in the vacuum flask should be placed in an appropriate waste container, unless the flask is new/clean.
Preparation of Perfusate Solutions
Prefix perfusate (Krebs-Ringer Carbicarb buffer, or KRC)
Reagent | [final] mM | F.W. | For 1 L | For 2 L |
|---|---|---|---|---|
Purified water to start with | - | - | ~800 ml | ~1600 ml |
NaCl | 118.0 | 58.44 | 6.896 g | 13.792 g |
KCl | 4.7 | 74.55 | 0.350 g | 0.701 g |
CaCl2·2H2O | 2.0 | 147.02 | 0.294 g | 0.588 g |
MgSO4·7H2O | 4.0 | 246.48 | 0.986 g | 1.972 g |
D-glucose | 11.0 | 180.16 | 1.982 g | 3.964 g |
NaHCO3 | 12.5 | 84.01 | 1.050 g | 2.100 g |
Na2CO3* | 12.5 | 106.00 | 1.325 g | 2.650 g |
Oxygenated "Krebs-Ringer Carbicarb (KRC)" buffer is used to flush blood cells prior to fixative perfusion. It is prepared from dry reagents as described here on the day before the procedure and stored at RT overnight. Make a fresh batch before each day of perfusions. One-liter of KRC should be sufficient for up to eight mice or juvenile rats (P45 and younger), or 2 L for up to four adult rats (P46 and older). Use KRC Reagent Calculator to figure out the amounts of reagents needed.
*IMPORTANT: DO NOT directly add Na2CO3 (sodium carbonate) as a dry solid reagent!! Dissolve Na2CO3 in ~50 ml of water separately from the other reagents. When the other reagents have dissolved, slowly (1-2 ml at a time) add the Na2CO3 solution with continuous mixing. As Na2CO3 is added, it will be necessary to adjust the pH between 7.5 and 8 with 1M HCl to prevent precipitation. After all of the Na2CO3 has been added, allow the solution to mix for several minutes before adjusting the pH to 7.35-7.40, then bring to the final volume with purified water. Filter through a vacuum filtration system into a 1- or 2-L bottle.
Measure the osmolality (see below), and if necessary adjust it to 300-330 mmol/kg. If you were careful in weighing the reagent, the solution should be within this range and no adjustment will be needed. KRC is warmed to 41°C in a water bath (37°C at the tip of perfusion needle) and gassed with O2/CO2 (95%/5%) for at least 30 min before use. Temperature of the water bath must be adjusted according to your own perfusion apparatus to achieve 37°C at the needle tip.
Fixative
Reagent | [final] | F.W./Stock | For 0.5 L | For 2 L |
|---|---|---|---|---|
Purified water to start with | - | - | ~300 ml | ~1200 ml |
Na cacodylate·3H2O* | 100 mM | 214.0 | 10.700 g | 42.800 g |
CaCl2·2H2O | 2 mM | 147.02 | 0.147 g | 0.588 g |
MgSO4·7H2O | 4 mM | 246.48 | 0.493 g | 1.972 g |
formaldehyde | 2.0% | 20.0% | 50 ml | 200 ml |
glutaraldehyde** | 2.5% | 50.0% | 25 ml | 100 ml |
Our standard perfusion fixative, 2% formaldehyde + 2.5% glutaraldehyde, is shown here. Each adult rat will require 2 L of fixative, while 500 ml will be used for each mouse or juvenile rat. Use the following calculators to figure out the amounts of reagents needed:
- Fixative Reagent Calculator (rats P46 and older)
- Fixative Reagent Calculator (rats P45 and younger; mice)
*IMPORTANT: Sodium cacodylate is a known carcinogen. Open the bottle and weigh only in a chemical fume hood.
**IMPORTANT: Three days prior to fixative preparation, remove 50% glutaraldehyde stock from refrigerator and leave at RT.
The stock buffer minus the aldehydes is prepared the day before use and stored at RT overnight. After the salts are dissolved, adjust pH to 7.35, and store at RT. On the day of use, move the solution to a fume hood before adding the aldehydes and bring to the final volume, filter through a vacuum filtration system and place in a 1- or 2-L bottle.
When perfusing multiple adult rats, make up the cacodylate buffer with calcium chloride and magnesium sulfate at 2× concentration for 1 L per animal. On the day of perfusion, add 200 ml of 20% formaldehyde and 100 m of 50% glutaraldehyde to 1 L of the 2× buffer. Then add enough purified water to 2 L before filtering into a 2L bottle. Repeat until you have enough for the number of your animals.
Measure the osmolality (see below), which should be 900-1100 mmol/kg. Warm the solution to 41°C in water bath (37°C at the tip of perfusion needle) before use.
Making 20% formaldehyde stock solution from solid paraformaldehyde
If you don't have 20% formaldehyde solution at hand, you can make it yourself the day before perfusion.
You'll need:
- beakers
- magnetic stirrer
- hot plate
- thermometer
- disposable pipette
- filter and funnel (or vacuum filter)
- purified water
- paraformaldehyde
- 5 N NaOH (aq)
To make 5 N NaOH (aq),
- In a 100-ml beaker, add 30 ml of purified water.
- Add 20.0 g of NaOH to the beaker and use a small magnetic stirrer to completely dissolve.
- Transfer the NaOH solution from the beaker into another 50-ml volumetric flask.
- Use the same beaker to dispense purified water and bring the volume to 50 ml. Mix well. Excess water should be disposed into the "Lead - NaOH" waste bottle.
- Dispense NaOH solution into the cleaned 20-ml scintillation vials. Make sure to label the vials and store at RT in the “Base” storage container.
20% formaldehyde solution must be prepared under a chemical fume hood.
- Heat 200 ml purified water to 60°C.
- Dissolve 40 g paraformaldehyde for 20 min with strong stirring while maintaining the temperature.
- Add 5 N NaOH drop-wise until the solution is almost clear.
- Let it cool to < 30°C.
- Filter the solution into another container.
Measuring osmolality with WESCOR VAPRO 5520 osmometer
See here.
Anesthesia
The objective is to anesthetize the animal so that it does not experience pain during the dissection but is still alive with the heart beating at the time of perfusion. Weigh the animal and record pertinent information on the Perfusion Worksheet. A large glass desiccator jar with a wad of 4-5 small Kimwipes is used as an anesthesia chamber for adult rats. A glass container with perforated lid (containing a piece of Kimwipe) in a plexiglass chamber can be used for juvenile rats or mice. Five minutes prior to starting, add 1.5 ml of 100% isoflurane to the Kimwipes below the perforated plate and put the top on the desiccator. Place the animal in the desiccator after the atmosphere has equilibrated for 5 minutes. For adult rats, open the O2 regulator, set the vaporizer at 5% isoflurane (press the release button [1 in Fig. 12] and turn the dial control [2 in Fig. 12]), and adjust the O2 flow to 400 ccm (3 [control] and 4 [indicator] in Fig. 12). Also turn the ventilator on, and adjust the stroke rate (5 in Fig. 12) to 120 breaths/min and the tidal volume (6 in Fig. 12) to 1.5 cc. Within about 1.5 to 2 minutes inside the desiccator, the animal should begin to stumble and fall over (0.5-1 min for mice or juvenile rats). Anesthesia should have reached the stage where the animal is non-responsive to toe pinch in about 2.5-3 minutes (1-2 min for juveniles). At this point, place the animal on the dissection tray with its nose inside the nose cone. Secure the animal to the Styrofoam board with T-pins.

If the Plexiglas rodent anesthesia chamber is used instead of the desiccator, place the animal in the chamber attached to the isoflurane vaporizer. Set the vaporizer at 5% isoflurane and adjust the O2 flow to 400 ccm. The rat should become anesthetized in about 4 minutes. Check this by rotating the chamber slightly and observing if the animal tries to adjust its stance, i.e., tries to stay on its feet. The vaporizer should be connected separately to the box, nose cone and ventilator using Y-connectors and tubing. If the nose cone is connected to the box via the box’s exhaust as shown in some vendor’s diagrams, the animal will not continuously receive the same level of isoflurane via the nose cone after the box is opened.
For perfusing mice or juvenile rats (or if a vaporizer and a ventilator are not available), add 0.5-1 ml of isoflurane to gauze pads in the bottom of a 15-ml conical tube and use as a nose cone. Make sure that the anesthetic would not drip out of the tube. In this case, tracheotomy will not be performed, and therefore the time between cutting the diaphragm and perfusion with the fixative must be as short as possible (30 sec or less) to minimize hypoxic damages to the brain tissue. Prepare a similar apparatus with a 50-ml conical tube for adult rats as a backup nose cone, in case the vaporizer or ventilator fails during the procedure.
Division of Labor during Tracheotomy and Perfusion
This procedure is best performed by a "surgeon" and "assistant." The surgeon is responsible for anesthetizing the animal, performing the tracheotomy and further dissection, and inserting the needle into the heart. The assistant has a crucial role in record-keeping, preparing the perfusion apparatus, operating the isoflurane vaporizer, and in regulating the perfusion pressure and changing from KRC to fixative in the early stages of the perfusion. After the heart is sufficiently fixed to hold the needle in place, the rest of the perfusion could be performed alone by either person. In the Step-By-Step procedure outline below, the minimal role of the assistant is shown in italics.
Before the animal is anesthetized, the perfusion apparatus must be completely pressure-tested, the perfusion solutions brought to 41°C (such that they are at 37°C at the tip of the perfusion needle), and KRC gassed with O2/CO2 (95%/5%) for at least 30 min. The assistant must also flush fixative to remove air bubbles from the fixative line to the point just past the 3-way switch, and then KRC throughout the system to flush out the fixative and any remaining bubbles. The assistant must operate the isoflurane vaporizer and ventilator. Then the assistant must get the pressure stabilized at 80 mmHg and be ready to begin the flow of KRC to allow about 10 ml (enough to clear the tubing and begin perfusing with warm KRC) before the surgeon inserts the perfusion needle into the heart. The assistant must be ready to switch from KRC to fixative within 5 sec after the left ventricle is penetrated. For mice and juvenile rats, this switch must occur immediately after the needle insertion. The assistant will change the pressure as required to ensure good fixation at least as long as the surgeon is tending to the animal.
Step-By-Step Procedure:
All procedures are performed in a well-ventilated fume hood or on a necropsy table with down draft. Appropriate protective clothing, including gloves, mask, and eye protection, are worn. All waste is contained and disposed of according to local regulations.
The minimal role of the assistant is shown in italics.
Steps to be skipped for mice or juvenile rats are indicated by A (for "adult rats only"). They do not require tracheotomy and artificial ventilation. Therefore, time between cutting the diaphragm (i.e., loss of breathing) and perfusion with fixative must be as short as possible (30 sec or less) to minimize hypoxic damage to the brain tissue.
- Place a piece of absorbent pad under the dissection tray.
- After filling the perfusate bottles, place the lead donuts on the bottles and close them with the rubber stoppers. Open the pressure release vent ("clamp 2" in Fig. 2), and close clamps ("clamp 4" and "clamp 5" in Fig. 2) and flow regulator on the perfusate line.
- Connect tubing from the perfusate bottles labeled O2/CO2 to the oxygenation system.
- Connect Tygon tubing from the perfusate bottles labeled "#1" to the #1 port on Perfusion Two pump. This line should be clamped ("clamp 1" in Fig. 2) while KRC is bubbled to keep water from getting into the air pump system.
- On Perfusion Two pump, set Air Tank switch at "Disconnect" and Perfusion Pressure switch at "Hold" positions.
- Warm the perfusate in water bath to 41°C, and oxygenize KRC for at least 30 min.
- Lay out surgical tools for perfusion.
- Before the animal is anesthetized:
- Make sure to have a new in-line filer for the vacuum line of the waste collection system. Turn on the vacuum. Attach a waste suction line to the dissection tray with a piece of tape. Check the system by rinsing the tray with some water.
- The O2 /CO2 supply to the KRC bottle must be closed and tightly clamped ("clamp 3" in Fig. 2).
- The pressure release vent on perfusate bottles must be clamped tightly ("clamp 2" in Fig. 2).
- Release the clamp on the air pressure tubing ("clamp 1" in Fig. 2).
- Release the clamps on the perfusate line ("clamp 4" and "clamp 5" in Fig. 2).
- Turn on Perfusion Two pump (the main switch is on the back panel) with Air Tank switch at "Disconnect" and Perfusion Pressure at "Hold" positions. Compressor will start pumping air until the pressure reaches about 300 mmHg in air tank (This will not be indicated on sphygmomanometer, which measures the pressure in perfusate bottles). Turn Air Tank switch to "Connect" and Perfusion Pressure switch to "Release" positions. Then turn the regulator knob on Perfusion Two pump clockwise to increase the pressure to 200 mmHg to test the perfusate system (check with the sphygmomanometer).
- Open the three-way valve and flow regulator to flush the perfusate system, first with fixative and then the KRC, to remove all air bubbles from the tubing. Bubbles tend to get stuck at the three-way valve, connectors, and flow regulator. Use this opportunity to fill a glass specimen container with fixative and to reduce pressure to 80 mmHg. To reduce pressure, slightly open vent on the hand pump and turn the regulator knob counterclockwise until pressure reaches 80 mmHg. The waste fluid is drained into the dissection tray, and taken up by the waste collection line. Once this is done, close the flow regulator, with three-way valve open to KRC. At this point, sphygmomanometer will likely read 90-100 mmHg, but do not adjust the regulator any further.
- For mice or juvenile rats, prepare a nose cone by placing several plies of gauze into a 15-ml conical tube. Add a small amount (~1 ml) of isoflurane to gauze and recap the tube until use. For Adult rats, do this with a 50-ml conical tube. This will serve as a backup nose cone in the unlikely event of vaporizer or ventilator failure.
- (A) Start the vaporizer set at 5% isoflurane and the O2 flow at 400 ccm, and the ventilator running at 120 breaths/min and a tidal volume of 1.5 cc.
- In a large desiccator jar, add a wad of 4-5 small Kimwipes. Add 1.5 ml of isoflurane to the Kimwipes below the perforated plate and put the lid on the desiccator. Let isoflurane evaporate for 5 min. Make sure the animal does not come in contact with liquid isoflurane.
- Place the animal into the desiccator jar. Start the timer (counting up from 00:00).
- Remove the animal from desiccator and test the animal’s anesthesia level with a toe pinch. A sufficiently anesthetized animal will not respond.
- Place the animal on the dissection tray and attach its nose to the nose cone.
- Secure the animal to Styrofoam board with T-pins. Spread out each limb as far as possible.
- (A) Make a chin-to-sternum incision.
- (A) Isolate the trachea, elevate the trachea by placing the tip of a pair of curved hemostats under it to place a piece of silk suture (or cotton thread) around it proximal to the larynx and tie a loose knot in it.
- (A) Make a lateral cut across trachea just below larynx and above the suture, being careful not to cut completely through trachea or to let any fluids get in it.
- (A) Reduce the O2 flow to the vaporizer to 100 ccm and reduce the isoflurane level to 4%.
- (A) Remove the nose cone.
- (A) Immediately insert the endotracheal tube into the trachea and tie the suture. Secure the tube by taping it to a rolled up paper towel just above the animal’s head.
- (A) Clamp the exhaust line of the endotracheal tube or place your right index finger over the exhaust port on the ventilator for 2-3 breaths to create an artificial "sigh."
- Make a small hole below sternum and carefully cut laterally just under the diaphragm. Then:
- (A) Cut along the midline of the rib cage from the sternum to bottom of incision made in the throat carefully as not to dislodge the endotracheal tube. Spread open the rib cage with a pair of retractors. Clean away the pleura to release the heart and lungs. OR,
- Clamp the sternum with a pair of hemostats. Then carefully cut the diaphragm along the rib cage. Slide one blade of the scissors into the chest cavity along the rib cage, keeping the scissors away from the heart and lungs, until the incisions reaches just below the forelimbs. Cut up the side of the chest. Repeat with the other side of the chest. Lift the sternum up and turn over the neck to expose the chest cavity. Clean away the pleura to release the heart and lungs.
- (A) Repeat the artificial sigh sequence.
- (A) With artificial respiration complete (heart beating and lungs moving in and out), confirm that the assistant has the perfusion system ready to go.
- The assistant opens the flow regulator for KRC, with the pressure at 80 mmHg.
- Make an incision with iris scissors in the right atrium (or ventricle, if the atrium is not accessible).
- Take hold the apex of the heart with your thumb and forefinger or a good pair of tissue forceps. With the warm KRC flowing at 80 mmHg, insert the perfusion needle into left ventricle until it stops at the cork disk and hold it there. KRC will flush the blood through the systemic circulation and out the right atrium. There should be no fluid entering the endotracheal tube and ventilator tubing.
- In 3-5 seconds, switch the 3-way valve to begin the flow of fixative (For mice or juvenile rats, do this immediately after the needle is inserted). Increase the pressure to 120 mmHg. For mice or juvenile rats, take the nose cone off at this point.
- (A) After 15 seconds gradually increase the pressure to 180 mmHg and maintain this pressure for 5 min. During this time the animal should be having spasms and contractions and should start to stiffen.
- Clip the chin and observe the fixative oozing from the cut. Other signs of a good perfusion include: (1) feet and tail are pale white, and (2) the tail is stiff down to its tip.
- When the heart is fixed, usually within a couple of minutes, and the needle is secure the surgeon can let go of it, or if need be, prop it up with T-pins so that it won’t move.
- (A) Turn off the ventilator and vaporizer, and remove the endotracheal tube. Check the tube to make sure it is not blocked.
- After 5 min of perfusion at a higher pressure (180 mmHg for adult rats or 120 mmHg for mice), decrease the perfusion pressure to 80 mmHg by opening the valve on hand pump and then adjusting the pressure regulator knob. Maintain this pressure for about 50 min (or 20 min for mice or juvenile rats). At the end of this period, approximately 1800 ml (or 500 ml for mice or juvenile rats) of fixative should have been used. DO NOT ALLOW THE FIXATIVE BOTTLE TO RUN OUT OF FIXATIVE BECAUSE THAT COULD CAUSE AIR TO BE PERFUSED INTO THE BRAIN. Reduce the flow of fixative even to the point of cutting it off (~35 mmHg), if necessary, but the duration of perfusion with the fixative should be at least 60 min (or 30 min for mice or juvenile rats). Make sure the fixatives still drips out of the clipped chin after reducing pressure.
- Close the flow regulator, disconnect the perfusion needle, and remove the animal from the Styrofoam board. Leave the animal under fume hood for at least 1 hr before dissecting the brain out. If there is no room to keep the whole fixed animal, cut its head off (see Step 36) and wrap it in a piece of parafilm to keep it from drying out.
- Turn off Perfusion Two pump, release remaining pressure through vent on perfusate bottles. Use the remaining KRC to rinse the Styrofoam board and tray. Save the remaining fixatives to store vibraslices later. Rinse the perfusate bottles with deionized (DI) water, then flush the perfusate line with DI-water. Collect all waste liquid into the waste flask.
- Remove the head by cutting through the neck (between the ear and forelimb) with a sharp knife and dissect out the brain from the skull being careful not to nick it with tools. While dissecting out, care should be taken not to dry out the brain tissue (keep 0.1M sodium cacodylate buffer handy). Check and record firmness of the brain. Place the brain in a container filled with the fixative for overnight at RT before it is examined and vibrasliced.
- Transfer the brain into a petri dish filled with 0.1M sodium cacodylate buffer, and examine the brain under a dissecting microscope to determine whether or not small red veins are visible. A well-perfused brain will appear light orange-gold and have no red veins whereas a poorly perfused will have a pink tinge. Take images for record. Transfer the brain back into the fixative.
- If the surface of the brain appears to be well perfused, slice it with a vibrating blade microtome. For our standard EM processing, it should be sliced in phosphate buffer (0.1 M, pH = 7.4) at 70-µm thickness in the parasagittal plane (can be up to 100 µm thickness). Collect vibraslices in 24-well plates containing 0.1 M sodium cacodylate buffer. Dissect area(s) of interest with a fine dissection knife in 0.1 M sodium cacodylate buffer and embed into 7-9% agarose for further processing. If not immediately processed for EM, store the vibraslices in the same fixative at RT in 24-well plates (sealed with Parafilm; replace the fixative periodically).
Clean-up
- Perfusate bottles and tubing:
- Remove the tubing from the bottles.
- Empty excess KRC into sink, and add ~100 ml deionized water.
- Empty excess fixative into a plastic 5-gallon waste container, rinse once with some deionized water (collect waste into the same container). Then add ~100 ml deionized water.
- Excess fixative can be saved for storage of fixed brain tissue (incl. vibratome sections).
- Re-attach the tubing and run deionized water to clean the tubing. Collect waste into the 5-gallon container provided by EHS. Keep pumping air through the tubing to clear water.
- Detach the tubing and hang dry.
- Surgical instruments:
- Surgical tray and the styroform board should be rinsed with tap water (use the waste collection system), then disinfected with bleach. Rinse with water and air dry.
- Surgical instruments should be soaked and washed in cold running water (worm water will coagulate blood), then disinfected with 70% ethanol. Air-dry completely before storage.
- Solid waste:
- PPE (gloves, mask, face shield, etc.): Place in the "Solid Waste (No UA)" bag.
- Lab supplies (absorbent pad, Kimwipes, tubes, etc.): Place in the "Solid Waste (No UA)" bag.
- Carcasses: Double-bag and place into the carcasses freezer in the NHB vivarium.
- Animal cage: Return to the NHB vivarium.
- Liquid waste:
- Collect in plastic 5-gallon container. Request for pick-up by EHS.
Safety Precautions
- You must complete required lab safety training before starting this procedure.
- You must complete required animal use training and listed on IACUC protocol before starting this procedure.
- If this is your first time doing this procedure, ask to be trained by an experienced lab member. If you have not done this in a while, you should ask for a refresher.
- Also review the following material:
- Kuwajima M, Mendenhall JM, Harris KM (2013) Large-Volume Reconstruction of Brain Tissue from High-Resolution Serial Section Images Acquired by SEM-Based Scanning Transmission Electron Microscopy. Methods Mol Biol (Nanoimaging: Methods and Protocols) 950:253-73. (PDF)
- Further reading:
- Hayat MA (1981) Fixation for electron microscopy. Academic Press
- Karnovsky MJ (1965) A formaldehyde-glutaraldehyde fixative of high osmolality for use in electron microscopy. J Cell Biol 27:137A-138A. (PDF)
- Tao-Cheng JH et al. (2007) Structural changes at synapses after delayed perfusion fixation in different regions of the mouse brain. J Comp Neurol 501:731-740. (PDF)
- Dehghani A et al. (2018) Nuclear expansion and pore opening are instant signs of neuronal hypoxia and can identify poorly fixed brains. Sci Rep 8:14770. (PDF)
- Before starting, even if you have done this procedure before,
- read this protocol entirely.
- If you are using adult rats, review the instruction movie on the tracheotomy procedure.
- review relevant Safety Data Sheets and Harris Lab SOP (also see below).
- ensure you have all reagents and supplies listed below.
- ensure all equipment is in good working order.
- Isoflurane vaporizer must be serviced annually; check tubing, surgical instruments, etc.
- have all waste containers ready (also see Clean-up).
- plan your schedule well so that you wouldn’t be rushed to complete the procedure.
- Review SDS and Harris Lab SOP for the following hazardous chemicals used in this procedure:
- Ethanol: flammable; irritant (eye)
- Formaldehyde
- Glutaraldehyde
- Hydrochloric acid
- Isoflurane
- Sodium cacodylate: carcinogen; irritant (skin, eye); skin permeator
- Sodium hydroxide
- Other hazards associated with this procedure include:
- Physical: compressed gas cylinder (O2/CO2)
- Sharps: Surgical scissors, scalpel, needles
- Biological: Live rats/mice, blood, animal waste and soiled cage bedding
- The following Personal Protective Equipment is required for this procedure:
- Lab coat
- Nitrile gloves (double-layer required; regularly check for holes)
- Eye goggles
- Mask
- Face shield
- Place a piece of absorbent sheet on the work surface before starting the procedure. When done, discard into the “Solid Waste – No UA” bag
Reagents, Supplies, Equipment
Personnel Protective Equipment
- Eye goggles, face shield
- Gloves (nitrile)
- Lab coat
- Mask
- Plastic Apron (optional)
Assorted tubing, connectors, and clamps
- Barbed fittings from Cole-Parmer
- Luer kits from World Precision Instrument
- Silicon rubber tubing for anesthesia line
- Vacuum line for waste collection system
- IV line with clamp and flow regulator for perfusate lines
- Perfusate lines should be transparent enough to be able to see air bubbles.
- Tygon tubing for general use
Air Pressure System
- Sphygmomanometer with a hand pump (cut off the cuff)
- Use hand pump in the absence of an air pump.
- Air pump: Perfusion Two (Leica Biosystems 39471010)
- This pump is designed to deliver constant air pressure at 300 mmHg. To be able to adjust pressure, we added a regulator (Air Logic R-7010-2B2B-W/K) between "Air Tank" and "Perfusion Pressure" switches (See Figures 2-4).
- Air filter (Parker Hannifin 9933-05-AAQ)
- 1-L glass bottle (Kimax, or equivalent) × 1
- This can be substituted by a plastic air tank (e.g., Clippard AVT-PP-35).
- #6 two-hole stopper × 1
Oxygenation System
- O2/CO2 (95%/5%) cylinder with regulator and support
Anesthesia System
- Isoflurane (Animal Health International 19632158; stored at RT in well-ventilated area)
- Medical grade O2 cylinder with regulator and support (Can be replaced by O2/CO2 or an oxygen concentrator)
- Large glass desiccator, wad of 4-5 Kimwipes, Pasteur pipet
- Matrx VIP3000 Isoflurane Vaporizer (Stoelting)
- This apparatus must be serviced annually.
- For Central Texas area: William Connery, Handlebar Anesthesia, (512) 423-7668, handlebaranesthesia@yahoo.com
- A small animal ventilator (Harvard Apparatus Model 683, or equivalent)
- Nose cone (e.g., Stoelting; Kent Scientific)
- endotracheal tube (a modified 16-gauge hypodermic needle) with Y-connector
- Optional: Plexiglas anesthesia induction chamber (e.g., Stoelting; Kent Scientific)
Perfusate System
- Deep water bath (e.g., VWR Digital Unstirred Water Bath, L×W×D = 127/8"×1113/16"×529/32"; VWR 89032-216)
- Lead donuts × 2
- #6 stoppers: three-hole × 1, two hole × 1
- 3-way valve × 1
- Flow regulator × 1
- 13-gauge needle with 60° bevel with cork disk ½ inch from tip (to restrict depth of penetration; use a16-gauge for juvenile rats)
- Air stone × 1
Waste Collection System
- 4-L vacuum flask (preferably plastic-coated) × 1
- #11½ one-hole stopper × 1
- Vacuum line filter (Whatman VACU-GUARD, VWR 28137-858), 1 per day of perfusions
Dissection/surgical instruments
Scissors and knife etc. should be sharpened periodically.
- Stainless steel dissection tray with Styrofoam board cut to fit snugly lengthwise in the tray with ~1-inch space on one side.
- Pins to secure animal to Styrofoam board
- Scalpel and blades
- Assorted dissecting scissors
- Forceps
- Hemostats
- Retractors
- Knife (to decapitate rat)
- Bone Rongers
- Spatulas
- Silk suture (or cotton tread from fabric store can be used instead)
- Gauze pads
- Applicator sticks
For Preparation of Perfusates
All reagents are stored at RT unless otherwise noted.
- Calcium chloride dihydrate (CaCl2·2H2O; Sigma-Aldrich 223506)
- d-Glucose (Sigma-Aldrich G7528)
- Formaldehyde (20% aqueous solution in 100 ml bottles; Ladd Research 20304)
- Glutaraldehyde (50% aquieous solution in 100 ml bottles; Ladd Research 20211; stored at 4°C)
- Hydrochloric acid (HCl; 1 M aqueous solution; for adjusting pH)
- Magnesium sulfate heptahydrate (MgSO4·7H2O; Sigma-Aldrich M5921)
- Potassium chloride (KCl; Sigma-Aldrich P9333)
- Sodium bicarbonate (NaHCO3; Sigma-Aldrich S6297)
- Sodium cacodylate trihydrate (Ladd Research 20305)
- Sodium carbonate (Na2CO3; Sigma-Aldrich 223530)
- Sodium chloride (NaCl; Sigma-Aldrich S7653)
- Sodium hydroxide (NaOH; 1 M aqueous solution; for adjusting pH)
- Purified water
- double-distilled, ASTM type I, WFI (water for injection), or equivalent; e.g., Fisher 91-502-5
- ASTM type I water can be made with a properly maintained water filtration system (e.g., Milli-Q® Type 1 Ultrapure Water System )
- 2- or 4-L glass beaker × 2
- Magnetic stirrer × 2
- 100-ml glass beaker and a disposable pipet (for dissolving sodium carbonate [Na2CO3])
- 1- or 2-L graduated cylinder (depending on the final volume)
- pH meter (and calibration standards)
- 1- or 2-L glass bottle (Kimax, or equivalent) × 2
- Vacuum filtration system (pore size = 0.22 µm; e.g., VWR 10040-468 – this one screws onto Kimax glass bottles)
- WESCOR VAPRO 5520 Osmometer (with calibration standards, filter paper disks, pipet, and pipet tips)
Record Keeping
- Timer (in count-up mode)
- Worksheet for rats P46 or older
- Worksheet for rats P45 or younger and mice (all ages)
Perfusion Apparatus Assembly
The perfusion apparatus consists of five sub-systems (Fig. 2): 1) air pressure (Green), 2) perfusate (Blue), 3) oxygenation (Red), 4) anesthesia (Pink), and 5) waste collection (Brown).
Air Pressure System
The air pressure system (Figs. 2 and 3) consists of a modified "Perfusion Two" air pump, air tank, and a modified sphygmomanometer.
Modification of Perfusion Two pump
Perfusion Two pump is designed to generate a constant pressure at 300 mmHg. Because this procedure requires the pressure to be varied from 180 to 80 mmHg (or lower), we have added a small regulator to be able to control the output pressure. Figure 4 shows the inside of the pump after modification: the regulator is placed such that the compressed air flows into it from the Air Tank switch and out to the Perfusion Pressure switch. This configuration allows the modified pump to be used in a way analogous to a cylindar of compressed air with a 2-stage regulator.
Air tank and a modified sphygmomanometer
The air tank (1-L Kimax bottle; 5 in Fig. 3) is sealed with a #6 stopper. A Y- (or T-) connector is attached to a hole in the stopper, to which two pieces of tubing are attached to connect the air tank to #2 and #3 ports of the Perfusion Two air pump (2 and 3 in Fig. 3, respectively). Between the #3 port and the air tank, an in-line air filter (4 in Fig. 3) is connected to prevent compressor oil from getting into the perfusate bottles. #1 port of the air pump (1 in Fig. 3) is connected to a hand pump (the bulb detached from the cuff of a sphygmomanometer), the sphygmomanometer (7 in Fig. 4), and perfusate bottles (see below). If the "Perfusion Two" pump is not available, simply connect a hand pump and sphygmomanometer to the perfusate system.
Perfusate System
The perfusate system (Figs. 2, 5-8) consists of a water bath, two 2-L bottles (one for KRC and the other for the fixative), perfusion needle, assortment of tubing, connectors, clamps, and valves.
Lead donuts (5 in Fig. 5) are placed around the necks of the bottles to keep them from floating and tipping over in the water bath as the fluid in them is exhausted. The fixative and the KRC bottles are sealed with #6 stoppers (1 in Figs. 6 and 7). The holes are used to connect the bottles with (1) air pressure system, (2) oxygenation system (KRC only), and (3) a 3-way switch and tubing leading to the perfusion needle. KRC and fixative are driven during perfusion by the air pressure system (see above). It is very important that the stoppers and the inside of the neck of the bottles be completely dry before inserting the stoppers to prevent the stoppers from blowing out under pressure. When the apparatus is assembled prior to each perfusion, it should be tested for the pressure of up to 200 mmHg to ensure the connections throughout the system will withstand pressure and not blow apart. Superglue is used to secure joints between different sized tubing.
Assembling the Apparatus
Connecting the perfusate bottles to the air pressure system:
Attach the long end of Y-connector into one of the three holes in the stoppers (2 in Figs. 6 and 7). Use a short piece of Tygon tubing on one side of Y-connector (2a in Figs. 6 and 7) to connect the two perfusate bottles. On one of the stoppers, another piece of tubing (2b in Fig. 6) is attached to the unused side of the Y-connector to connect the sphygmomanometer (6 in Fig. 5), hand pump (7 in Fig. 5), and the #1 port of Perfusion Two air pump (8 in Fig. 5 connects to 1 in Fig. 3) via a 4-way connector. On the other stopper, a short piece of tubing is attached to the unused side of the Y-connector for use as a pressure relief vent while KRC and fixative are gassed with O2/CO2 (2b in Fig. 7 and 4 in Fig. 5). This pressure relief tubing is folded over and clamped with a tubing clamp when pressure is applied by the air pump during the perfusion.
Connecting the perfusate bottles to the perfusion needle:
Through the second hole of the bottle stoppers, run a piece of Tygon tubing (3 in Figs. 5-7; must be long enough to reach the bottom of the bottles), which is then connected to the three-way valve (1 in Fig. 8). If the tubing is curled too much and its end is raised from bottom of the bottle, an elbow connector can be attached (Figs. 6 and 7). In this case, the unused end of the connector should be beveled and pointed towards the bottom to facilitate perfusate flow. The third connector on the three-way valve is connected via a luer-lock connector to IV tubing, to which the perfusion needle (4 in Fig. 8) is attached. A flow regulator (3 in Fig. 8) and clamp (2 in Fig. 8) is installed on this segment of the tubing. The length of the IV tubing from the bottles to valve and then the needle should be kept as short as practical: the longer the distance between the water bath and the animal the greater the drop in temperature of the perfusates. Adjust the temperature of the water bath in order to deliver fixative at 37°C at tip of the needle. A cork disk (cut from a small cork stopper; 5 in Fig. 8) is attached to the needle with superglue to prevent it from piercing through the heart.
Connecting the perfusate bottles to the oxygenation system:
Through third hole in the stoppers, run a piece of Tygon tubing (4 in Fig. 6; long enough to reach the bottom of the bottle). Attach air stones (2 in Fig. 5 and 5 in Fig. 6) on the bottle side of the tubing. The other side of tubing is connected to O2/CO2 cylinder-regulator, with a clamp in between (1 in Fig. 5; clamp not shown).
Connecting the oxygenation system to the anesthesia system:
The anesthesia system (Figs. 2, 9, and 10) consists of an isoflurane vaporizer driven by an O2 cylinder (or the O2/CO2 cylinder from above), a nose cone, endotracheal tube, and a ventilator to ventilate the anesthetized animal during the dissection and the initial stages of perfusion. The vaporizer and ventilator will not be used for mice or juvenile rats. A large glass desiccator is used to anesthetize the animal prior to putting on the nose cone (an optional small Plexiglas chamber connected to the vaporizer can be used for this purpose). For juvenile rats and mice, a 15-ml conical tube with gauze pads containing ~1 ml isoflurane is used as the nose cone.
Connect O2 regulator to the O2 input on the back panel of vaporizer (behind the O2 flow control; 1 in Fig. 9). Connect the isoflurane output (2 in Fig. 9) to a Y-connector. One side of the Y-connector is attached to a piece of silicone rubber tubing (3 in Fig. 9) leading to the nose cone (1 in Fig. 10). Use another piece of silicone rubber tubing to connect the other side of the Y-connector to air intake of the ventilator (4 in Fig. 9). Output from the ventilator (5 in Fig. 9 and 2 in Fig. 10) is connected to the endotracheal tube (3 in Fig. 10; a blunted and polished 16-gauge needle) via a Y-connector. Exhaust line from the endotracheal tube (4 in Fig. 8) connects back to the exhaust port of the ventilator (6 in Fig. 9). Make sure to label the exhaust line.
Waste Collection System
The waste collection system (Figs. 2, 10 and 11) is used to remove blood and perfusate from the dissection tray as it accumulates, and consists of a plastic-coated 4-L vacuum flask attached to vacuum line. A #11½ one-hole stopper is used to seal the flask (Fig. 11). Through the hole, attach a short segment of a plastic serological pipet (long enough to pass the vacuum port of the flask), to which Tygon tubing is connected (1 in Fig. 9). Place the other end of this tubing to the dissection tray (5 in Fig. 10). The flask is connected to vacuum line via heavy rubber vacuum tube (3 in Fig. 11). An in-line filter (2 in Fig. 11) is placed to prevent waste liquid from getting into vacuum line. Replace the in-line filter after each day of perfusions, or whenever it gets wet and occluded. After the procedure contents of the vacuum flask are transferred to appropriate disposal containers in accordance with local institutional policies.
Test-run
A newly assembled perfusion apparatus (air pressure, perfusate, oxygenation, and waste subsystems) needs to be tested for:
- air pump operation
- air and fluid leaks
- air pressure up to 200 mmHg
- perfusate temperature (37°C at the needle tip)
- waste suction line
This test does not involve the anesthesia system. The isoflurane vaporizer should be tested by a qualified vendor at least once a year.
Test Procedure
- Fully assemble the apparatus with the bottles filled with RO water. Place them in water bath for at least 30 min before starting. Get a thermometer.
- 3-way switch should have the fixative line in OFF position (1 in Fig. 8). Close all clamps (see Fig. 2). Perfusate line should be closed at this point. On the Perfusion Two pump, turn off Air Tank and Perfusion Pressure switches.
- Do you know how to operate the regulator on O2/CO2 tank?
- If yes, proceed to the next step.
- If not, you should be trained for it ASAP.
- Open air vent (clamp 2 in Fig. 2) and O2/CO2 line (clamp 3 in Fig. 2). Slowly open O2/CO2 regulator. Do you see bubbles coming out of the air stone?
- If yes, make sure you have enough O2/CO2 for the next round of perfusion and close the regulator. Clamp O2/CO2 line (clamp 3 in Fig. 2). O2/CO2 tank and its regulator can be removed at this point. Proceed to the next step.
- If no, check O2/CO2 line to see it it is blocked or leaking.
- Close air vent (clamp 2 in Fig. 2). Open clamp 1 in Fig 2.
- Open vacuum line. Is suction on?
- If yes, proceed to the next step.
- If no, check to see if the waste suction line is blocked. Also check the in-line filter (2 in Fig. 11).
- Turn on the Perfusion Two pump. Do you hear low buzzing noise of air compressor coming from the pump? It should stop when pressure in the air tank reaches ~300 mmHg (although this is not measured by the manometer).
- If yes, proceed to the next step.
- If no, make sure the power cable is connected. Still doesn't work? You might have to replace the fuse next to the main switch.
- Check for air leaks. If no leaks, hold for several min to see if the stopper on the air tank bottle remain closed.
- If still intact, proceed to the next step.
- If it blows out, turn off the pump and re-assemble the air tank.
- On the pump, turn on Air Tank switch, and then Perfusion Pressure switch. Open the perfusate lines (clamps 4 and 5 in Fig. 2; 2 and 3 in Fig. 8). Check for leaks along the KRC line. Does water from KRC bottle come out at needle tip?
- If yes, proceed to the next step.
- If no, check KRC line for any blockage. Also, turn the regulator knob clockwise several times.
- Is the waste suction line picking up water released from the needle?
- If yes, proceed to the next step.
- If no, check to see if the waste suction line is blocked. Also check the in-line filter (2 in Fig. 11).
- Check the temperature of water at the needle tip. Is it 37°C?
- If yes, proceed to the next step.
- If no, close the perfusate line, adjust the temperature of the water bath, wait for 30 min to equibrate before testing again.
- With water running, turn the regulator knob on the pump. Clockwise to increase, counter-clockwise to decrease. Does the pressure change?
- If yes, get yourself familiar with how many turns translate into pressure changes. Proceed to the next step.
- If not, check the regulator's connections (see Fig. 4).
- Turn the regulator clockwise until the pressure reaches 200 mmHg. Close the flow regulator (3 in Fig. 8). Hold for several min to see if the stoppers on the KRC and fixative bottles remain closed.
- If still intact, proceed to the next step.
- If it blows out, turn off the pump. Wipe dry the stoppers and the mouth of the bottles. Replace the stoppers.
- Turn the 3-way switch so that the KRC line is in OFF position. Open the flow regulator (3 in Fig. 8). Reduce the pressure to 180 mmHg. Check for leaks along the fixative line. Does water from fixative bottle come out at needle tip?
- If yes, proceed to the next step.
- If no, check fixative line for any blockage.
- Turn off the pump. Release pressure by opening vent on the hand pump (7 in Fig. 5).
- Congrtulations! Test is now complete and your apparatus is ready for action. Proceed to cleanup.
- Remove O2/CO2 tank and its regulator.
- Empty the bottles and replace the stoppers.
- Close the hand pump vent.
- Turn on the pump again to run air through the perfusate line.
- Turn off the pump. Remove air pressure line from Port #1 of the pump (1 in Fig. 3).
- Remove the needle from perfusate line.
- Remove the stoppers and perfusate lines from the bottles and pump to hang dry. Keep all clamps open.
- Clean the bottles and store all equipment.
- Water collected in the vacuum flask should be placed in an appropriate waste container, unless the flask is new/clean.
Preparation of Perfusate Solutions
Prefix perfusate (Krebs-Ringer Carbicarb buffer, or KRC)
Reagent | [final] mM | F.W. | For 1 L | For 2 L |
|---|---|---|---|---|
Purified water to start with | - | - | ~800 ml | ~1600 ml |
NaCl | 118.0 | 58.44 | 6.896 g | 13.792 g |
KCl | 4.7 | 74.55 | 0.350 g | 0.701 g |
CaCl2·2H2O | 2.0 | 147.02 | 0.294 g | 0.588 g |
MgSO4·7H2O | 4.0 | 246.48 | 0.986 g | 1.972 g |
D-glucose | 11.0 | 180.16 | 1.982 g | 3.964 g |
NaHCO3 | 12.5 | 84.01 | 1.050 g | 2.100 g |
Na2CO3* | 12.5 | 106.00 | 1.325 g | 2.650 g |
Oxygenated "Krebs-Ringer Carbicarb (KRC)" buffer is used to flush blood cells prior to fixative perfusion. It is prepared from dry reagents as described here on the day before the procedure and stored at RT overnight. Make a fresh batch before each day of perfusions. One-liter of KRC should be sufficient for up to eight mice or juvenile rats (P45 and younger), or 2 L for up to four adult rats (P46 and older). Use KRC Reagent Calculator to figure out the amounts of reagents needed.
*IMPORTANT: DO NOT directly add Na2CO3 (sodium carbonate) as a dry solid reagent!! Dissolve Na2CO3 in ~50 ml of water separately from the other reagents. When the other reagents have dissolved, slowly (1-2 ml at a time) add the Na2CO3 solution with continuous mixing. As Na2CO3 is added, it will be necessary to adjust the pH between 7.5 and 8 with 1M HCl to prevent precipitation. After all of the Na2CO3 has been added, allow the solution to mix for several minutes before adjusting the pH to 7.35-7.40, then bring to the final volume with purified water. Filter through a vacuum filtration system into a 1- or 2-L bottle.
Measure the osmolality (see below), and if necessary adjust it to 300-330 mmol/kg. If you were careful in weighing the reagent, the solution should be within this range and no adjustment will be needed. KRC is warmed to 41°C in a water bath (37°C at the tip of perfusion needle) and gassed with O2/CO2 (95%/5%) for at least 30 min before use. Temperature of the water bath must be adjusted according to your own perfusion apparatus to achieve 37°C at the needle tip.
Fixative
Reagent | [final] | F.W./Stock | For 0.5 L | For 2 L |
|---|---|---|---|---|
Purified water to start with | - | - | ~300 ml | ~1200 ml |
Na cacodylate·3H2O* | 100 mM | 214.0 | 10.700 g | 42.800 g |
CaCl2·2H2O | 2 mM | 147.02 | 0.147 g | 0.588 g |
MgSO4·7H2O | 4 mM | 246.48 | 0.493 g | 1.972 g |
formaldehyde | 2.0% | 20.0% | 50 ml | 200 ml |
glutaraldehyde** | 2.5% | 50.0% | 25 ml | 100 ml |
Our standard perfusion fixative, 2% formaldehyde + 2.5% glutaraldehyde, is shown here. Each adult rat will require 2 L of fixative, while 500 ml will be used for each mouse or juvenile rat. Use the following calculators to figure out the amounts of reagents needed:
- Fixative Reagent Calculator (rats P46 and older)
- Fixative Reagent Calculator (rats P45 and younger; mice)
*IMPORTANT: Sodium cacodylate is a known carcinogen. Open the bottle and weigh only in a chemical fume hood.
**IMPORTANT: Three days prior to fixative preparation, remove 50% glutaraldehyde stock from refrigerator and leave at RT.
The stock buffer minus the aldehydes is prepared the day before use and stored at RT overnight. After the salts are dissolved, adjust pH to 7.35, and store at RT. On the day of use, move the solution to a fume hood before adding the aldehydes and bring to the final volume, filter through a vacuum filtration system and place in a 1- or 2-L bottle.
When perfusing multiple adult rats, make up the cacodylate buffer with calcium chloride and magnesium sulfate at 2× concentration for 1 L per animal. On the day of perfusion, add 200 ml of 20% formaldehyde and 100 m of 50% glutaraldehyde to 1 L of the 2× buffer. Then add enough purified water to 2 L before filtering into a 2L bottle. Repeat until you have enough for the number of your animals.
Measure the osmolality (see below), which should be 900-1100 mmol/kg. Warm the solution to 41°C in water bath (37°C at the tip of perfusion needle) before use.
Making 20% formaldehyde stock solution from solid paraformaldehyde
If you don't have 20% formaldehyde solution at hand, you can make it yourself the day before perfusion.
You'll need:
- beakers
- magnetic stirrer
- hot plate
- thermometer
- disposable pipette
- filter and funnel (or vacuum filter)
- purified water
- paraformaldehyde
- 5 N NaOH (aq)
To make 5 N NaOH (aq),
- In a 100-ml beaker, add 30 ml of purified water.
- Add 20.0 g of NaOH to the beaker and use a small magnetic stirrer to completely dissolve.
- Transfer the NaOH solution from the beaker into another 50-ml volumetric flask.
- Use the same beaker to dispense purified water and bring the volume to 50 ml. Mix well. Excess water should be disposed into the "Lead - NaOH" waste bottle.
- Dispense NaOH solution into the cleaned 20-ml scintillation vials. Make sure to label the vials and store at RT in the “Base” storage container.
20% formaldehyde solution must be prepared under a chemical fume hood.
- Heat 200 ml purified water to 60°C.
- Dissolve 40 g paraformaldehyde for 20 min with strong stirring while maintaining the temperature.
- Add 5 N NaOH drop-wise until the solution is almost clear.
- Let it cool to < 30°C.
- Filter the solution into another container.
Measuring osmolality with WESCOR VAPRO 5520 osmometer
See here.
Anesthesia
The objective is to anesthetize the animal so that it does not experience pain during the dissection but is still alive with the heart beating at the time of perfusion. Weigh the animal and record pertinent information on the Perfusion Worksheet. A large glass desiccator jar with a wad of 4-5 small Kimwipes is used as an anesthesia chamber for adult rats. A glass container with perforated lid (containing a piece of Kimwipe) in a plexiglass chamber can be used for juvenile rats or mice. Five minutes prior to starting, add 1.5 ml of 100% isoflurane to the Kimwipes below the perforated plate and put the top on the desiccator. Place the animal in the desiccator after the atmosphere has equilibrated for 5 minutes. For adult rats, open the O2 regulator, set the vaporizer at 5% isoflurane (press the release button [1 in Fig. 12] and turn the dial control [2 in Fig. 12]), and adjust the O2 flow to 400 ccm (3 [control] and 4 [indicator] in Fig. 12). Also turn the ventilator on, and adjust the stroke rate (5 in Fig. 12) to 120 breaths/min and the tidal volume (6 in Fig. 12) to 1.5 cc. Within about 1.5 to 2 minutes inside the desiccator, the animal should begin to stumble and fall over (0.5-1 min for mice or juvenile rats). Anesthesia should have reached the stage where the animal is non-responsive to toe pinch in about 2.5-3 minutes (1-2 min for juveniles). At this point, place the animal on the dissection tray with its nose inside the nose cone. Secure the animal to the Styrofoam board with T-pins.
If the Plexiglas rodent anesthesia chamber is used instead of the desiccator, place the animal in the chamber attached to the isoflurane vaporizer. Set the vaporizer at 5% isoflurane and adjust the O2 flow to 400 ccm. The rat should become anesthetized in about 4 minutes. Check this by rotating the chamber slightly and observing if the animal tries to adjust its stance, i.e., tries to stay on its feet. The vaporizer should be connected separately to the box, nose cone and ventilator using Y-connectors and tubing. If the nose cone is connected to the box via the box’s exhaust as shown in some vendor’s diagrams, the animal will not continuously receive the same level of isoflurane via the nose cone after the box is opened.
For perfusing mice or juvenile rats (or if a vaporizer and a ventilator are not available), add 0.5-1 ml of isoflurane to gauze pads in the bottom of a 15-ml conical tube and use as a nose cone. Make sure that the anesthetic would not drip out of the tube. In this case, tracheotomy will not be performed, and therefore the time between cutting the diaphragm and perfusion with the fixative must be as short as possible (30 sec or less) to minimize hypoxic damages to the brain tissue. Prepare a similar apparatus with a 50-ml conical tube for adult rats as a backup nose cone, in case the vaporizer or ventilator fails during the procedure.
Division of Labor during Tracheotomy and Perfusion
This procedure is best performed by a "surgeon" and "assistant." The surgeon is responsible for anesthetizing the animal, performing the tracheotomy and further dissection, and inserting the needle into the heart. The assistant has a crucial role in record-keeping, preparing the perfusion apparatus, operating the isoflurane vaporizer, and in regulating the perfusion pressure and changing from KRC to fixative in the early stages of the perfusion. After the heart is sufficiently fixed to hold the needle in place, the rest of the perfusion could be performed alone by either person. In the Step-By-Step procedure outline below, the minimal role of the assistant is shown in italics.
Before the animal is anesthetized, the perfusion apparatus must be completely pressure-tested, the perfusion solutions brought to 41°C (such that they are at 37°C at the tip of the perfusion needle), and KRC gassed with O2/CO2 (95%/5%) for at least 30 min. The assistant must also flush fixative to remove air bubbles from the fixative line to the point just past the 3-way switch, and then KRC throughout the system to flush out the fixative and any remaining bubbles. The assistant must operate the isoflurane vaporizer and ventilator. Then the assistant must get the pressure stabilized at 80 mmHg and be ready to begin the flow of KRC to allow about 10 ml (enough to clear the tubing and begin perfusing with warm KRC) before the surgeon inserts the perfusion needle into the heart. The assistant must be ready to switch from KRC to fixative within 5 sec after the left ventricle is penetrated. For mice and juvenile rats, this switch must occur immediately after the needle insertion. The assistant will change the pressure as required to ensure good fixation at least as long as the surgeon is tending to the animal.
Step-By-Step Procedure:
All procedures are performed in a well-ventilated fume hood or on a necropsy table with down draft. Appropriate protective clothing, including gloves, mask, and eye protection, are worn. All waste is contained and disposed of according to local regulations.
The minimal role of the assistant is shown in italics.
Steps to be skipped for mice or juvenile rats are indicated by A (for "adult rats only"). They do not require tracheotomy and artificial ventilation. Therefore, time between cutting the diaphragm (i.e., loss of breathing) and perfusion with fixative must be as short as possible (30 sec or less) to minimize hypoxic damage to the brain tissue.
- Place a piece of absorbent pad under the dissection tray.
- After filling the perfusate bottles, place the lead donuts on the bottles and close them with the rubber stoppers. Open the pressure release vent ("clamp 2" in Fig. 2), and close clamps ("clamp 4" and "clamp 5" in Fig. 2) and flow regulator on the perfusate line.
- Connect tubing from the perfusate bottles labeled O2/CO2 to the oxygenation system.
- Connect Tygon tubing from the perfusate bottles labeled "#1" to the #1 port on Perfusion Two pump. This line should be clamped ("clamp 1" in Fig. 2) while KRC is bubbled to keep water from getting into the air pump system.
- On Perfusion Two pump, set Air Tank switch at "Disconnect" and Perfusion Pressure switch at "Hold" positions.
- Warm the perfusate in water bath to 41°C, and oxygenize KRC for at least 30 min.
- Lay out surgical tools for perfusion.
- Before the animal is anesthetized:
- Make sure to have a new in-line filer for the vacuum line of the waste collection system. Turn on the vacuum. Attach a waste suction line to the dissection tray with a piece of tape. Check the system by rinsing the tray with some water.
- The O2 /CO2 supply to the KRC bottle must be closed and tightly clamped ("clamp 3" in Fig. 2).
- The pressure release vent on perfusate bottles must be clamped tightly ("clamp 2" in Fig. 2).
- Release the clamp on the air pressure tubing ("clamp 1" in Fig. 2).
- Release the clamps on the perfusate line ("clamp 4" and "clamp 5" in Fig. 2).
- Turn on Perfusion Two pump (the main switch is on the back panel) with Air Tank switch at "Disconnect" and Perfusion Pressure at "Hold" positions. Compressor will start pumping air until the pressure reaches about 300 mmHg in air tank (This will not be indicated on sphygmomanometer, which measures the pressure in perfusate bottles). Turn Air Tank switch to "Connect" and Perfusion Pressure switch to "Release" positions. Then turn the regulator knob on Perfusion Two pump clockwise to increase the pressure to 200 mmHg to test the perfusate system (check with the sphygmomanometer).
- Open the three-way valve and flow regulator to flush the perfusate system, first with fixative and then the KRC, to remove all air bubbles from the tubing. Bubbles tend to get stuck at the three-way valve, connectors, and flow regulator. Use this opportunity to fill a glass specimen container with fixative and to reduce pressure to 80 mmHg. To reduce pressure, slightly open vent on the hand pump and turn the regulator knob counterclockwise until pressure reaches 80 mmHg. The waste fluid is drained into the dissection tray, and taken up by the waste collection line. Once this is done, close the flow regulator, with three-way valve open to KRC. At this point, sphygmomanometer will likely read 90-100 mmHg, but do not adjust the regulator any further.
- For mice or juvenile rats, prepare a nose cone by placing several plies of gauze into a 15-ml conical tube. Add a small amount (~1 ml) of isoflurane to gauze and recap the tube until use. For Adult rats, do this with a 50-ml conical tube. This will serve as a backup nose cone in the unlikely event of vaporizer or ventilator failure.
- (A) Start the vaporizer set at 5% isoflurane and the O2 flow at 400 ccm, and the ventilator running at 120 breaths/min and a tidal volume of 1.5 cc.
- In a large desiccator jar, add a wad of 4-5 small Kimwipes. Add 1.5 ml of isoflurane to the Kimwipes below the perforated plate and put the lid on the desiccator. Let isoflurane evaporate for 5 min. Make sure the animal does not come in contact with liquid isoflurane.
- Place the animal into the desiccator jar. Start the timer (counting up from 00:00).
- Remove the animal from desiccator and test the animal’s anesthesia level with a toe pinch. A sufficiently anesthetized animal will not respond.
- Place the animal on the dissection tray and attach its nose to the nose cone.
- Secure the animal to Styrofoam board with T-pins. Spread out each limb as far as possible.
- (A) Make a chin-to-sternum incision.
- (A) Isolate the trachea, elevate the trachea by placing the tip of a pair of curved hemostats under it to place a piece of silk suture (or cotton thread) around it proximal to the larynx and tie a loose knot in it.
- (A) Make a lateral cut across trachea just below larynx and above the suture, being careful not to cut completely through trachea or to let any fluids get in it.
- (A) Reduce the O2 flow to the vaporizer to 100 ccm and reduce the isoflurane level to 4%.
- (A) Remove the nose cone.
- (A) Immediately insert the endotracheal tube into the trachea and tie the suture. Secure the tube by taping it to a rolled up paper towel just above the animal’s head.
- (A) Clamp the exhaust line of the endotracheal tube or place your right index finger over the exhaust port on the ventilator for 2-3 breaths to create an artificial "sigh."
- Make a small hole below sternum and carefully cut laterally just under the diaphragm. Then:
- (A) Cut along the midline of the rib cage from the sternum to bottom of incision made in the throat carefully as not to dislodge the endotracheal tube. Spread open the rib cage with a pair of retractors. Clean away the pleura to release the heart and lungs. OR,
- Clamp the sternum with a pair of hemostats. Then carefully cut the diaphragm along the rib cage. Slide one blade of the scissors into the chest cavity along the rib cage, keeping the scissors away from the heart and lungs, until the incisions reaches just below the forelimbs. Cut up the side of the chest. Repeat with the other side of the chest. Lift the sternum up and turn over the neck to expose the chest cavity. Clean away the pleura to release the heart and lungs.
- (A) Repeat the artificial sigh sequence.
- (A) With artificial respiration complete (heart beating and lungs moving in and out), confirm that the assistant has the perfusion system ready to go.
- The assistant opens the flow regulator for KRC, with the pressure at 80 mmHg.
- Make an incision with iris scissors in the right atrium (or ventricle, if the atrium is not accessible).
- Take hold the apex of the heart with your thumb and forefinger or a good pair of tissue forceps. With the warm KRC flowing at 80 mmHg, insert the perfusion needle into left ventricle until it stops at the cork disk and hold it there. KRC will flush the blood through the systemic circulation and out the right atrium. There should be no fluid entering the endotracheal tube and ventilator tubing.
- In 3-5 seconds, switch the 3-way valve to begin the flow of fixative (For mice or juvenile rats, do this immediately after the needle is inserted). Increase the pressure to 120 mmHg. For mice or juvenile rats, take the nose cone off at this point.
- (A) After 15 seconds gradually increase the pressure to 180 mmHg and maintain this pressure for 5 min. During this time the animal should be having spasms and contractions and should start to stiffen.
- Clip the chin and observe the fixative oozing from the cut. Other signs of a good perfusion include: (1) feet and tail are pale white, and (2) the tail is stiff down to its tip.
- When the heart is fixed, usually within a couple of minutes, and the needle is secure the surgeon can let go of it, or if need be, prop it up with T-pins so that it won’t move.
- (A) Turn off the ventilator and vaporizer, and remove the endotracheal tube. Check the tube to make sure it is not blocked.
- After 5 min of perfusion at a higher pressure (180 mmHg for adult rats or 120 mmHg for mice), decrease the perfusion pressure to 80 mmHg by opening the valve on hand pump and then adjusting the pressure regulator knob. Maintain this pressure for about 50 min (or 20 min for mice or juvenile rats). At the end of this period, approximately 1800 ml (or 500 ml for mice or juvenile rats) of fixative should have been used. DO NOT ALLOW THE FIXATIVE BOTTLE TO RUN OUT OF FIXATIVE BECAUSE THAT COULD CAUSE AIR TO BE PERFUSED INTO THE BRAIN. Reduce the flow of fixative even to the point of cutting it off (~35 mmHg), if necessary, but the duration of perfusion with the fixative should be at least 60 min (or 30 min for mice or juvenile rats). Make sure the fixatives still drips out of the clipped chin after reducing pressure.
- Close the flow regulator, disconnect the perfusion needle, and remove the animal from the Styrofoam board. Leave the animal under fume hood for at least 1 hr before dissecting the brain out. If there is no room to keep the whole fixed animal, cut its head off (see Step 36) and wrap it in a piece of parafilm to keep it from drying out.
- Turn off Perfusion Two pump, release remaining pressure through vent on perfusate bottles. Use the remaining KRC to rinse the Styrofoam board and tray. Save the remaining fixatives to store vibraslices later. Rinse the perfusate bottles with deionized (DI) water, then flush the perfusate line with DI-water. Collect all waste liquid into the waste flask.
- Remove the head by cutting through the neck (between the ear and forelimb) with a sharp knife and dissect out the brain from the skull being careful not to nick it with tools. While dissecting out, care should be taken not to dry out the brain tissue (keep 0.1M sodium cacodylate buffer handy). Check and record firmness of the brain. Place the brain in a container filled with the fixative for overnight at RT before it is examined and vibrasliced.
- Transfer the brain into a petri dish filled with 0.1M sodium cacodylate buffer, and examine the brain under a dissecting microscope to determine whether or not small red veins are visible. A well-perfused brain will appear light orange-gold and have no red veins whereas a poorly perfused will have a pink tinge. Take images for record. Transfer the brain back into the fixative.
- If the surface of the brain appears to be well perfused, slice it with a vibrating blade microtome. For our standard EM processing, it should be sliced in phosphate buffer (0.1 M, pH = 7.4) at 70-µm thickness in the parasagittal plane (can be up to 100 µm thickness). Collect vibraslices in 24-well plates containing 0.1 M sodium cacodylate buffer. Dissect area(s) of interest with a fine dissection knife in 0.1 M sodium cacodylate buffer and embed into 7-9% agarose for further processing. If not immediately processed for EM, store the vibraslices in the same fixative at RT in 24-well plates (sealed with Parafilm; replace the fixative periodically).
Clean-up
- Perfusate bottles and tubing:
- Remove the tubing from the bottles.
- Empty excess KRC into sink, and add ~100 ml deionized water.
- Empty excess fixative into a plastic 5-gallon waste container, rinse once with some deionized water (collect waste into the same container). Then add ~100 ml deionized water.
- Excess fixative can be saved for storage of fixed brain tissue (incl. vibratome sections).
- Re-attach the tubing and run deionized water to clean the tubing. Collect waste into the 5-gallon container provided by EHS. Keep pumping air through the tubing to clear water.
- Detach the tubing and hang dry.
- Surgical instruments:
- Surgical tray and the styroform board should be rinsed with tap water (use the waste collection system), then disinfected with bleach. Rinse with water and air dry.
- Surgical instruments should be soaked and washed in cold running water (worm water will coagulate blood), then disinfected with 70% ethanol. Air-dry completely before storage.
- Solid waste:
- PPE (gloves, mask, face shield, etc.): Place in the "Solid Waste (No UA)" bag.
- Lab supplies (absorbent pad, Kimwipes, tubes, etc.): Place in the "Solid Waste (No UA)" bag.
- Carcasses: Double-bag and place into the carcasses freezer in the NHB vivarium.
- Animal cage: Return to the NHB vivarium.
- Liquid waste:
- Collect in plastic 5-gallon container. Request for pick-up by EHS.