Please use the online version of Specify to attach images. If you use the desktop version of the software we will first need to make some changes in your desktop preferences settings.
Go to http://specify.npl.tacc.utexas.edu/specify and log in. If this is your first time using the online version of Specify, you will first need to create a Catalog Number query.
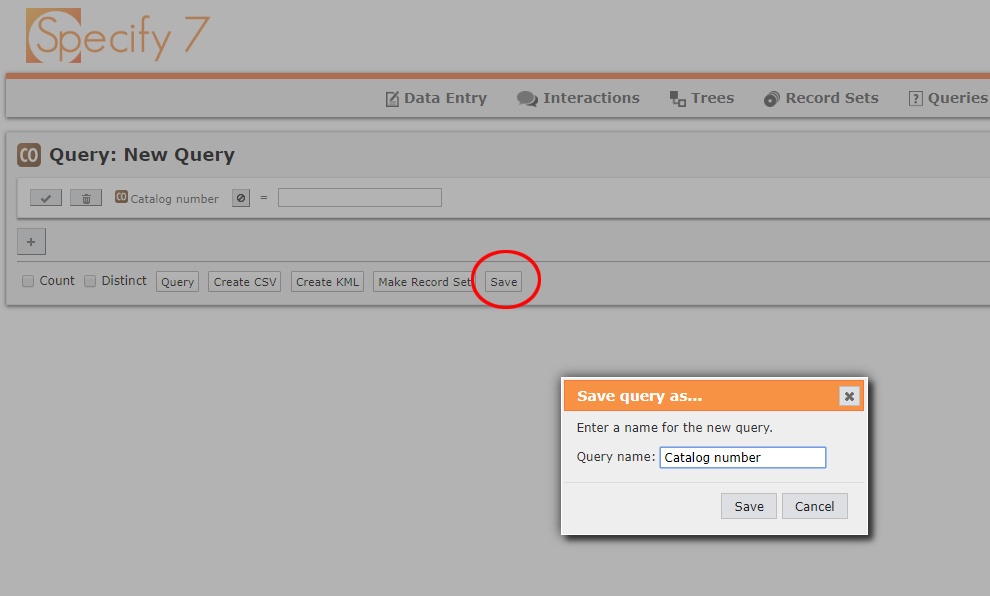
1. click Queries on the top menu bar and select new.
2. The New Query Type window will open. Select Collection Object.

3. The New Query window will open. Click the "plus" button and use the drop-down list to select Catalog number.

4. Next use the Select Operator drop-down list to select "equal"
5. Save Query: click the save button and change the name of New Query to "Catalog Number" or something like that (mine is called Online Catalog Number).
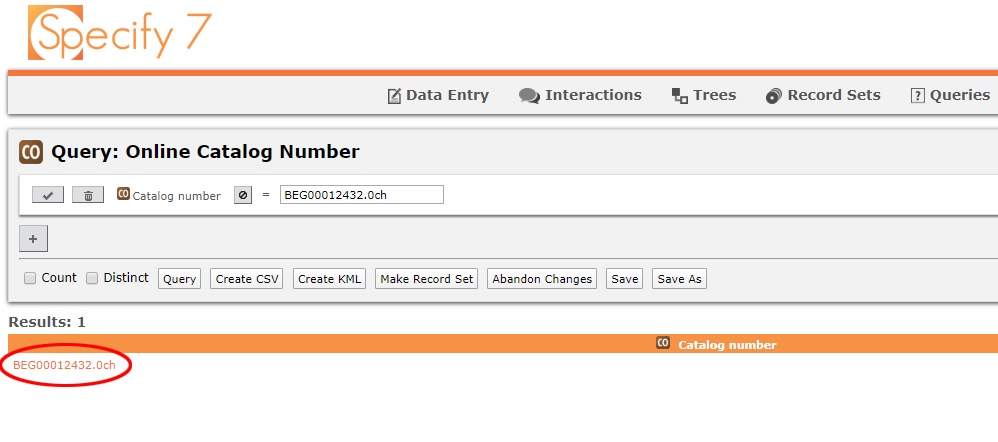
Your new catalog number query will now be available whenever you click on Queries.
Now open your new query and enter the number you are looking for. Remember that you will need to enter the entire number. You cannot search using a partial number in the online version of Specify. This number will always have 11 characters (first 3 for the collection: NPL, BEG, UT0; then 8 numbers) followed by a decimal and 3 more characters.
Examples:
UT000051266.000
NPL00063289.000
BEG00012345.002
BEG00012345.0ch
NPL00054321.00A
------------------------------------------------------------------------------
ATTACHING IMAGES
The web folder you have been given will contain images ready to be attached. You will search for the object in Specify, attach/upload the image, then move the completed web folder image into the Done folder. While you are attaching images you will be checking a few things for accuracy.
1. Inside the Web folder window, copy the catalog number and paste it into your catalog number query in your internet browser (you will of course need to change the dash to a decimal). Click the query button below. The collection object should appear just below. If the query comes back empty, then there is a problem with the number, and you will need to figure it out before you move on.

2. select the the collection object and the Collection Object window will open.
3. Open a preview window of the image from your web folder so that you can compare the information from the image with the information in the database. Sometimes numbers are entered incorrectly in the image title, or data is incorrect or incomplete in the database. Check to see if the information is correct for Collecting Event, Taxon name, and Number of Pieces. If there are any major differences, then we will need to figure out the problem before you proceed. If the number of pieces is close, say off by 1 or 2 pieces, then go ahead and change the number in the database. If the specimen taxon name is not present in the database, then you can add the name. Type the genus name and a drop-down list should appear, select the full taxon name from the list. If you do not see the name in the list, DO NOT add a new name. If there is a Taxon name, but it is different than the label, do not change the name. Discontinue that image attachment until we figure out the problem. Keep in mind that there may be other taxon name qualifers that need to be added to the Qualifier field, like question marks, aff., or cff., for example. Use the provided drop-down list in Qualifier for those. Also, if the specimen is a type specimen, the Type Status field should be filled as well. Discontinue that image attachment if you have any questions about the specimen, and move on to the next. If the Collecting Event information is incorrect or missing in the database, DO NOT make any changes unless you have been trained in Collecting Events.

4. Now you will attach your images. Scroll to Inventory and Preparations. You will be attaching your images to the preparations section. Keep in mind that one catalog number may have more than one preparation. You will need to be sure that you are attaching the correct image with the correct preparation. Click the attachment button, and select New. (need to add an image of what this looks like. It's easy to miss.) Where it stays Inventory and Preparations there will be a number next to it. (1) If it is more then one, they you will need to choose which preparation before adding an image.
5. Select Choose File and browse to your web folder. Select the image that you want to attach and it will appear in the attachment window. If there are more images that you need to attach, click New and add each image until you are finished. If you accidentally select New but do not attach another image, you will need to delete the "empty image" before you move one. Close the attachment box and remember to click Save at the bottom right side of the Collection Object screen. Be very careful not to select Delete :)

6. You are done. Go back to your Web folder and drag the completed images into the Done folder. If there are images that you cannot add because of data issues, you can create a folder called Problems, and set those images aside. I usually create a text file with a list of each image problem so that I don't have to remember later.