Eloqua is a email marketing tool that replaced iModules in December 2016. In order to access Eloqua, you must first attend a training session (VI250).
How to create your HTML email
1. Find a saved template
They will located in the Assets–>Emails–>All Files–>UGST–>Newsletter folder. Find your department's template and save a copy to update using the naming conventions below.
2. Update your email
Be sure to update the default ‘reply to’ address when sending your newsletter. To make this change, go to the Actions menu (the double arrow at the top right), choose ‘Settings’, and type your reply-to name and address in the Reply-to fields (under the ‘Advanced’ heading). Otherwise, your email will go to utemail@fortyacres.utexas.edu. Also, be sure to update your email subject line.
3. Send yourself a test preview
To preview your email, go to the Actions menu (the double arrow at the top right), and choose "Test Content."
4. Prepare your list
Name your list using these naming conventions: CSU(Subdept)_FY_Purpose_Name_Asset Type. Example: UGST_FY 16-17_Event_FRR _Invite1_SEG.xls
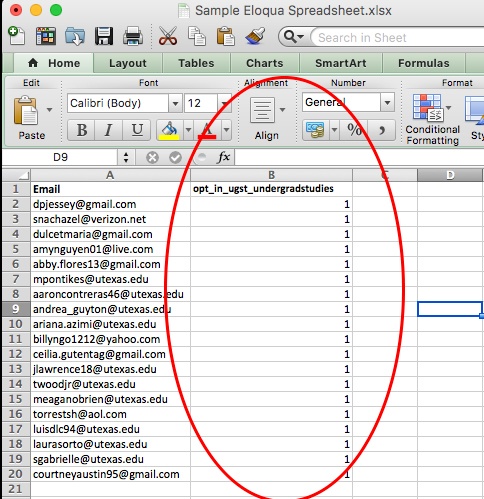
If you are uploading a contacts spreadsheet, be sure to include a 2nd column that includes "opt_in_ugst_undergradstudies" on the first row, followed by 1's for each row of email addresses. This will ensure the email address will be opted-in to the newsletter.
Example:
5. Create your segment
To create a new segment, go to Audience –> Segments –> Create a Segment –> Blank Segment –> Plus Button –> Upload Contacts. Drag the file and check for errors. Click "next step." In the Contact Upload Wizard, double-click each row under the Target Field column and choose the menu item that matches the Source Field.
Example:

Next, be sure to name your segment (click on the left-hand corner) and save it in the UGST folder (click on the right hand corner next to the Actions menu).
Note: If you are re-using an old segment, go to Audience –> Segments –>All Files –>UGST Folder, and search for your file there.
6. Create your campaign
To schedule your email, go to Orchestration –> Campaigns –> Create a Simple Campaign. Here you will:
- Name your campaign and identify campaign type (choose "Simple")
- Select Recipients (choose "Select Segment")
- Select an email (choose "Upload an Email")
- Email Delivery (choose "Schedule For a Later Time")
Naming Conventions: Newsletter
Naming conventions for your newsletter are extremely important when working in Eloqua. Use this naming convention when creating your work: CSU(Subdept)_FY_Purpose_Name_Asset Type
CSU(Subdept): The four-letter code for the CSU. The School of Undergraduate Studies's CSU code is UGST.
FY: the fiscal year. This should use seven characters formatted as such: FY16-17
Purpose: Newsletter, Event, Solicitation, Promotional, Informational, Features, Professional Development, and Class Year Marketing are available options.
Name: The campaign name.
Asset Type: This will be a two or three character code to abbreviate the type of asset you're creating. These are the pieces that make up your campaign as a whole and include Emails, Forms, Landing Pages, Segments, Lists, and Filters. In the case of campaigns using multiple emails, landing pages, etc, append the end of the Asset type and include a more specific name, i.e. EML1_EmailIntro, EML2_EmailFollowup. The codes for the assets you'll be using are listed below.
| Asset Type | Asset Code |
|---|---|
| Campaign | CMP |
| EML | |
| Filter | FLT |
| Form | FRM |
| Landing Page | LP |
| List | LST |
| Segment | SEG |
Example: UGST_FY 16-17_Newsletter_Compass Points February 2017_EML
Naming Conventions: Images
To keep track of our images, please use the following naming convention: CSU(Subdept)_NewsletterAbbreviation_Name.jpg
CSU(Subdept): UGST
Newsletter Abbreviation: OURnewsletter, VICKnewsletter, CPnewsletter, BDPnewsletter, FRRnewsletter, etc.
Name: name your image
Reminders
- If you are new to Eloqua, let Lane Mann know that you need to be added to the contacts list so you can send yourself email previews.
- Be sure to save your images in the appropriate folders.
- When adding a link to your text, use the "Hyperlink Tools" box and click on "Manage Links." Here you'll be able to "Track Links" and view analytics after sending your email. This is helpful if you want to view the percentage of people who clicked on your link and who specifically clicked on a link.
Resources
Eloqua Support List Serve: eloqua-support@utlists.utexas.edu