Page History
| Panel | ||||||||
|---|---|---|---|---|---|---|---|---|
| ||||||||
|
| Warning | ||
|---|---|---|
| ||
For security purposes, several Zoom features have been changed or restricted. Please see the following sections regarding: |
| Info | ||
|---|---|---|
| ||
If any of the options discussed below are not available to you, please be sure that you're using the latest version of Zoom. |
| Multiexcerpt | ||||
|---|---|---|---|---|
| ||||
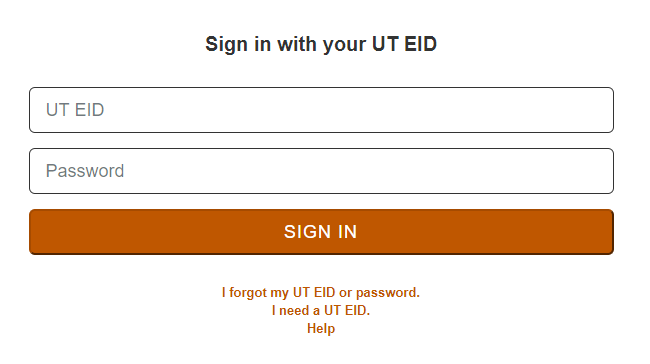
Signing in with SSOIn order for you and your students to have to the best ease of use and to take full advantage of Zoom, please be sure that each of you are signed into Zoom using SSO (your UT Zoom account) and not a personal Zoom account.
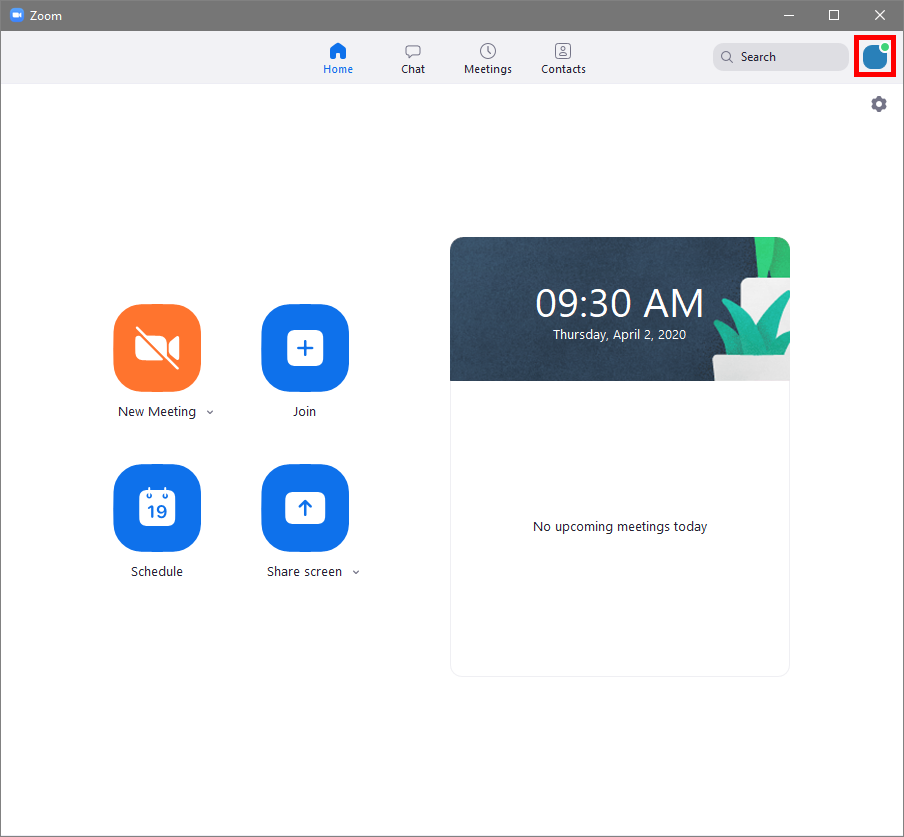
Signing In and Out of ZoomYou can find detailed instructions for signing in and out of Zoom here. Verifying That You're Signed In With Your UT Zoom Account
Switching Zoom Accounts
|


| Multiexcerpt | ||
|---|---|---|
| ||
Enabling Private ChatPrivate chat allows individual participants of your meetings to communicate with each other directly, via 1-to-1 messaging that are is not visible to other participants. Private chat between participants is disabled by default. To enable:
|

| Multiexcerpt | ||||||||||||||||||||
|---|---|---|---|---|---|---|---|---|---|---|---|---|---|---|---|---|---|---|---|---|
| ||||||||||||||||||||
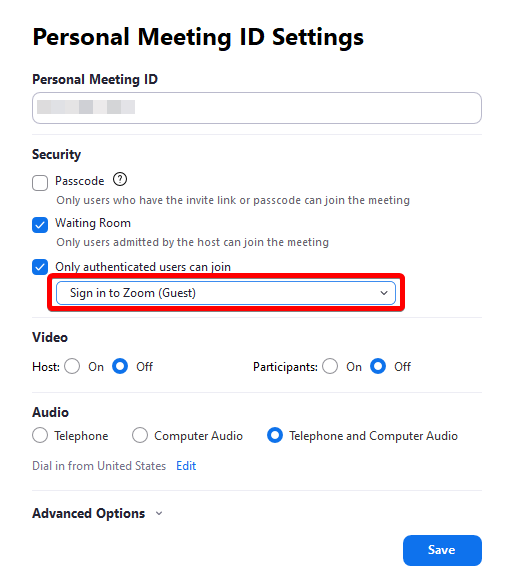
Allowing Outside ParticipantsFor security reasonsTo prevent unauthorized access, Zoom meetings have been restricted such that they can only be joined by individuals who have a Zoom account - either through UT or their own Pro or free Zoom account. By default, all Zoom meetings are restricted to only allow UT Zoom accounts to join as participants. Other non-UT Zoom accounts, like free accounts, will be prevented from joining the meeting. created with your UT Zoom account are restricted by default to participants that also have a UT Zoom account. Participants attempting to join with a non-UT Zoom account, such as their personal Zoom account or a Zoom account provided by another institution, will not be able to join.
Enable Outside Participants for a Scheduled Meeting
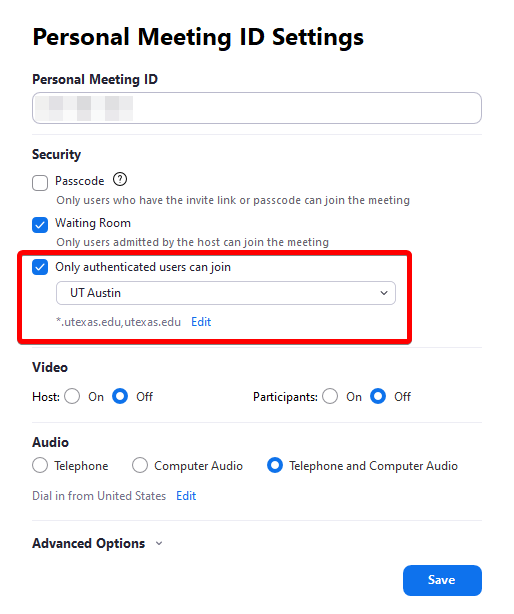
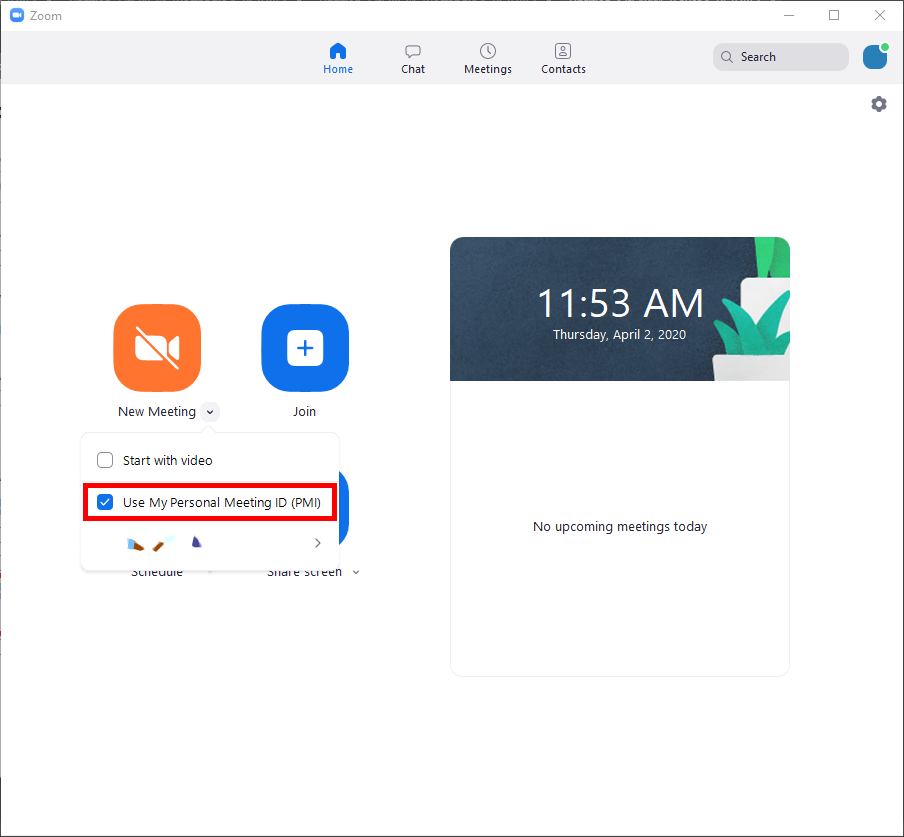
Enabling Outside Participants for an Ad-Hoc MeetingIf you'd like to allow outside participants to access meetings created using the "New Meeting" button, you'll need to make changes to the settings for your Personal Meeting ID (PMI).
Warning | | |||||||||||||||||||
|


| Note | ||
|---|---|---|
| ||
Meetings created with your UT Zoom account are required to have at least one of the available security options enabled. You will be unable to start or schedule a meeting if all of the security options are disabled. |
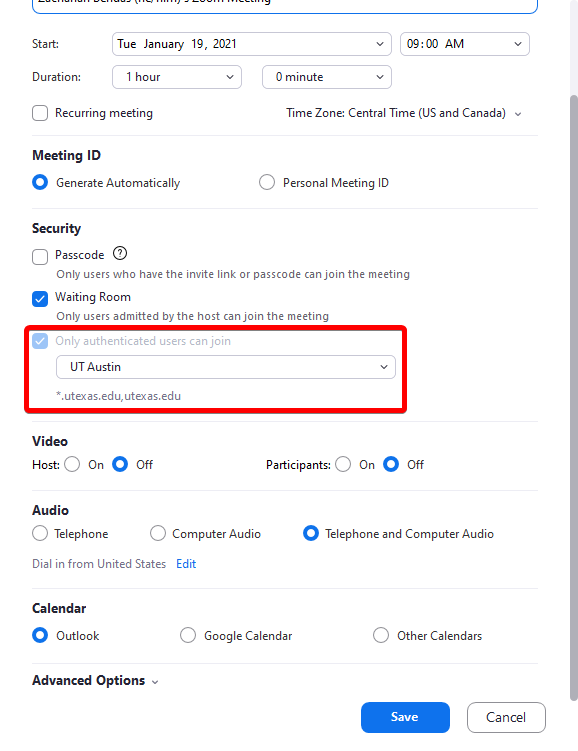
Waiting Room
The Waiting Room feature is enabled by default, and is most useful in combination with the "Only authenticated users can join" option described above, but can be enabled on its own.
When enabled, the Waiting Room will automatically hold meeting participants when they join the meeting. They will be shown a message indicating that they are in the waiting room. The meeting's hosts or co-hosts can then admit all participants that are in the waiting room or admit participants individually.
| Note | ||
|---|---|---|
| ||
If you have both Waiting Room and "Only authenticated users can join" features enabled, participants who are logged in with a UT Zoom account will automatically bypass the waiting room. If you intend for all participants to be held in the waiting room, please disable "Only authenticated users can join". |
To enable the Waiting Room feature:
- Begin creating your meeting as usual, with your desired settings
- Check the box next to "Waiting Room"

- Click "Save" to create your meeting
Passcode
If you enable the Passcode feature, your participants will need to join your Zoom meeting directly with the invite link you provide them, or, if they join using the meeting ID, they will be prompted to provide the passcode that was set for the meeting.
| Note |
|---|
If you enable the Passcode option and do not send the meeting invitation or invite link to your intended participants, you must provide them with the meeting's passcode. They will be unable to join your meeting without it. |
To enable the Passcode feature:
- Begin creating your meeting as usual, with your desired settings
- Check the box next to "Passcode"

- A passcode will be automatically generated, but you can set it manually, if desired
- Click "Save" to create your meeting
The passcode will be automatically included in the email invitation created by Zoom, and will be embedded in the meeting's invite link.
Meeting Options
Below is a video summarizing Meeting Options and best practices for classes!
- Navigate to http://utexas.zoom.com/
- Then select "Sign In" and enter in your UT EID and password at the prompt
- Select "Settings" from the options along the left-hand side
| Multimedia | ||
|---|---|---|
|
Meeting Controls
Below is a video, provided by Zoom, detailing the controls available to you during a meeting.
| Widget Connector | ||
|---|---|---|
|
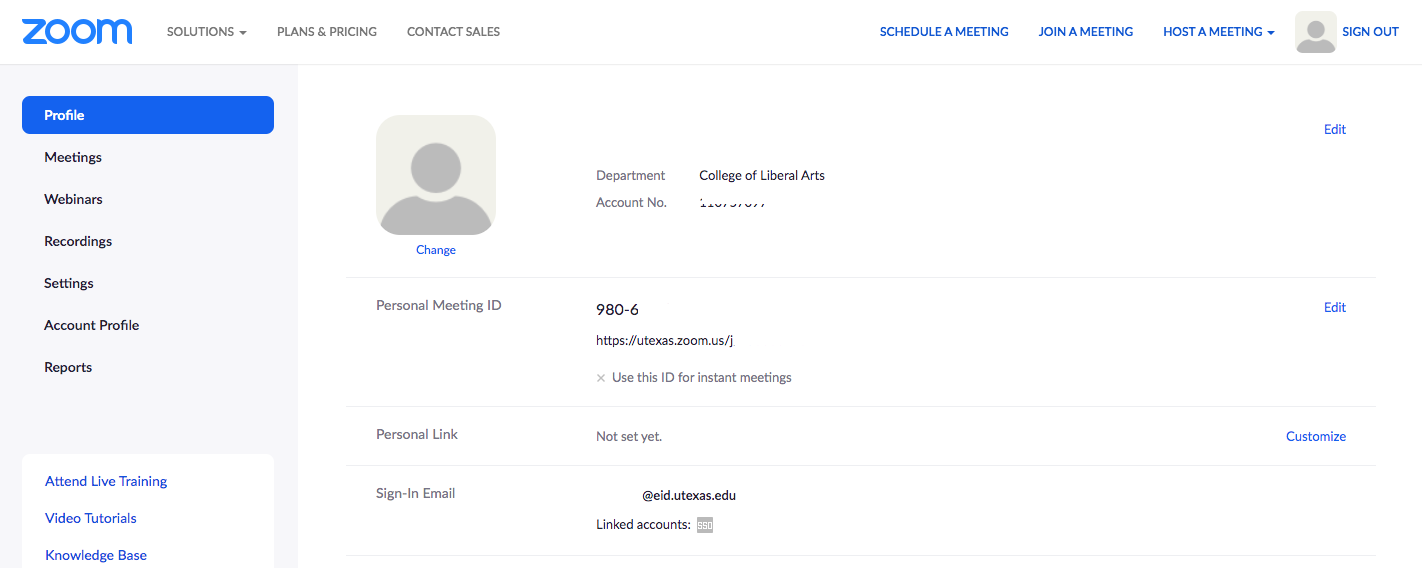
Account Settings
To access to your Account Settings:
- Navigate to http://utexas.zoom.com/
- Then select "Sign In" and enter in your UT EID and password at the prompt
- You'll be presented with the "Profile" page, where you can make changes to your display name with Zoom and several other options.
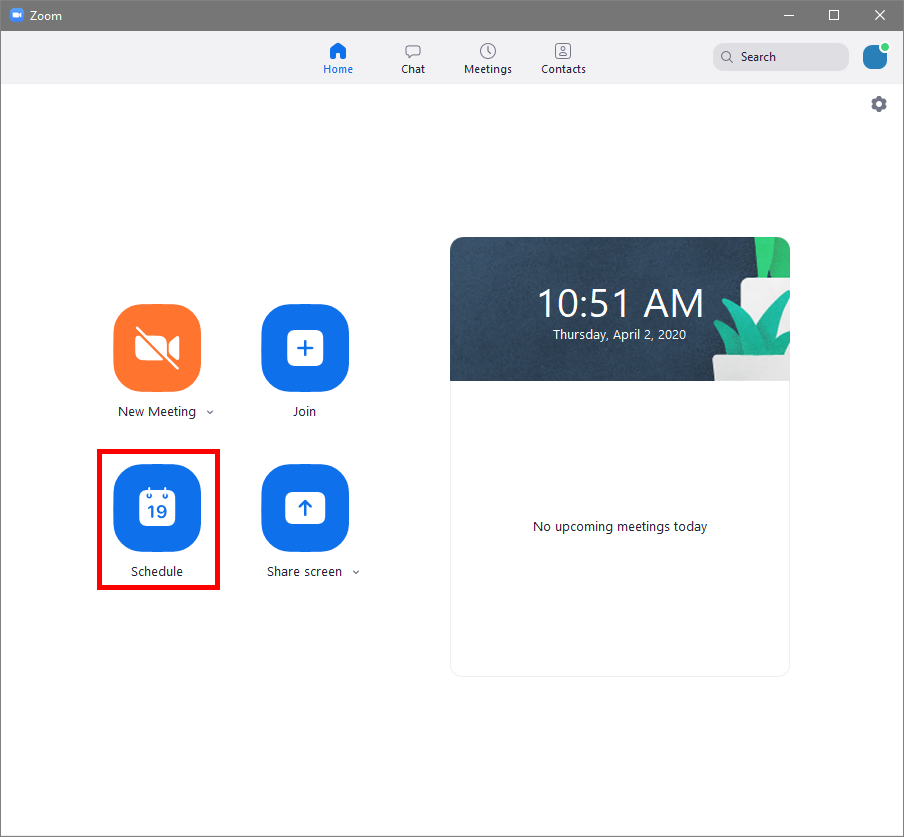
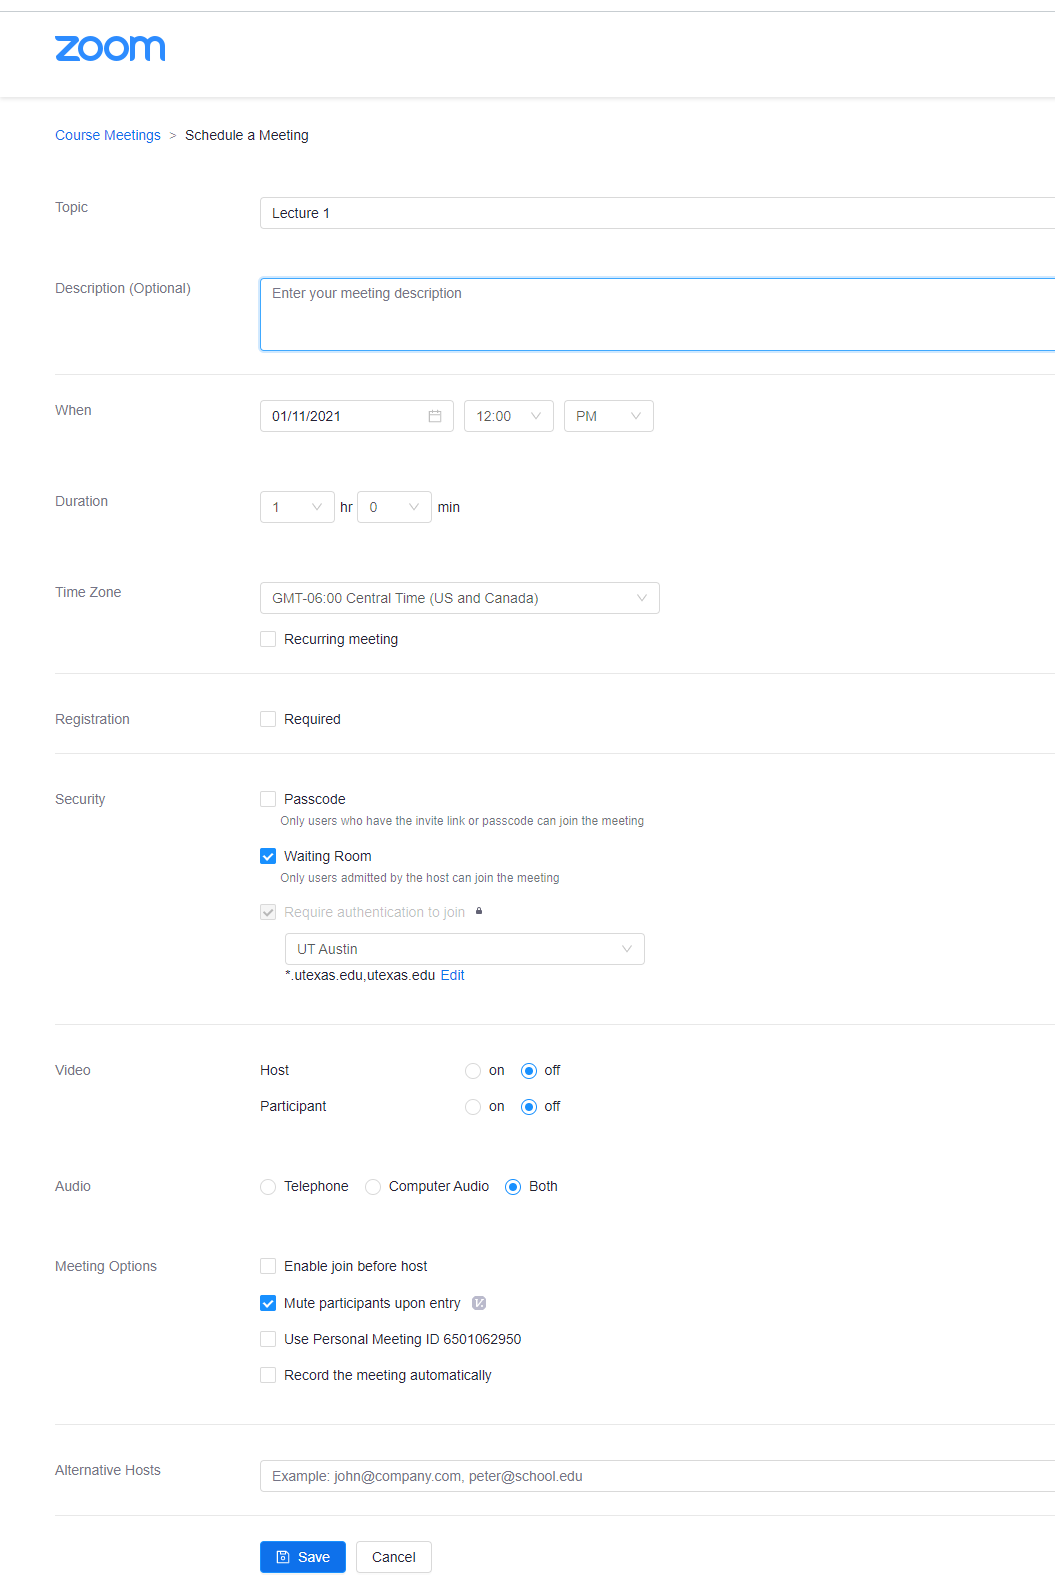
Scheduling a Meeting via the Zoom Portal
To schedule a meeting:
- Navigate to http://utexas.zoom.com/
- Then select "Sign In" and enter in your UT EID and password at the prompt
- Select "Meetings" from the options along the left-hand side
- Click "Schedule a New Meeting" to begin creating your new meeting

Scheduling Options
| Note |
|---|
UT Zoom users have a meeting duration limit of 24 hrs. |
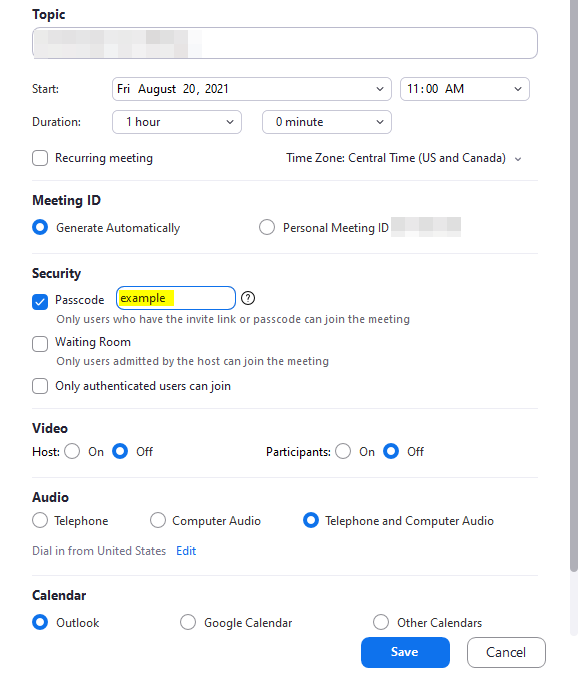
When you want to Schedule a Meeting, you can customize your meeting with the following options:
- Topic: Enter a topic or name for your meeting.
- Start: Select a date and time for your meeting. You can start your meeting at any time before the scheduled time.
- Duration: Choose the approximate duration of the meeting. This is only for scheduling purposes. The meeting will not end after this length of time.
- Time Zone: By default, Zoom will use your computer's time zone. Click the drop-down menu to select a different time zone.
- Recurring meeting: Choose if you would like a recurring meeting
- This feature is extremely useful for online class meetings, as it can be posted in Canvas without needing to create a new meeting for each class session
- The meeting ID will remain the same for each session of a recurring meeting
- Security:
Passcode: Require all participants to input the chosen password when joining the meeting.
- This setting is not enabled by default, as it may make it more difficult for students to join class sessions and requires dissemination of the password beforehand.
- Waiting Room: Places incoming participants into the "Waiting Room" until admitted by the host.
- This setting can be useful for Office Hours use cases, where you want to only speak to a specific participant or number of participants at a time.
- Require authentication to join: Restrict this meeting to UT Zoom users, by default.
- Please see Allowing Outside Participants for more information on this option.
- Video:
- Host: Choose if you would like the host video on or off when joining the meeting. Even if you choose off, the host will have the option to start their video.
- Participant: Choose if you would like the participants' videos on or off when joining the meeting. Even if you turn off, the participants will have the option to start their video.
- Audio: Choose whether to allow users to call in via Telephone only, Computer Audio only, or Both.
Advanced Options: If the "Advanced Options" section is collapsed, click on the arrow to expand it and view additional meeting options.
- Allow participants to join before start time or Allow participants to join anytime: Allow participants to join the meeting without you or before you join.
- Mute participants on entry: If join before host is not enabled, this will mute participants as they join the meeting. Participants can unmute themselves after joining the meeting.
Note We highly recommend that this option be used whenever possible, for whatever classroom environment you may be emulating. This allows students who may be in loud areas, who may not be quite yet prepared for class, or who might have any other myriad ongoing situation, to join the meeting without interrupting the flow of instruction or otherwise disrupting the instructor or other students. For this reason, this option is enabled by default. - Note: To mute all participants currently in a meeting, see the options to manage participants.
- Use Personal Meeting ID: Check this if you want to use your Personal Meeting ID. If not selected, a random unique meeting ID will be generated.
- Record the meeting automatically: Check this if you want the meeting to be automatically recorded. Select if you want it to be recorded locally (to your computer) or to the cloud (zoom.us/recording).
- It is highly recommended that class sessions be set to record to the cloud, as this allows them to be most easily made available to your students via Canvas
- Alternative hosts: Enter the email address (the-users-EID@eid.utexas.edu) of another Zoom user who is Licensed - to allow this user to start the meeting in your absence. Read more about Alternative Hosts.
Student Notifications
By default, once your meeting is scheduled, students will NOT receive an email notification.
- However, it will create a calendar event in the student's Canvas account.
- Notifications are only sent if a student has enabled the Canvas Calendar to send him/her a notification (this is not enabled by default).
The meeting will appear like below on the students' Canvas Calendar: 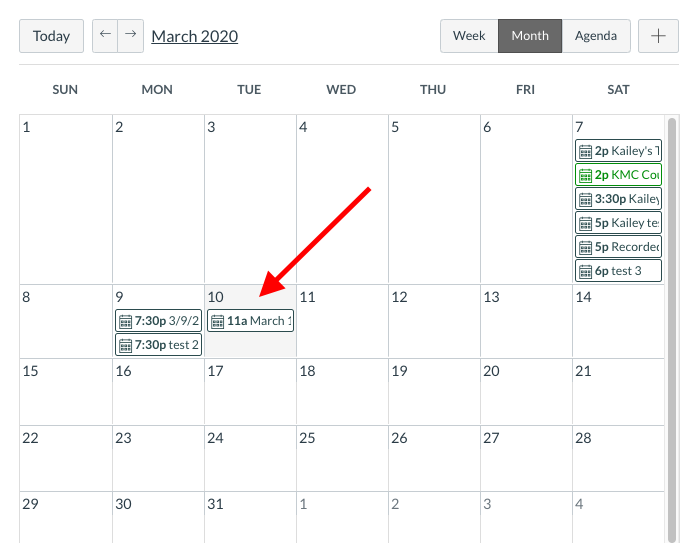
Overview
Content Tools