Page History
By Susanne Kraft susanne.kraft@austin.utexas.edu
This set up is designed using our DIGI 002 ProTools LE Suites on CMB first floor
| Plug in and Thread the in and | |
| | |
Plug in the Bananna plugs into the back of the deck to the “Fully | | |
This will send the signal to the Digi 002 channel 2 “Line” input. | | |
Put the deck in Playback | ||
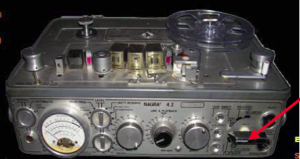
| This is an example of the tape threaded properly on the Nagra | |
| Make sure the POWER is set to External not Batteries to power the unit. | |
| Double check that the Bananna plugs and plugged into the back of the deck to the "Fully Floating Line Output" Left and Right | |
| This will send the signal to the Digi 002 channel 2 "Line" input. Adjust the input gain on channel 2 to good level |


- Go to >File > New Session and name/save it to the Storage drive.
...

...
- Go to >File > New track and choose how many and what type of track you want
...
- to make
...

...
- In protools choose what channels to input by selecting the correct I/O. To
...
- show the I/O view go to >Display >Edit window shows > I/O view.
...
...
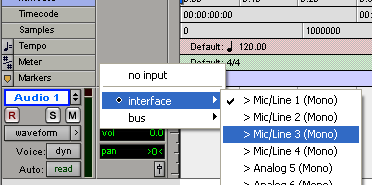
- In the I/O view you can select input and output by clicking on the Mic/Line
...
- 1 input. When this is clicked choose what source.
Ch1=MIC CH2=Nagra CH3&4=DAT etc. . .
...

...
- To choose to digitize from Nagra select Mic/Line 2 as the source.
...
...
- Enable the track for recording by pressing the R button
...

...
- The button will turn red and then on the transport click the red record button
...
- as well. Then play the Nagra tape and click the play button to start recording on the
...
- protools track.
...


...
- Adjust the gain on the channel by turning
...
- 'Gain" knobs on the 002 labeled in
...
- yellow @ the upper left corner of the 002 board. Levels should be around where
...
- the green turns to yellow on the meter. If it is hitting the red it is too hot.
...

...
12. To stop recording hit the space bar.
...
Overview
Content Tools