Page History
In order to comply with updated University policy, LAITS Computer Support is completing a project to migrate the Endpoint Management (EPM) software for MacOS macOS systems, JAMF, from our current LAITS hosted system to the central campus hosted system. Although we We will be pushing the migration in the coming weeks and months, however you can choose to have your system migrated now. Please see the section marked Self Service for instructions on initiating the migration yourself.
If you haven't migrated before the required initiation, you will see the workflow beginning with step 3 below.following workflow.
Forced Migration
- Once your computer is queued for migration, you will receive this popup on your screen:

- Click continue and you will see a notification bubble in the top right corner of the screen that should look like this:

- Click the notification and you will be presented with the following screen. Click allow when prompted and authenticate with your username and password if asked:

- If you see any popups telling you that a System Extension has been blocked, please dismiss them by clicking on OK. The system extensions will be automatically approved once your computer is enrolled in the central Jamf instance. These popups should look like the following:


- After dismissing the System Extension notifications and approving the device enrollment, verify that your computer has been successfully migrated. The Profiles pane in System Preferences or (System Settings if your computer has already been updated to macOS Ventura) will look like the following image if the migration was successful:

Another way to confirm that the migration was successful is to launch the Self Service application and check the branding. The simplest way to do this is to click the magnifying glass in the top right corner of your screen to activate Spotlight search and type 'UT Self Service' and press enter. If you had used self service in the past, you may remember that the LAITS logo was used as the icon. Self Service will now be represented by the UT shield and the program should now look like this:
- Your migration is now complete! If you ran into any problems during this process please give us a call at 512-471-5000 or open a chat with one of our techs at chat.laits.utexas.edu. If you are on campus, you may also stop by one of our helpdesk locations in PAR 106 or RLP 4.224 any time Monday through Friday, 8-5.
Self Service Voluntary Migration
1. To start the migration process you will open the LAITS Self Service Application and select the "Migrate to Campus JAMF" option. It should be the first available in the list.
(If instead of the "LAITS Self Service" Application you see "UT Self Service" in your application folder this means your computer has already been migrated.)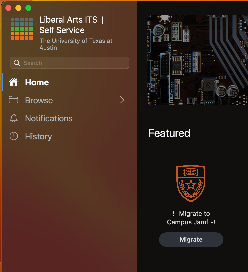
...
3. The next screen you will see will confirm you want to migrate your computer:
4. Follow the steps at the beginning of this page under Forced Migration to complete enrollment in the new Jamf instance.
Overview
Content Tools