Page History
The First step is to do a Sequence Export that Matches the Sequence settings. This will be your VIDEO file that you will combine with your surround sound mix. |  |
| Go to >Sequence>Sequence Settings |
|
Sequence Settings most common: Look at the Timecode - should be 23.976 or 24 Frame size should be 4096 x 2160 or 3840 x 2160 or 2048 x 1152 Working Color Space REC 709 NOTE WHAT ASPECT RATIO OF THE SEQUENCE |
|
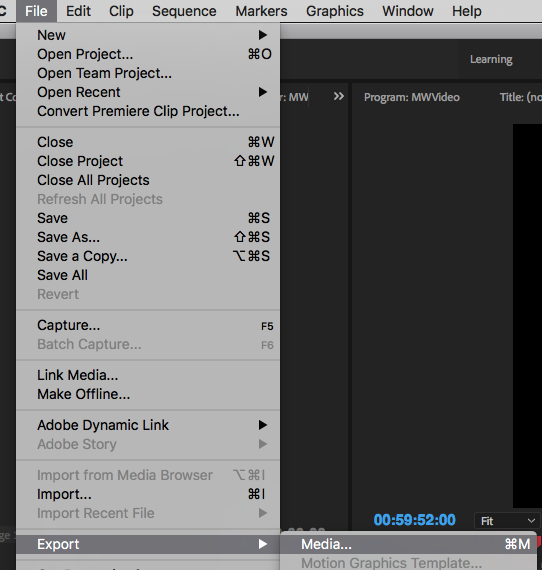
| Export it go to >File>Export>Media |
|
| Select the final timeline you want to export and choose >File>Export>Media |
|
Name your file Choose Format > DNxHR/DNxHD MXF OP1a Video Codec DNxHR HQ 8-bit |
|
Then choose the frame size of your tmeline >4K >UHD >Full HD Depending what your timeline aspect ratio |
|
Frame Rate should be 23.98 |
|
>Click on the Output Name Title it and choose where you want to save the file by clicking on Location |
|
| Choose the destination for the file Save it to your storage drive etc. . . |
|
Click on Export in the lower right corner |
|
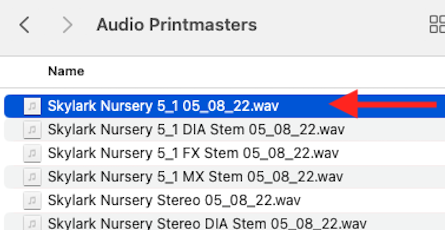
The file will export for a bit so wait for that. In the meantime locate your Sound Mix files. The sound mixer should of exported a Surround Interleaved 5.1 .wav file |
|
The file should look similar to this 5_1.wav file Don't want the ones labeled Stem they are not the full mix |
|
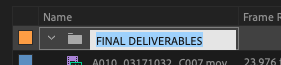
We suggest making a new Bin to put the final files into for organization >File>New>Bin |
|
Title the bin >Final Deliverables or similar then open the Bin to import the image and sound files into |
|
Import the 5.1 Interleaved File into your Premiere Project RT click in the new bin and choose Import |
|
Select the file and import |
|
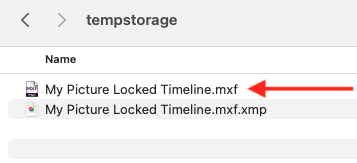
Import the Video File you just exported that matched the Sequence Settings Choose only the .mxf that exported there will also be a .xmp but you can ignore that |
|
Click on the New Item and choose Sequence |
|
Choose Sequence |
|
Choose DNxHR HQ 2K 23.976 |
|
Click on the Settings TAB Editing Mode - Choose Custom 1998 x 1080 settings for FLAT DCP's or 2048 x 858 for SCOPE DCP's If you do not know if your film is flat or scope?? Do you have bars on the top and bottom of your image to make it look wide screen? Then your film is scope. If you do not have bars then it's flat. Still confused? Ask tech staff to help. DONT' HIT OKAY YET |
|


Go to the Video Previews |
|
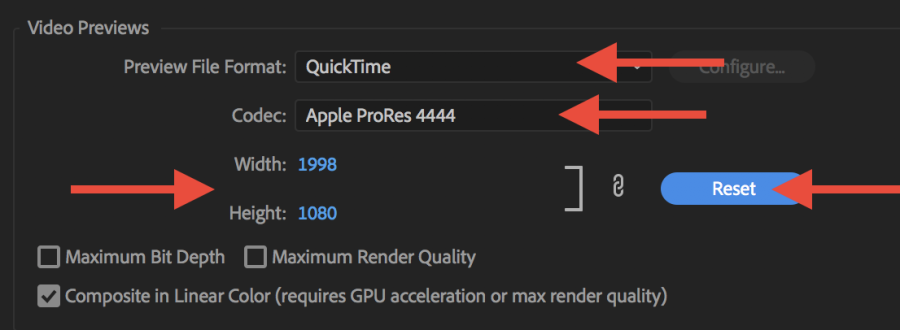
Change the Codec to Apple ProRes 4444 |
|
DCP – Settings - Double check to make sure this all looks correct
Video Previews need to match these settings as well Preview File Format to QuickTime
Then click on Reset and that will change the Width and Height to match Video Custom Settings. DONT' HIT OKAY YET |
|


...
Overview
Content Tools