...
| Tip | ||
|---|---|---|
| ||
Use our summer school reservation (BIO_DATA_week_1CoreNGS-Tue) when submitting batch jobs to get higher priority on the stampede2 ls6 normal queue during this course today:
Note that the reservation (BIO_DATA_week_1name (CoreNGS-Tue) is different from the TACC allocation/project for this class, which is UT-2015-05-18 OTH21164. |
| Table of Contents |
|---|
| Anchor | ||||
|---|---|---|---|---|
|
When you SSH into stampede2 ls6, your session is assigned to one of a small set of login nodes (also called head nodes). These are not separate from the cluster compute nodes that will run your jobs.
Think of a node as a computer, like your laptop, but probably with more cores and memory. Now multiply that computer a thousand or more, and you have a cluster.
...
The small set of login nodes are a shared resource (type the users command to see everyone currently logged in) and are not meant for running interactive programs – for that you submit a description of what you want done to a batch system, which farms distributes the work out to one or more compute nodes.
...
- Do not perform substantial computation on the login nodes.
- They are closely monitored, and you will get warnings from the TACC admin folks!
- Code is usually developed and tested somewhere other than TACC, and only moved over when pretty solid.
- Do not perform significant network access from your batch jobs.
- Instead, stage your data onto $SCRATCH from a login node onto $SCRATCH before submitting your job.
...
Lonestar6 and Stampede2 overview and comparison
Here is a comparison of the configurations and ls5 ls6 and stampede2. As you can see, stampede2 is the larger cluster, launched in 2017, but ls6, launched om 2022, has fewer but more powerful nodes.
| ls5ls6 | stampede2 | |
|---|---|---|
| login nodes | 63 20 128 cores each | 6 28 cores each |
| standard compute nodes | 560 AMD Epyc Milan processors 128 1,252 24 cores per node (48 virtual) | 4,200 KNL (Knights Landing) processors
1,736 SKX (Skylake) processors
|
| large memory GPU nodes | 16 AMD Epyc Milan processors 128 cores per nod 2x NVIDIA A100 GPUs 10 total 2 w/1 TB memory, 48 cores | -- |
| batch system | SLURM | SLURM |
| maximum job run time | 48 hours, normal queue 2 hours, development queue | 96 hours on KNL nodes, normal queue 48 hours on SKX nodes |
Note the use of the term virtual core above. Compute cores are standalone processors – mini CPUs, each of which can execute separate sets of instructions. However modern cores may also have hyper-threading enabled, where a single core can appear as more than one virtual processor to the operating system (see https://en.wikipedia.org/wiki/Hyper-threading for more on hyper-threading). For example, Lonestar5 nodes have 2 hyperthreads (HTs) per core. So with 2 HTs for each of the 24 physical cores, each node has a total of 48 virtual cores.
User guides for ls5 and stampede2 can be found at:
, normal queue 2 hours, development queue |
User guides for ls6 and stampede2 can be found at:
- https://portal.tacc.utexas.https://portal.tacc.utexas.edu/user-guides/stampede2lonestar6
- https://portal.tacc.utexas.edu/user-guides/lonestar5stampede2
Unfortunately, the TACC user guides are aimed towards a different user community – the weather modelers and aerodynamic flow simulators who need very fast matrix manipulation and other high performance computing High Performance Computing (HPC) features. The usage patterns for bioinformatics – generally running 3rd party tools on many different datasets – datasets – is rather a special case for HPC. TACC calls our type of processing "parameter sweep jobs" and has a special process for running them, using their launcher module.
Software at TACC
Programs and your $PATH
When you type in the name of an arbitrary program (ls for example), how does the shell know where to find that program? The answer is your $PATH. $PATH is a pre-defined environment variable whose value is a list of directories.The shell looks for program names in that list, in the order the directories appear.
To determine where the shell will find a particular program, use the which command:
| Code Block | ||||
|---|---|---|---|---|
| ||||
which rsync
which cat |
The module system
The module system is an incredibly powerful way to have literally thousands of software packages available, some of which are incompatible with each other, without causing complete havoc. The TACC staff builds the desired package from source code in well-known locations that are NOT on your $PATH. Then, when a module is loaded, its binaries are added to your $PATH.
For example, the following module load command makes the fastqc FASTQ file quality checking program available to you:
| Code Block | ||||
|---|---|---|---|---|
| ||||
# first type "fastqc" to show that it is not present in your environment:
fastqc
# it's not on your $PATH either:
which fastqc

# now add fastqc to your environment and try again:
module load fastqc
fastqc --help
# and see how it's now on your $PATH:
which fastqc
# you can see the new directory at the front of $PATH
echo $PATH

# to remove it, use "unload"
module unload fastqc
fastqc
# gone from $PATH again...
which fastqc |
module spider
These days the TACC module system includes hundreds of useful bioinformatics programs. To see if your favorite software package has been installed at TACC, use module spider:
| Code Block | ||
|---|---|---|
| ||
module spider fastqc
module spider samtools
|
TACC BioContainers modules
It is quite a large systems administration task to install software at TACC and configure it for the module system. As a result, TACC was always behind in making important bioinformatics software available. To address this problem, TACC moved to providing bioinformatics software via containers, which are virtual machines like VMware and Virtual Box, but are lighter weight: they require less disk space because they rely more on the host's base Linux environment. Specifically, TACC (and many other High Performance Computing clusters) use Singularity containers, which are similar to Docker containers but are more suited to the HPC environment (in fact one can build a Docker container then easily convert it to Singularity for use at TACC).
TACC obtains its containers from BioContainers (https://biocontainers.pro/ and https://github.com/BioContainers/containers), a large public repository of bioinformatics tool Singularity containers. This has allowed TACC to easily provision thousands of such tools!
These BioContainers are not visible in TACC's "standard" module system, but only after the master biocontainers module is loaded:
| Code Block | ||
|---|---|---|
| ||
# Make sure the non-biocontainers version of fastqc is not loaded
module unload fastqc
# Verify that fastqc is not available
fastqc

# Load the Biocontainers master module (this takes a while)
module load biocontainers

# Now look for these programs
module spider kallisto
module spider bowtie2
module spider minimap2
module spider multiqc
module spider GATK
module spider velvet |
Notice how the BioContainers module names have "ctr" in their names, version numbers, and other identifying information.
| Tip |
|---|
The standard TACC module system is being phased out in favor of the new BioContainers module, so use BioContainers modules instead. |
loading a biocontainer module
Once the biocontainers module has been loaded, you can just load the desired tool module, as with the kallisto pseudo-aligner program below.
| Code Block | ||
|---|---|---|
| ||
# Load the Biocontainers master module
module load biocontainers

# Load the default kallisto biocontainer
module load kallisto

# Verify kallisto is not available (although not on login nodes)
kallisto |
Note that loading a BioContainer does not add anything to your $PATH. Instead, it defines an alias, which is just a shortcut for executing the command. You can see the alias definition using the type command. And you can ensure the program is available using the command -v utility.
| Code Block | ||
|---|---|---|
| ||
# Note that kallisto has not been added to your $PATH
which kallisto

# Instead, an alias has been defined. Use type to see its definition
type kallisto

# Ensure kallisto is available with command -v
command -v kallisto |
installing custom software
Even with all the tools available at TACC, inevitably you'll need something they don't have. In this case you can build the tool yourself and install it in a local TACC directory. While building 3rd party tools is beyond the scope of this course, it's really not that hard. The trick is keeping it all organized.
For one thing, remember that your $HOME directory quota is fairly small (10 GB on stampede2), and that can fill up quickly if you install many programs. We recommend creating an installation area in your $WORK2 directory and installing programs there. You can then make symbolic links to the binaries you need in your $HOME/local/bin directory (which was added to your $PATH in your .bashrc).
See how we used a similar trick to make the launcher_creator.py program available to you. Using the ls -l option shows you where symbolic links point to:
| Code Block | ||||
|---|---|---|---|---|
| ||||
ls -l ~/local/bin |
| Expand | ||
|---|---|---|
| ||
|
| Warning | ||
|---|---|---|
| ||
Remember that the order of locations in the $PATH environment variable is the order in which the locations will be searched. In particular, the (non-BioContainers) module load command adds to the front of your path. This can mask similarly-named programs, for example, in your $HOME/local/bin directory. |
...
Job execution is controlled by the SLURM batch system on both stampede2 and ls5.
To run a job you prepare 2 files:
- a commands file file containing the commands to run, one command per line (<job_name>.cmds)
- a job control file that describes how to run the job (<job_name>.slurm)
The process of running the job involves these steps:
- Create a commands file containing exactly one command per line.
- Prepare a job control file for the commands file that describes how the job should be run.
- You submit the job control file to the batch system. The job is then said to be queued to run.
- The batch system prioritizes the job based on the number of compute nodes needed and the job run time requested.
- When compute nodes become available, the job tasks (command lines in the <job_name>.cmds file) are assigned to one or more compute nodes and begin to run in parallel.
- The job completes when either:
- you cancel the job manually
- all tasks in the job complete (successfully or not!)
- the requested job run time has expired
SLURM at a glance
Here are the main components of the SLURM batch system.
...
About cores and hyperthreads
Note the use of the term virtual core on stampede2. Compute cores are standalone processors – mini CPUs, each of which can execute separate sets of instructions. However modern cores may also have hyperthreading enabled, where a single core can appear as more than one virtual processor to the operating system (see https://en.wikipedia.org/wiki/Hyper-threading). For example, stampede2 nodes have 2 or 4 hyperthreads (HTs) per core. So KNL nodes with 4 HTs for each of the 68 physical cores, have a total of 272 virtual cores.
Threading is an operating system scheduling mechanism for allowing one CPU/core to execute multiple computations, seemingly in parallel.
The writer of a program that takes advantage of threading first identifies portions of code that can run in parallel because the computations are independent. The programmer assigns some number of threads to that work (usually based on a command-line option) using specific thread and synchronization programming language constructs. An example is the the samtools sort -@ N option to specify N threads can be used for sorting independent sets of the input alignments.
If there are multiple cores/CPUs available, the operating system can assign a program thread to each of them for actual parallelism. But only "seeming" (or virtual) parallelism occurs if there are fewer cores than the number of threads specified.
Suppose there's only one core/CPU. The OS assigns program thread A to the core to run until the program performs an I/O operation that causes it to be "suspended" for the I/O operation to complete. During this time, when normally the CPU would be doing nothing but waiting on the I/O to complete, the OS assigns program thread B to the CPU and lets it do some work. This threading allows more efficient use of existing cores as long as the multiple program threads being assigned do some amount of I/O or other operations that cause them to suspend. But trying to run multiple compute-only, no-I/O programs using multiple threads on one CPU just causes "thread thrashing" -- OS scheduler overhead when threads are suspended for time, not just I/O.
The analogy is a grocery store where there are 5 customers (threads). If there are 5 checkout lines (cores), each customer (thread) can be serviced in a separate checkout line (core). But if there's only one checkout line (core) open, the customers (threads) will have to wait in line. To be a more accurate analogy, any checkout clerk would be able to handle some part of checkout for each customer, then while waiting for the customer to find and enter credit card information, the clerk could handle a part of a different customer's checkout.
Hyperthreading is just a hardware implementation of OS scheduling. Each CPU offers some number of "virtual cores" (hyperthreads) that can "almost" act like separate cores using various hardware tricks. Still, if the work assigned to multiple hyperthreads on a single core does not pause from time to time, thread thrashing will occur.
Software at TACC
Programs and your $PATH
When you type in the name of an arbitrary program (ls for example), how does the shell know where to find that program? The answer is your $PATH. $PATH is a predefined environment variable whose value is a list of directories.The shell looks for program names in that list, in the order the directories appear.
To determine where the shell will find a particular program, use the which command. Note that which tells you where it looked if it cannot find the program.
| Code Block | ||||
|---|---|---|---|---|
| ||||
which rsync
which cat

which bwa # not yet available to you |
The module system
The module system is an incredibly powerful way to have literally thousands of software packages available, some of which are incompatible with each other, without causing complete havoc. The TACC staff stages packages in well-known locations that are NOT on your $PATH. Then, when a module is loaded, its binaries are added to your $PATH.
For example, the following module load command makes the singularity container management system available to you:
| Code Block | ||||
|---|---|---|---|---|
| ||||
# first type "singularity" to show that it is not present in your environment:
singularity
# it's not on your $PATH either:
which singularity

# now add biocontainers to your environment and try again:
module load biocontainers
# and see how singularity is now on your $PATH:
which singularity
# you can see the new directory at the front of $PATH
echo $PATH

# to remove it, use "unload"
module unload biocontainers
singularity
# gone from $PATH again...
which singularity |
TACC BioContainers modules
It is quite a large systems administration task to install software at TACC and configure it for the module system. As a result, TACC was always behind in making important bioinformatics software available. To address this problem, TACC moved to providing bioinformatics software via containers, which are virtual machines like VMware and Virtual Box, but are lighter weight: they require less disk space because they rely more on the host's base Linux environment. Specifically, TACC (and many other High Performance Computing clusters) use Singularity containers, which are similar to Docker containers but are more suited to the HPC environment (in fact one can build a Docker container then easily convert it to Singularity for use at TACC).
TACC obtains its containers from BioContainers (https://biocontainers.pro/ and https://github.com/BioContainers/containers), a large public repository of bioinformatics tool Singularity containers. This has allowed TACC to easily provision thousands of such tools!
These BioContainers are not visible in TACC's "standard" module system, but only after the master biocontainers module is loaded. Once it has been loaded, you can search for your favorite bioinformatics program using module spider.
| Code Block | ||
|---|---|---|
| ||
# Verify that samtools is not available
samtools
# and cannot be found in the standard module system
module spider samtools

# Load the BioContainers master module (this takes a while)
module load biocontainers

# Now look for these programs
module spider samtools
module spider Rstats
module spider kallisto
module spider bowtie2
module spider minimap2
module spider multiqc
module spider gatk
module spider velvet |
Notice how the BioContainers module names have "ctr" in their names, version numbers, and other identifying information.
| Tip |
|---|
The standard TACC module system has been phased out for bioinformatics programs, so always look for your application in BioContainers. While it's great that there are now hundreds of programs available through BioContainers, the one drawback is that they can only be run on cluster compute nodes, not on login nodes. To test BioContainer program interactively, you will need to use TACC's idev command to obtain an interactive cluster node. More on this shortly... |
loading a biocontainer module
Once the biocontainers module has been loaded, you can just module load the desired tool, as with the kallisto pseudo-aligner program below.
| Code Block | ||
|---|---|---|
| ||
# Load the Biocontainers master module
module load biocontainers

# Verify kallisto is not yet available
kallisto

# Load the default kallisto biocontainer
module load kallisto

# Verify kallisto is not available (although not on login nodes)
kallisto |
Note that loading a BioContainer does not add anything to your $PATH. Instead, it defines an alias, which is just a shortcut for executing the command. You can see the alias definition using the type command. And you can ensure the program is available using the command -v utility.
| Code Block | ||
|---|---|---|
| ||
# Note that kallisto has not been added to your $PATH, but instead has an alias
which kallisto

# Ensure kallisto is available with command -v
command -v kallisto |
installing custom software
Even with all the tools available at TACC, inevitably you'll need something they don't have. In this case you can build the tool yourself and install it in a local TACC directory. While building 3rd party tools is beyond the scope of this course, it's really not that hard. The trick is keeping it all organized.
For one thing, remember that your $HOME directory quota is fairly small (10 GB on ls6), and that can fill up quickly if you install many programs. We recommend creating an installation area in your $WORK directory and installing programs there. You can then make symbolic links to the binaries you need in your ~/local/bin directory (which was added to your $PATH in your .bashrc).
See how we used a similar trick to make the launcher_creator.py program available to you. Using the ls -l option shows you where symbolic links point to:
| Code Block | ||||
|---|---|---|---|---|
| ||||
ls -l ~/local/bin

# this will tell you the real location of the launcher_creator.py script is
# /work/projects/BioITeam/common/bin/launcher_creator.py |
| Warning | ||
|---|---|---|
| ||
Remember that the order of locations in the $PATH environment variable is the order in which the locations will be searched. |
Job Execution
Job execution is controlled by the SLURM batch system on both stampede2 and ls6.
To run a job you prepare 2 files:
- a commands file file containing the commands to run, one task per line (<job_name>.cmds)
- a job control file that describes how to run the job (<job_name>.slurm)
The process of running the job involves these steps:
- Create a commands file containing exactly one task per line.
- Prepare a job control file for the commands file that describes how the job should be run.
- You submit the job control file to the batch system. The job is then said to be queued to run.
- The batch system prioritizes the job based on the number of compute nodes needed and the job run time requested.
- When compute nodes become available, the job tasks (command lines in the <job_name>.cmds file) are assigned to one or more compute nodes and begin to run in parallel.
- The job completes when either:
- you cancel the job manually
- all job tasks complete (successfully or not!)
- the requested job run time has expired
SLURM at a glance
Here are the main components of the SLURM batch system.
| stampede2, ls5 | |
|---|---|
| batch system | SLURM |
| batch control file name | <job_name>.slurm |
| job submission command | sbatch <job_name>.slurm |
| job monitoring command | showq -u |
| job stop command | scancel -n <job name> |
Simple example
Let's go through a simple example. Execute the following commands to copy a pre-made simple.cmds commands file:
| Code Block | ||||
|---|---|---|---|---|
| ||||
mkdir -p $SCRATCH/core_ngs/slurm/simple
cd $SCRATCH/core_ngs/slurm/simple
cp $CORENGS/tacc/simple.cmds . |
What are the tasks we want to do? Each task corresponds to one line in the simple.cmds commands file, so let's take a look at it using the cat (concatenate) command that simply reads a file and writes each line of content to standard output (here, your Terminal):
| Code Block | ||||
|---|---|---|---|---|
| ||||
cat simple.cmds |
The tasks we want to perform look like this:
| Code Block | ||||
|---|---|---|---|---|
| ||||
sleep 5; echo "Command 1 on `hostname` - `date`" > cmd1.log 2>&1
sleep 5; echo "Command 2 on `hostname` - `date`" > cmd2.log 2>&1
sleep 5; echo "Command 3 on `hostname` - `date`" > cmd3.log 2>&1
sleep 5; echo "Command 4 on `hostname` - `date`" > cmd4.log 2>&1
sleep 5; echo "Command 5 on `hostname` - `date`" > cmd5.log 2>&1
sleep 5; echo "Command 6 on `hostname` - `date`" > cmd6.log 2>&1
sleep 5; echo "Command 7 on `hostname` - `date`" > cmd7.log 2>&1
sleep 5; echo "Command 8 on `hostname` - `date`" > cmd8.log 2>&1 |
There are 8 tasks. Each task sleeps for 5 seconds, then uses the echo command to output a string containing the task number and date to a log file named for the task number. Notice that we can put two commands on one line if they are separated by a semicolon ( ; ).
Use the handy launcher_creator.py program to create the job control file.
| Code Block | ||||
|---|---|---|---|---|
| ||||
launcher_creator.py -j simple.cmds -n simple -t 00:01:00 -a OTH21164 -q development |
You should see output something like the following, and you should see a simple.slurm batch submission file in the current directory.
| Code Block |
|---|
Project simple.
Using job file simple.cmds.
Using development queue.
For 00:01:00 time.
Using OTH21164 allocation.
Not sending start/stop email.
Launcher successfully created. Type "sbatch simple.slurm" to queue your job. |
Submit your batch job then check the batch queue to see the job's status.
| Code Block | ||||
|---|---|---|---|---|
| ||||
sbatch simple.slurm
showq -u

# Output looks something like this:
-------------------------------------------------------------
          Welcome to the Lonestar6 Supercomputer
-------------------- |
Simple example
Let's go through a simple example. Execute the following commands to copy a pre-made simple.cmds commands file:
| Code Block | ||||
|---|---|---|---|---|
| ||||
mkdir -p $SCRATCH/core_ngs/slurm/simple
cd $SCRATCH/core_ngs/slurm/simple
cp $CORENGS/tacc/simple.cmds . |
What are the tasks we want to do? Each task corresponds to one line in the simple.cmds file, so let's take a look at it using the cat (concatenate) command that simply reads a file and writes each line of content to standard output (here, your Terminal):
| Code Block | ||||
|---|---|---|---|---|
| ||||
cat simple.cmds |
The tasks we want to perform look like this:
| Code Block | ||
|---|---|---|
| ||
echo "Command 1 on `hostname` - `date`" > cmd1.log 2>&1
echo "Command 2 on `hostname` - `date`" > cmd2.log 2>&1
echo "Command 3 on `hostname` - `date`" > cmd3.log 2>&1
echo "Command 4 on `hostname` - `date`" > cmd4.log 2>&1
echo "Command 5 on `hostname` - `date`" > cmd5.log 2>&1
echo "Command 6 on `hostname` - `date`" > cmd6.log 2>&1
echo "Command 7 on `hostname` - `date`" > cmd7.log 2>&1
echo "Command 8 on `hostname` - `date`" > cmd8.log 2>&1 |
There are 8 tasks. Each is a simple echo command that just outputs string containing the task number and date to a different file.
Use the handy launcher_creator.py program to create the job submission script.
| Code Block | ||||
|---|---|---|---|---|
| ||||
launcher_creator.py -j simple.cmds -n simple -t 00:01:00 -a UT-2015-05-18 -q normal |
You should see output something like the following, and you should see a simple.slurm batch submission file in the current directory.
| Code Block |
|---|
Project simple.
Using job file simple.cmds.
Using normal queue.
For 00:01:00 time.
Using UT-2015-05-18 allocation.
Not sending start/stop email.
Launcher successfully created. Type "sbatch simple.slurm" to queue your job. |
Submit your batch job like this, then check the batch queue to see the job's status.
| Code Block | ||||
|---|---|---|---|---|
| ||||
sbatch --reservation=BIO_DATA_week_1 simple.slurm
showq -u

# Output looks something like this:
-----------------------------------------------------------------
          Welcome to the Stampede2 Supercomputer
-----------------------------------------------------------------
--> Verifying valid submit host (login3)...OK
--> Verifying valid jobname...OK
--> Enforcing max jobs per user...OK
--> Verifying availability of your home dir (/home1/01063/abattenh)...OK
--> Verifying availability of your work2 dir (/work2/01063/abattenh/stampede2)...OK
--> Verifying availability of your scratch dir (/scratch/01063/abattenh)...OK
--> Verifying valid ssh keys...OK
--> Verifying access to desired queue (normal)...OK
--> Verifying job request is within current queue limits...OK
--> Checking available allocation (UT-2015-05-18)...OK
--> Verifying that quota for filesystem /home1/01063/abattenh is at  0.00% allocated...OK
--> Verifying that quota for filesystem /work2/01063/abattenh/stampede2 is at 16.51% allocated...OK
Submitted batch job 7824769 |
If you're quick, you'll see a queue status something like this:
| Code Block |
|---|
SUMMARY OF JOBS FOR USER: <abattenh> ACTIVE JOBS----------------------------------------- --> Verifying valid submit host (login1)...OK --> Verifying valid jobname...OK --> Verifying valid ssh keys...OK --> Verifying access to desired queue (normal)...OK --> Checking available allocation (OTH21164)...OK Submitted batch job 232542 |
The queue status will show your job as ACTIVE while its running, or WAITING if not.
| Code Block |
|---|
SUMMARY OF JOBS FOR USER: <abattenh> ACTIVE JOBS- JOBID JOBNAME USERNAME STATE NODES REMAINING STARTTIME ================================================================================ 7824769 simple abattenh Running 1 0:00:57 Wed Jun 2 15:29:55 WAITING JOBS------------------------ JOBID JOBNAME USERNAME STATE NODES WCLIMITREMAINING QUEUETIMESTARTTIME ================================================================================ Total Jobs: 1924965 simple abattenh Active Jobs:Running 1 Idle Jobs0:00:42 0 Sat Jun Blocked Jobs: 0 |
If you don't see your simple job in either the ACTIVE or WAITING sections of your queue, it probably already finished – it should only run for a few seconds!
Notice in my queue status, where the STATE is Running, there is only one node assigned. Why is this, since there were 8 tasks?
Every job, no matter how few tasks requested, will be assigned at least one node. Each stampede2 node has 68 physical cores, so each of the 8 tasks can be assigned to a core.
Exercise: What files were created by your job?
| Expand | ||
|---|---|---|
| ||
ls should show you something like this:
The newly created files are the .log files, as well as error and output logs simple.e2916562 and simple.o2916562. |
filename wildcarding
Here's a cute trick for viewing the contents all your output files at once, using the cat command and filename wildcarding.
| Code Block | ||||
|---|---|---|---|---|
| ||||
cat cmd*.log |
The cat command actually takes a list of one or more files (if you're giving it files rather than standard input – more on this shortly) and outputs the concatenation of them to standard output. The asterisk ( * ) in cmd*.log is a multi-character wildcard that matches any filename starting with cmd then ending with .log. So it would match cmd_hello_world.log.
You can also specify single-character matches inside brackets ( [ ] ) in either of the ways below, this time using the ls command so you can better see what is matching:
| Code Block | ||||
|---|---|---|---|---|
| ||||
ls cmd[12345678].log
ls cmd[1-8].log |
3 21:33:31

WAITING JOBS------------------------
JOBID     JOBNAME    USERNAME      STATE   NODES WCLIMIT   QUEUETIME
================================================================================

Total Jobs: 1 Active Jobs: 1 Idle Jobs: 0 Blocked Jobs: 0 |
If you don't see your simple job in either the ACTIVE or WAITING sections of your queue, it probably already finished – it should only run for a few seconds!
Notice in my queue status, where the STATE is Running, there is only one node assigned. Why is this, since there were 8 tasks?
Every job, no matter how few tasks requested, will be assigned at least one node. Each lonestar6 node has 128 physical cores, so each of the 8 tasks can be assigned to a different core.
Exercise: What files were created by your job?
| Expand | ||
|---|---|---|
| ||
ls should show you something like this:
The newly created files are the .log files, as well as error and output logs simple.e924965 and simple.o924965. |
filename wildcarding
You can look at one of the output log files like this:
| Code Block | ||
|---|---|---|
| ||
cat cmd1.log |
But here's a cute trick for viewing the contents all your output files at once, using the cat command and filename wildcarding.
| Code Block | ||||
|---|---|---|---|---|
| ||||
cat cmd*.log |
The cat command can take a list of one or more files. The asterisk ( * ) in cmd*.log is a multi-character wildcard that matches any filename starting with cmd then ending with .log.
You can also specify single-character matches inside brackets ( [ ] ) in either of the ways below, this time using the ls command so you can better see what is matching:
| Code Block | ||||
|---|---|---|---|---|
| ||||
ls cmd[1234].log
ls cmd[2-6].log |
This technique is sometimes called filename globbing, and the pattern a glob. Don't ask me why This technique is sometimes called filename globbing, and the pattern a glob. Don't ask me why – it's a Unix thing. Globbing – translating a glob pattern into a list of files – is one of the handy thing the bash shell does for you. (Read more about Wildcards and special filenames. Pathname wildcards)
Exercise: How would you list all files starting with "simple"?
| Expand | ||
|---|---|---|
| ||
ls simple* |
Here's what my cat output looks like. Notice the times are all nearly the same because all the tasks ran in parallel. That's the power of cluster computing!
| Code Block |
|---|
Command 1 on c455c304-033005.stampede2ls6.tacc.utexas.edu - WedSat Jun 23 1521:3033:1650 CDT 20212023 Command 2 on c455c304-033005.stampede2ls6.tacc.utexas.edu - WedSat Jun 23 1521:3033:1644 CDT 20212023 Command 3 on c455c304-033005.stampede2ls6.tacc.utexas.edu - WedSat Jun 23 1521:3033:1646 CDT 20212023 Command 4 on c455c304-033005.stampede2ls6.tacc.utexas.edu - WedSat Jun 23 1521:3033:1647 CDT 20212023 Command 5 on c455c304-033005.stampede2ls6.tacc.utexas.edu - WedSat Jun 23 1521:3033:1651 CDT 20212023 Command 6 on c455c304-033005.stampede2ls6.tacc.utexas.edu - WedSat Jun 23 1521:3033:1647 CDT 20212023 Command 7 on c455c304-033005.stampede2ls6.tacc.utexas.edu - WedSat Jun 23 1521:3033:1651 CDT 20212023 Command 8 on c455c304-033005.stampede2ls6.tacc.utexas.edu - WedSat Jun 23 1521:3033:1649 CDT 20212023 |
echo
Lets take a closer look at a typical task in the simple.cmds file.
| Code Block | |||||
|---|---|---|---|---|---|
| |||||
sleep 5; echo "Command 3 `date`" > cmd3.log 2>&1 |
The echo command is like a print statement in the bash shell. Echo echo takes its arguments and writes them to one line of standard output. While not always required, it is a good idea to put the echo's output string in double quotes.
...
So what is this funny looking `date` bit doing? Well, date is just another Linux command (try just typing it in) that just displays the current date and time. Here we don't want the shell to put the string "date" in the output, we want it to execute the date command and put the result text into the output. The backquotes ( ` ` also called backticks) around the date command tell the shell we want that command executed and its standard output substituted into the string. (Read more about Quoting in the shell.)
| Code Block | ||||
|---|---|---|---|---|
| ||||
# These are equivalent: date echo `date` # But different from this: echo date |
...
There's still more to learn from one of our simple tasks, something called output redirection:
...
| language | bash |
|---|
...
.
Every command and Unix program has three "built-in" streams: standard input, standard output and standard error, each with a name, a number, and a redirection syntax.
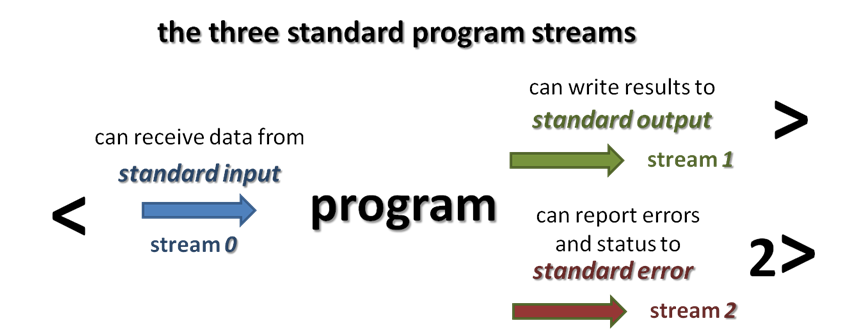
Normally echo writes its string to standard output. If you invoke echo in an interactive shell like Terminal, standard output is displayed to the Terminal window.
Usually we want to separate the outputs of all our commands. Why is this important? Suppose we run a job with 100 commands, each one a whole pipeline (alignment, for example). 88 finish fine but 12 do not. Just try figuring out which ones had the errors, and where the errors occurred, if all the normal output is in one intermingled file and all the error in another intermingled file!
, but it could encounter an error and write an error message to standard error. We want both standard output and standard error for each task stored in a log file named for the command number.
| Code Block | ||||
|---|---|---|---|---|
| ||||
sleep 5; echo "Command 3 `date`" > cmd3.log 2>&1 |
So in the above example the first '>' says to redirect the standard output of the echo command to the cmd3.So in the above example the first '>' says to redirect the standard output of the echo command to the cmd3.log file. The '2>&1' part says to redirect standard error to the same place. Technically, it says to redirect standard error (built-in Linux stream 2) to the same place as standard output (built-in Linux stream 1); and since standard output is going to cmd3.log, any standard standard error will go there also. (Read more about Standard I/O streams .)and redirection)
When the TACC batch system runs a job, all outputs So what happens when output is generated by tasks in a batch job? Well, you may have noticed the files with the batch job are directed to one output and error file per job. Here they have names like simple.e2916562e924965 and simple.o2916562 were created by your jobo924965. simple.o2916562o924965 contains all all standard output and simple.o2916562o924965 contains all standard error generated by your tasks that was not redirected elsewhere, as well as information relating to running your job and its tasks.
Job parameters
Now that we've executed a really simple job, let's take a look at some important job submission parameters. These correspond to arguments to the launcher_creator.py script.
A bit of background. Historically, TACC was set up to cater to researchers writing their own C or Fortran codes highly optimized to exploit parallelism (the HPC crowd). Much of TACC's documentation is aimed at this audience, which makes it difficult to pick out the important parts for us.
The kind of jobs we biologists generally run are relatively new to TACC. They even have a special name for them: "parametric sweeps", by which they mean the same program running on different data sets.
In fact there is a special software module required to run our jobs, called the launcher module. You don't need to worry about activating the launcher module – that's done by the <job_name>.slurm script created by launcher_creator.py like this:
| Code Block | ||
|---|---|---|
| ||
module load launcher |
The launcher module knows how to interpret various job parameters in the <job_name>.slurm batch SLURM submission script and use them to create your job and assign its tasks to compute nodes. Our launcher_creator.py program is a simple Python script that lets you specify job parameters and writes out a valid <job_name>.slurm submission script.
launcher_creator.py
If you call launcher_creator.py with no arguments it gives you its usage description:
For large jobs with complex tasks, it is not easy to troubleshoot execution problems using these files.
So a best practice is to separate the outputs of all our tasks into individual log files, one per task, as we do here. Why is this important? Suppose we run a job with 100 commands, each one a whole pipeline (alignment, for example). 88 finish fine but 12 do not. Just try figuring out which ones had the errors, and where the errors occurred, if all the standard output is in one intermingled file and all standard error in the other intermingled file!
Job parameters
Now that we've executed a really simple job, let's take a look at some important job submission parameters. These correspond to arguments to the launcher_creator.py script.
A bit of background. Historically, TACC was set up to cater to researchers writing their own C or Fortran codes highly optimized to exploit parallelism (the HPC crowd). Much of TACC's documentation is aimed at this audience, which makes it difficult to pick out the important parts for us.
The kind of jobs we biologists generally run are relatively new to TACC. They even have a special name for them: "parametric sweeps", by which they mean the same program running on different data sets.
In fact there is a special software module required to run our jobs, called the launcher module. You don't need to worry about activating the launcher module – that's done by the <job_name>.slurm script created by launcher_creator.py like this:
| Code Block | ||
|---|---|---|
| ||
module load launcher |
The launcher module knows how to interpret various job parameters in the <job_name>.slurm batch SLURM submission script and use them to create your job and assign its tasks to compute nodes. Our launcher_creator.py program is a simple Python script that lets you specify job parameters and writes out a valid <job_name>.slurm submission script.
launcher_creator.py
If you call launcher_creator.py with no arguments it gives you its usage description. Because it is a long help message, we may want to pipe the output to more, a pager that displays one screen of text at a time. Type the spacebar to advance to the next page, and Ctrl-c to exit from more.
| Code Block | ||||
|---|---|---|---|---|
| ||||
# Use spacebar to page forward; Ctrl-c to exit
launcher_creator.py | more |
| Code Block | ||
|---|---|---|
| ||
usage: launcher_creator.py [-h] -n NAME -t TIME_REQUEST [-j JOB_FILE]
| ||
| Code Block | ||
| ||
usage: launcher_creator.py [-h] -n NAME -t TIME_REQUEST [-j JOB_FILE] [-b SHELL_COMMANDS] [-B SHELL_COMMANDS_FILE] [-q QUEUE] [-a [ALLOCATION]] [-m MODULES] [-M MODULES_FILE] [-w WAYNESS] [-N NUM_NODES] [-e [EMAIL]] [-l LAUNCHER] [-s] Create launchers for TACC clusters. Report problems to rt- other@ccbb.utexas.edu optional arguments: -h, --help show this help message and exit Required: -n NAME, --name NAME The name of your job. -t TIME_REQUEST, --time TIME_REQUEST The time you want to give to your job. Format: hh:mm:ss Commands: You must use at least one of these options to submit your commands for TACC. -j JOB_FILE, --jobs JOB_FILE The name of the job file containing your commands. -b SHELL_COMMANDS, --bash SHELL_COMMANDS A string of shell (Bash, zsh, etc) commands that are executed before any parametric jobs are launched. -B SHELL_COMMANDS_FILE, --bash_file SHELL_COMMANDS_FILE A file containing shell (Bash, zsh, etc) commands that are executed before any parametric jobs are launched. Optional: -q QUEUE, --queue QUEUE The TACC allocation for job submission. Default="development" -a [ALLOCATION], -A [ALLOCATION], --allocation [ALLOCATION] The TACC allocation for job submission. You can set a default ALLOCATION environment variable. -m MODULES, --modules MODULES A list of module commands. The "launcher" module is always automatically included. Example: -m "module swap intel gcc; module load bedtools" -M MODULES_FILE, --modules_file MODULES_FILE A file containing module commands. -w WAYNESS, --wayness WAYNESS Wayness: the number of commands you want to give each node. The default is the number of cores per node. -N NUM_NODES, --num_nodes NUM_NODES Number of nodes to request. You probably don't need this option. Use wayness instead. You ONLY need it if you want to run a job list that isn't defined at the time you submit the launcher. -e [EMAIL], --email [EMAIL] Your email address if you want to receive an email from Lonestar when your job starts and ends. Without an argument, it will use a default EMAIL_ADDRESS environment variable. -l LAUNCHER, --launcher_name LAUNCHER The name of the launcher script that will be created. Default="<name>.slurm" -s Echoes the launcher filename to stdout. |
Because it is a long help message, we may want to pipe the output to more, a pager that displays one screen of text at a time. Type the spacebar to advance to the next page, and Ctrl-c to exit from more.
| Code Block | ||||
|---|---|---|---|---|
| ||||
# Use spacebar to page forward; Ctrl-c to exit
launcher_creator.py | more |
| Expand | ||
|---|---|---|
| ||
|
job name and commands file
Recall how the simple.slurm batch file was created:
| Code Block | ||||
|---|---|---|---|---|
| ||||
launcher_creator.py -j simple.cmds -n simple -t 00:01:00 -a UT-2015-05-18 -q normal |
- The name of your commands file is given with the -j simple.cmds argument.
- Your desired job name is given with the -n <job_name> argument.
- The <job_name> (here simple) is the job name you will see in your queue.
- By default a corresponding <job_name>.slurm batch file is created for you.
- It contains the name of the commands file that the batch system will execute.
queues and runtime
TACC resources are partitioned into queues: a named set of compute nodes with different characteristics. The major ones on stampede2 are listed below. Generally you use development (-q development) when you are writing and testing your code, then normal once you're sure your commands will execute properly.
...
Echoes the launcher filename to stdout. |
| Expand | ||
|---|---|---|
| ||
|
job name and commands file
Recall how the simple.slurm batch file was created:
| Code Block | ||||
|---|---|---|---|---|
| ||||
launcher_creator.py -j simple.cmds -n simple -t 00:01:00 -a OTH21164 -q development |
- The name of your commands file is given with the -j simple.cmds option.
- Your desired job name is given with the -n simple option.
- The <job_name> (here simple) is the job name you will see in your queue.
- By default a corresponding <job_name>.slurm batch file is created for you.
- It contains the name of the commands file that the batch system will execute.
queues and runtime
TACC resources are partitioned into queues: a named set of compute nodes with different characteristics. The main ones on ls6 are listed below. Generally you use development (-q development) when you are writing and testing your code, then normal once you're sure your commands will execute properly.
| queue name | maximum runtime | purpose |
|---|---|---|
| development | 2 hrs | development/testing and short jobs (typically has short queue wait times) |
| normal | 48 hrs | normal jobs (queue waits are often long) |
- In launcher_creator.py, the queue is specified by the -q argument.
- The default queue is development. Specify -q normal for normal queue jobs.
- The maximum runtime you are requesting for your job is specified by the -t argument.
- Format is hh:mm:ss
- Note that your job will be terminated without warning at the end of its time limit!
allocation and SUs
You may be a member of a number of different projects, hence have a choice which resource allocation to run your job under.
- You specify that allocation name with the -a argument of launcher_creator.py.
- If you have set an $ALLOCATION environment variable to an allocation name, that allocation will be used.
| Expand | |||||||
|---|---|---|---|---|---|---|---|
| |||||||
The .bashrc login script you've installed for this course specifies the class's allocation as shown below. Note that this allocation will expire after the course, so you should change that setting appropriately at some point.
|
- When you run a batch job, your project allocation gets "charged" for the time your job runs, in the currency of SUs (System Units).
- SUs are related in some way to node hours, usually 1 SU = 1 node hour.
| Tip | ||
|---|---|---|
| ||
Jobs should consist of tasks that will run for approximately the same length of time. This is because the total node hours for your job is calculated as the run time for your longest running task (the one that finishes last). For example, if you specify 100 commands and 99 finish in 2 seconds but one runs for 24 hours, you'll be charged for 100 x 24 node hours even though the total amount of work performed was only ~24 hours. |
wayness (tasks per node)
One of the most confusing things in job submission is the parameter called wayness, which controls how many tasks are run on each compute node.
- Recall that there are 128 physical cores and 256 GB of memory on each compute node
- so theoretically you could run up to 128 commands on a node, each with ~2 GB available memory
- you usually run fewer tasks on a node, and when you do, each task gets more resources
| tasks per node (wayness) | cores available to each task | memory available to each task |
|---|---|---|
| 1 | 128 | ~256 GB |
| 2 | 64 | ~128 GB |
| 4 | 32 | ~64 GB |
| 8 | 16 | ~32 GB |
| 16 | 8 | ~16 GB |
| 32 | 4 | ~8 GB |
| 64 | 2 | ~4 GB |
| 128 | 1 | ~1 GB |
- In launcher_creator.py, wayness is specified by the -w argument.
- the default is 128 (one task per core)
- A special case is when you have only 1 command in your job.
- In that case, it doesn't matter what wayness you request.
- Your job will run on one compute node, and have all cores available.
Your choice of the wayness parameter will depend on the nature of the work you are performing: its computational intensity, its memory requirements and its ability to take advantage of multi-processing/multi-threading (e.g. bwa -t option or hisat2 -p option).
| Tip |
|---|
Bioinformatics programs generally perform substantial I/O, require more memory and fewer cores, so you'll generally want to run only a few tasks per node. |
Wayness example
Let's use launcher_creator.py to explore wayness options. First copy over the wayness.cmds commands file:
| Code Block | ||||
|---|---|---|---|---|
| ||||
# If $CORENGS is not defined:
export CORENGS=/work/projects/BioITeam/projects/courses/Core_NGS_Tools

cds
mkdir -p core_ngs/slurm/wayness
cd core_ngs/slurm/wayness
cp $CORENGS/tacc/wayness.cmds . |
Exercise: How many tasks are specified in the wayness.cmds file?
| Expand | ||
|---|---|---|
| ||
wc --help |
| Expand | |||||
|---|---|---|---|---|---|
| |||||
Find the number of lines in the wayness.cmds commands file using the wc (word count) command with the -l (lines) option:
The file has 16 lines, representing 16 tasks. |
The wayness.cmds commands file consists of a number of identical lines that look like this:
| Code Block | ||
|---|---|---|
| ||
sleep 3; echo "Command $LAUNCHER_JID of $LAUNCHER_NJOBS ($LAUNCHER_PPN |
- In launcher_creator.py, the queue is specified by the -q argument.
- The default queue is development. Specify -q normal for normal queue jobs.
- The maximum runtime you are requesting for your job is specified by the -t argument.
- Format is hh:mm:ss
- Note that your job will be terminated without warning at the end of its time limit!
allocation and SUs
You may be a member of a number of different projects, hence have a choice which allocation to run your job under.
- You specify that allocation name with the -a argument of launcher_maker.py.
- If you have set an $ALLOCATION environment variable to an allocation name, it will be used if you are a member of only one TACC project.
| Expand | |||||||
|---|---|---|---|---|---|---|---|
| |||||||
The .bashrc login script you've installed for this course specifies the class's allocation as shown below. Note that this allocation will expire after the course, so you should change that setting appropriately at some point.
|
...
| Tip | ||
|---|---|---|
| ||
Jobs should consist of tasks that will run for approximately the same length of time. This is because the total node hours for your job is calculated as the run time for your longest running task (the one that finishes last). For example, if you specify 64 commands and 99 finish in 2 seconds but one runs for 24 hours, you'll be charged for 64 x 24 node hours even though the total amount of work performed was only ~24 hours. |
wayness (tasks per node)
One of the most confusing things in job submission is the parameter called wayness, which controls how many tasks are run on each computer node.
- Recall that there are 68 physical cores and 96 GB of memory on each compute node
- so technically you can run up to 68 commands on a node, each with ~1.4 GB available memory
- you usually run fewer tasks on a node, and when you do, each task gets more resources
...
- In launcher_creator.py, wayness is specified by the -w argument.
- the default is 68 (one task per core)
- A special case is when you have only 1 command in your job.
- In that case, it doesn't matter what wayness you request.
- Your job will run on one compute node, and have all cores available.
Your choice of the wayness parameter will depend on the nature of the work you are performing: its computational intensity, its memory requirements and its ability to take advantage of multi-processing/multi-threading (e.g. bwa -t option or tophat -p option).
| Tip |
|---|
Bioinformatics programs generally require more memory and fewer cores, so you'll generally want to run only a few tasks/commands per node. |
Wayness example
Let's use launcher_creator.py to explore wayness options. First copy over the wayness.cmds commands file:
| Code Block | ||||
|---|---|---|---|---|
| ||||
cds
mkdir -p core_ngs/slurm/wayness
cd core_ngs/slurm/wayness
cp $CORENGS/tacc/wayness.cmds . |
Exercise: How many tasks are specified in the wayness.cmds file?
| Expand | ||
|---|---|---|
| ||
wc --help |
| Expand | |||||||
|---|---|---|---|---|---|---|---|
| |||||||
Find the number of lines in the wayness.cmds commands file:
The file has 34 lines, representing 34 tasks. |
The wayness.cmds commands file consists of a number of identical lines that look like this:
| Code Block | ||
|---|---|---|
| ||
sleep 5; echo "Command $LAUNCHER_JID of $LAUNCHER_NJOBS ($LAUNCHER_PPN per node) ran on node `hostname` core $LAUNCHER_TSK_ID" > cmd.$LAUNCHER_JID.log 2>&1 |
| Expand | ||
|---|---|---|
| ||
The wayness commands take advantage of a number of environment variables the launcher module system sets automatically for each task:
For more information, see https://github.com/TACC/launcher |
Create the batch submission script specifying a wayness of 17 (17 tasks per node), then submit the job and monitor the queue:
| Code Block | ||||
|---|---|---|---|---|
| ||||
launcher_creator.py -j wayness.cmds -n wayness -w 17 -t 00:02:00 -a UT-2015-05-18
sbatch --reservation=BIO_DATA_week_1 wayness.slurm
showq -u |
Exercise: With 34 tasks requested and wayness of 17, how many nodes will this job require? How much memory will be available for each task?
| Expand | ||
|---|---|---|
| ||
2 nodes (34 tasks x 1 node/17 tasks) |
Exercise: If you specified a wayness of 2, how many nodes would this job require? How much memory could each task use?
| Expand | ||
|---|---|---|
| ||
9 nodes (34 tasks x 1 node/4 tasks; round up to even number of nodes) |
Look at the output file contents once the job is done.
| Code Block | ||
|---|---|---|
| ||
cat cmd*log

# or, for a listing ordered by node name (the 11th field)
cat cmd*log | sort -k 11,11 |
You should see something like output below.
| Code Block | ||
|---|---|---|
| ||
Command 1 of 34 (17 per node) ran on node c455-032.stampede2.tacc.utexas.edu core 6 Command 10 of 34 (17 per node) ran on node c455-032.stampede2.tacc.utexas.edu core 8 Command 11 of 34 (17 per node) ran on node c455-032.stampede2.tacc.utexas.edu core 6 Command 13 of 34 (17 per node) ran on node c455-032.stampede2.tacc.utexas.edu core 3 Command 15 of 34 (17 per node) ran on node c455-032.stampede2.tacc.utexas.edu core 5 Command 16 of 34 (17 per node) ran on node c455-032.stampede2.tacc.utexas.edu core 14 Command 19 of 34 (17 per node) ran on node c455-032.stampede2.tacc.utexas.edu core 4 Command 2 of 34 (17 per node) ran on node `hostname` core $LAUNCHER_TSK_ID" > cmd.$LAUNCHER_JID.log 2>&1 |
| Expand | ||
|---|---|---|
| ||
The wayness commands take advantage of a number of environment variables the launcher module system sets automatically for each task:
For more information, see https://github.com/TACC/launcher |
Create the batch submission script specifying a wayness of 4 (4 tasks per node), then submit the job and monitor the queue:
| Code Block | ||||
|---|---|---|---|---|
| ||||
launcher_creator.py -j wayness.cmds -n wayness -w 4 -t 00:02:00 -a OTH21164 -q development
sbatch wayness.slurm
showq -u |
Exercise: With 16 tasks requested and wayness of 4, how many nodes will this job require? How much memory will be available for each task?
| Expand | ||
|---|---|---|
| ||
4 nodes (16 tasks x 1 node/4 tasks) |
Exercise: If you specified a wayness of 2, how many nodes would this job require? How much memory could each task use?
| Expand | ||
|---|---|---|
| ||
8 nodes (16 tasks x 1 node/2 tasks) |
Look at the output file contents once the job is done.
| Code Block | ||
|---|---|---|
| ||
cat cmd*log

# or, for a listing ordered by node name (the 11th field)
cat cmd*log | sort -k 11,11 |
The vertical bar ( | ) above is the pipe operator, which connects one program's standard output to the next program's standard input.

(Read more about the sort command at Linux fundamentals: cut, sort, uniq, and more about Piping)
You should see something like output below.
| Code Block | ||
|---|---|---|
| ||
Command 1 of 16 (4c455-032.stampede2.tacc.utexas.edu core 8 Command 25 of 34 (17 per node) ran on node c455-032.stampede2.tacc.utexas.edu core 9 Command 26 of 34 (17 per node) ran on node c455-032.stampede2.tacc.utexas.edu core 6 Command 27 of 34 (17 per node) ran on node c455-032.stampede2.tacc.utexas.edu core 8 Command 29 of 34 (17 per node) ran on node c455-032.stampede2.tacc.utexas.edu core 11 Command 30 of 34 (17 per node) ran on node c455-032.stampede2.tacc.utexas.edu core 3 Command 32 of 34 (17 per node) ran on node c455-032.stampede2.tacc.utexas.edu core 1 Command 33 of 34 (17 per node) ran on node c455-032.stampede2.tacc.utexas.edu core 10 Command 34 of 34 (17 per node) ran on node c455-032.stampede2.tacc.utexas.edu core 5 Command 4 of 34 (17 per node) ran on node c455-032.stampede2.tacc.utexas.edu core 3 Command 6 of 34 (17 per node) ran on node c455-032.stampede2.tacc.utexas.edu core 4 Command 9 of 34 (17 per node) ran on node c455c303-032005.stampede2ls6.tacc.utexas.edu core 90 Command 1210 of 3416 (174 per node) ran on node c455c304-033005.stampede2ls6.tacc.utexas.edu core 219 Command 1411 of 3416 (174 per node) ran on node c455c304-033005.stampede2ls6.tacc.utexas.edu core 1910 Command 1712 of 3416 (174 per node) ran on node c455c304-033005.stampede2ls6.tacc.utexas.edu core 1811 Command 1813 of 3416 (174 per node) ran on node c455c304-033006.stampede2ls6.tacc.utexas.edu core 2512 Command 2014 of 3416 (174 per node) ran on node c455c304-033006.stampede2ls6.tacc.utexas.edu core 2413 Command 2115 of 3416 (174 per node) ran on node c455c304-033006.stampede2ls6.tacc.utexas.edu core 2214 Command 2216 of 3416 (174 per node) ran on node c455c304-033006.stampede2ls6.tacc.utexas.edu core 2015 Command 232 of 3416 (174 per node) ran on node c455c303-033005.stampede2ls6.tacc.utexas.edu core 311 Command 243 of 3416 (174 per node) ran on node c455c303-033005.stampede2ls6.tacc.utexas.edu core 272 Command 284 of 3416 (174 per node) ran on node c455c303-033005.stampede2ls6.tacc.utexas.edu core 213 Command 35 of 3416 (174 per node) ran on node c455c303-033006.stampede2ls6.tacc.utexas.edu core 214 Command 316 of 3416 (174 per node) ran on node c455c303-033006.stampede2ls6.tacc.utexas.edu core 195 Command 57 of 3416 (174 per node) ran on node c455c303-033006.stampede2ls6.tacc.utexas.edu core 196 Command 78 of 3416 (174 per node) ran on node c455c303-033006.stampede2ls6.tacc.utexas.edu core 247 Command 89 of 3416 (174 per node) ran on node c455c304-033005.stampede2ls6.tacc.utexas.edu core 208 |
Notice that there are 2 4 different host names. This expression:
| Code Block | ||
|---|---|---|
| ||
cat cmd*log | awk '{print $11}' | sort | uniq -c |
should produce output something like this (read more about piping commands to make a histogram)
| Code Block | ||
|---|---|---|
| ||
19 c455-032.stampede2 4 c302-005.ls6.tacc.utexas.edu 15 c455-033.stampede2 4 c302-006.ls6.tacc.utexas.edu | ||
| Expand | ||
| ||
This probably has to do with the way the batch scheduler works. Since each of our commands finishes so quickly (5+ seconds), the first commands given to a node may finish quickly, leading the scheduler to assign more tasks to that node.
   4 c305-005.ls6.tacc.utexas.edu
4 c305-006.ls6.tacc.utexas.edu |
Some best practices
Redirect task output and error streams
We've already touched on the need to redirect standard output and standard error for each task. Just remember that funny redirection syntax:
| Code Block | ||||
|---|---|---|---|---|
| ||||
my_program input_file1 output_file1 > file1.log 2>&1 |
...
For example, you might have a script called align_bwa.sh (a bash script) or align_bowtie2.py (written in python Python) that performs multiple steps needed during the alignment process:
...
The BioITeam maintains a set of such scripts in the /work2work/projects/BioITeam/common/script directory. Take a look at some of them after you feel more comfortable with initial NGS processing steps. They can be executed by anyone with a TACC account.
...
| Code Block | ||||
|---|---|---|---|---|
| ||||
# navigate through the symbolic link in your Home directory cd ~scratch/core_ngs/slurm/simple ls ../wayness ls ../.. ls -l ~/.bashrc |
(Read more about Absolute and relative pathname syntax)
Interactive sessions (idev)
...
| Code Block | ||||
|---|---|---|---|---|
| ||||
idev -p normal -m 20 -A UT-2015-05-18-m 60 -N 1 -nA 68OTH21164 --reservation=BIO_DATA_week_1p normal -r CoreNGS-Tue |
Notes:
- -p normal requests nodes on the normal queue
- this is the default for our reservation, while the development queue is the normal default
- -m 20 60 asks for a 20-60 minute session (120 minutes is the maximum for development)
- -A UT-2015-05-18 OTH21164 specifies the TACC allocation/project to use
- -N 1 asks for 1 node and -n 68 requests access to all 68 cores
- --reservation=BIO_DATA_week_1CoreNGS-Tue gives us priority access to TACC nodes for the class. You normally won't use this argumentoption.
When you ask for an idev session, you'll see output as shown below. Note that the process may pause at repeat the "Sleeping for 7 seconds" job status: PD" (pending) step while it waits for an available node.
| Code Block |
|---|
-> Checking on the status of development queue. OK -> Defaults file : ~/.idevrc -> System : stampede2ls6 -> Queue : normal : development (cmd line: -p ) -> Nodes : 1 (cmd line: -N ) -> TotalTasks tasksper Node : 68128 (cmdQueue line:default -n ) -> Time (minutes) : 2060 (cmd line: -m ) -> Project : UT-2015-05-18 (cmd line: -A ) ----------------------------------------------------------------- : OTH21164 (cmd line: -A Welcome to the Stampede2 Supercomputer) ----------------------------------------------------------------- --> Verifying valid submit host (login3)...OK --> Verifying valid jobname...OK --> Enforcing max jobs per user...OK --> Verifying availability of your home dir (/home1/01063/abattenh)...OK --> Verifying availability of your work2 dir (/work2/01063/abattenh/stampede2)...OK --> Verifying availability of your scratch dir (/scratch/01063/abattenh)...OK --> Verifying valid ssh keys...OK-------- Welcome to the Lonestar6 Supercomputer ----------------------------------------------------------------- --> Verifying accessvalid tosubmit desiredhost queue (developmentlogin1)...OK --> Verifying job request is within current queue limitsvalid jobname...OK --> CheckingVerifying availablevalid allocation (UT-2015-05-18)ssh keys...OK --> Verifying thataccess quotato fordesired filesystem /home1/01063/abattenh is at 0.00% allocatedqueue (development)...OK --> Verifying that quota for filesystem /work2/01063/abattenh/stampede2 is at 16.51% allo cated> Checking available allocation (OTH21164)...OK Submitted batch job 7829779235465 -> After your idev job begins to run, a command prompt will appear, -> and you can begin your interactive development session. -> We will report the job status every 4 seconds: (PD=pending, R=running). -> job status: PD -> job status: R -> Job is now running on masternode= c455c302-083005...OK -> Sleeping for 7 seconds...OK -> Sleeping for 7 seconds...OK -> Sleeping for 7 seconds...OK -> Sleeping for 7 seconds...OK -> Checking to make sure your job has initialized an env for you....OK -> Creating interactive terminal session (login) on master node c455c302-083005. TACC Stampede2 System Provisioned on 24-May-2017 at 11:47 -> ssh -Y -o "StrictHostKeyChecking no" c302-005 |
Once the idev session has started, it looks quite similar to a login node environment, except for these differences:
- the hostname command on a login node will return a login server name like login3.stampede2ls6.tacc.utexas.edu
- while in an idev session hostname returns a compute node name like c455c303-083006.stampede2ls6.tacc.utexas.edu
- you cannot submit a batch job from inside an idev session, only from a login node
- your idev session will end when the requested time has expired
- or you can just type exit to return to a login node session
...