Versions Compared

Key

  • This line was added.
  • This line was removed.
  • Formatting was changed.

...

Section
Column
width2%


Column

Graduate Degree Program

Email Address Format

Year specification in email address format

MPA

[firstname].[lastname].##@mpa.mccombs.utexas.edu

## = the year you will graduate with a MPA degree

MBA

[firstname].[lastname].##@mba.mccombs.utexas.edu

## = the year you will graduate with a MBA degree

MSTC

[firstname].[lastname].##@mstc.mccombs.utexas.edu

## = the year you will graduate with a MSTC degree

MSBA

[firstname].[lastname].##@msba.mccombs.utexas.edu

## = the year you will graduate with a MSBA degree

MSF

[firstname].[lastname].##@msf.mccombs.utexas.edu

## = the year you will graduate with a MSF degree

MSM

[firstname].[lastname].##@msm.mccombs.utexas.edu

## = the year you will graduate with a MSM degree

PhD

[firstname].[lastname]@phd.mccombs.utexas.edu

Does not include a year in the email address

For more information about PhD student email addresses in particular please see McCombs PhD Student Email Addresses


Step One - Go to https://secure.mccombs.utexas.edu/MOR


Section
Column
width2%


Column

At the McCombs Online Resources (MOR) website, logon with your EID. Go to the UTMail tab and either confirm that the way you name is displayed is how you want your name to appear or else update your name preferences (see above for an example screenshot).

Step Two - Go to http://utmail.utexas.edu

Section
Column
width2%


Column

At the UTMail web site you will log on with your EID and create an account. You will be given an opportunity to select your own @utexas.edu address and set a password for your UTMail account. You can then check that account with what email application you prefer that works with Gmail.

Info
titleInfo for Student Employees and Alumni only

UTmail also offers Business accounts for employees and TexasExes accounts for alumni in addition to Personal accounts for students. If you are also a student employee or an alum you may already have a UTmail account or have the option to create more than one UTmail account. Most students will not see these other options, but if you do be sure to create a Personal UTmail account if you want a McCombs address. Personal accounts are student managed email accounts that become lifetime accounts upon graduation. Business accounts are available to employees only as long as they are employed by the university. TexasExes accounts are managed by the Texas Exes alumni association.

Neither Business accounts nor Texas Exes accounts can have McCombs addresses associated with them.

Info
titleConverting Business Accounts

If you already have a Business account but no Personal account, you may convert your Business account into a Personal account by contacting the ITS Help Desk at 512-475-9400. Normally, your Business account would be deleted once you leave the university. By converting it to a Personal account you ensure it also remains as a lifetime student mailbox.

You will only need to return to http://utmail.utexas.edu if you need to reset your UTmail password or if you want to change your UTmail address or display name. If you need assistance setting up your UTmail account, please click the support link on that page which will take you to http://www.utexas.edu/its/help/utmail.

Then. . . wait for your UTmail account to update.

Section
Column
width2%


Column

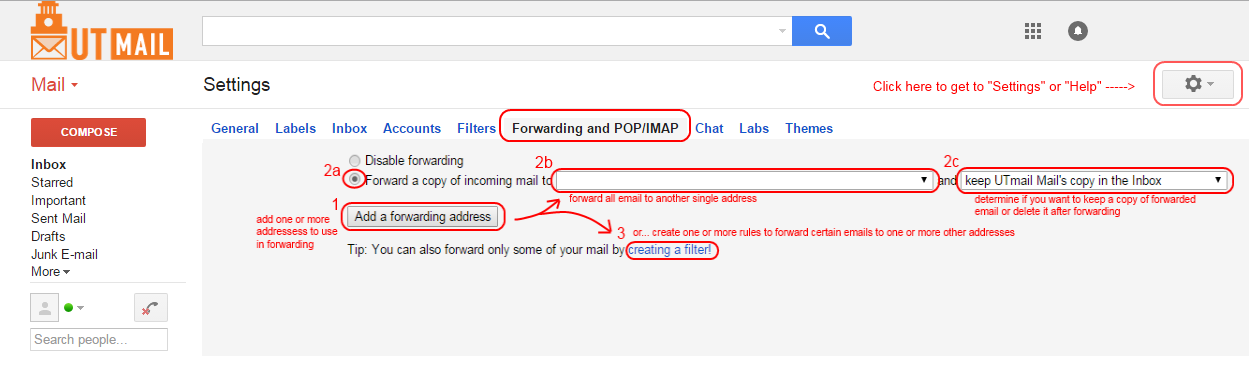
Once you specify your name preferences and claim your UTmail account, it will take up to three business days before the McCombs lifetime address is added to your account.If you have not completed BOTH steps one and two above, the lifetime McCombs address will NOT be added to your UTMail account.

Once the address has been added, you will see it listed in the Accounts tab under Settings. All emails sent to the addresses listed on your Accounts page will be delivered directly to this UTmail mailbox. You do not need to do anything else for your lifetime email to begin working, however, you may optionally customize the send-as, reply-to or forwarding settings for your account (see the next two sections regarding these options)


Optionally. . . Configure Send-As and Reply-To Behavior

Section
Column
width2%


Column
 

Because your McCombs address actually appears on your account, you can use it ways not normally available on typical Gmail accounts.

  • You can select one of your addresses to be the default address when you send new email from your UTmail account.
  • You can edit the address to change what display name shows up in emails you send using that address.
  • You can configure the default address to use when replying to messages to default to one particular address, or you can configure UTmail to default to the address the original message was sent to you as. 
  • Regardless of what email address you set as your default Send-As or Reply-To, when you send a new message you will have a drop down list in the From field that will let you select any of the addresses listed on your Accounts page.

    NOTE: You can also use the page to set up send-as for any other external email address you control, including an older McCombs lifetime address. To do so, click the "Add another address you own" link. The main differences are that you cannot make these other addressees default send-as addresses or configure auto-reply to use them, and the words "sent on behalf of" will appear in the From field when you send as these external addresses.


Optionally. . . Configure Forwarding

Section
Column
width2%


Column
 

If you do not want to actually use UTmail to check emails sent o your main UTmail address or your secondary McCombs address, you can configure forwarding as with normal Gmail accounts. To configure Forwarding, just go to the Forwarding and Pop/IMAP tab in your settings.

  • Click the button to "Add a forwarding address" to specify what address you want to forward to.
  • You can then with simply forward all email that comes into your UTmail account to forward to that address, and optionally choose to keep a copy of it first
  • Or you can click the "create a filter" rule to forward certain email messages to one address and other incoming emails to another address
  • The forwarding rules you create can be as simple or complex as you want them to be. If you need help, please refer to Help listed under "Settings"

...