| Anchor | ||||
|---|---|---|---|---|
|
From the task bar, select the Workbench tab. In the actions available space on the left, select Import Data'. A pop up window will ask you to select the file you wish to import. Only .xls (NOT .xlsx) and .csv file types are recognized. Hit 'Open' and move on to the next step.

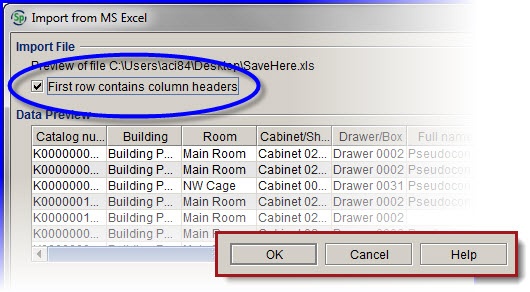
In the next window that opens up, it is important to make sure the First row contains column headers box is checked. If unchecked, the uploader will try and make the word "Catalog number" fit into the catalog number format, and so on. Needless to say, it won't work.
From here, the workbench opens the mapping editor. This is where you 'link' fields from one Data Type (data table) to the columns of your spreadsheet. If using a spreadsheet generated by Specify, like the one attached to this page, there should not be any problems with the mapping. Still, give everything a look-over just to be sure. Backing errors out of the database once you've committed the data set is difficult and time consuming.
Things to watch for:
| Anchor | ||||
|---|---|---|---|---|
|
On the best of days, the Accession Number field auto maps to an unused field in the Accession table. Also be aware if you don't give end the taxon terms with the number 1, the auto-mapper will try and map to the Taxon table instead of the Determination table. In this case, a field which is not displayed on the form.
Here's how to fix it.

Another tricky one to be aware of is the 'Field Number' mapping. Left to its own devices, the mapping editor will connect the Data set column titled "Field number" to the CO field with the same title. This will result in the data set being unable to load. You would not get an error message when you go to upload this, the data would simply get slotted into a the wrong field.

For the other fields that are not automatically mapped, just follow the second part of the above instructions.
If you can't find where a Specify field is located in the mapping interface, please ask. Some selections, like Collection Type are buried (3/4 of the way down the COAttribute listing) and others are repeated (Field Number, in both the CO form and the CE tables) and some are confusing- Alt Catalog number and 'Other Number'.
Testing data integrity*
AKA, how I met my 2 best friends:
Once you have uploaded the spreadsheet to the test database, the next step is validating the data. At the bottom of the workbench interface are 2 selections- the first highlights the cells that can't be uploaded in red. The second shows you new records highlighted in orange. There's also a blue highlight, which shows you records that have more than one possibility associated with it. This verification step is done automatically with no input from the user.
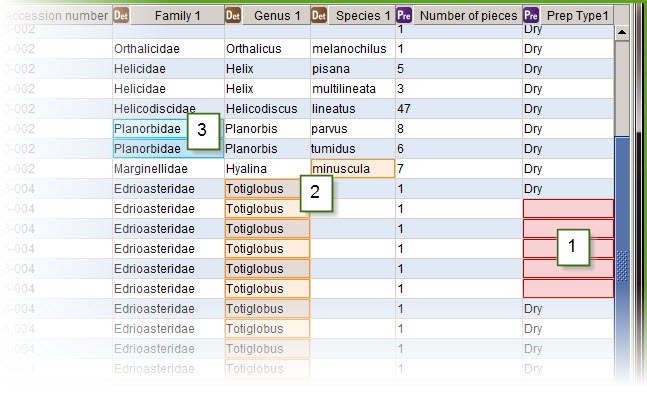 The first option, Highlight Invalid Cells shows you which cells render the whole line invalid. Workbench will not let you upload the data set until you fix these entries. You can delete the whole line, or fill in the red highlighted cells with correct data.
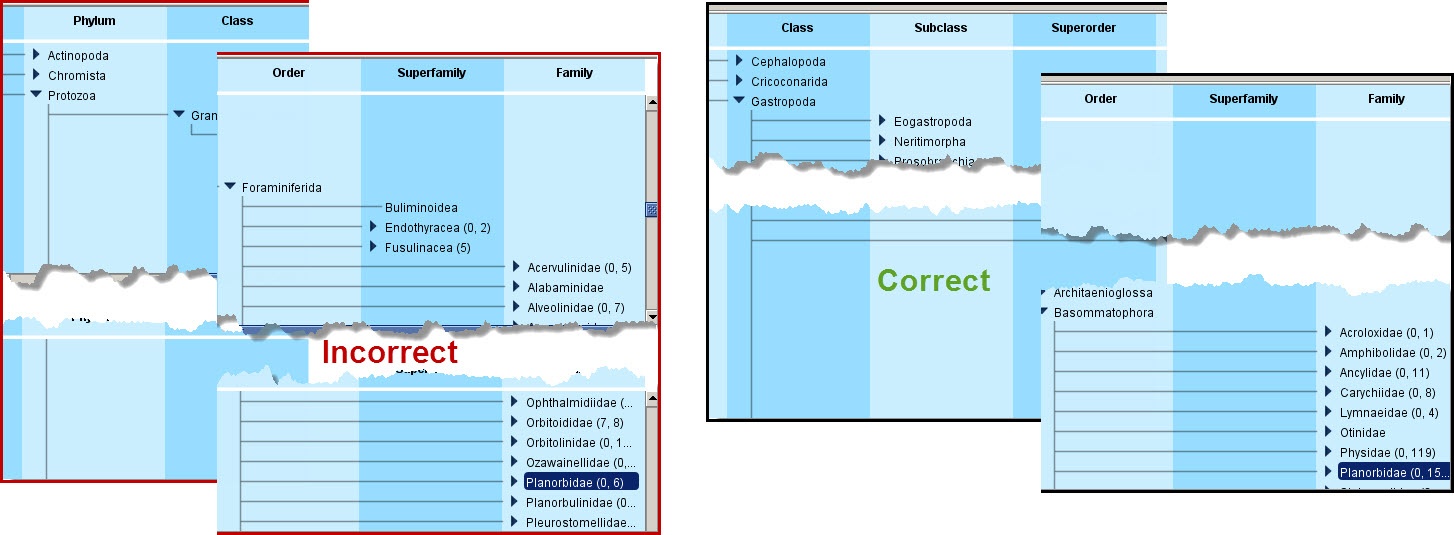
Second are the New Records. Specify workbench will not waste your time telling you which catalog numbers are new, or which dates are new- it just assumes these are supposed to be new. This verification focuses on things its trying to get you to pay special attention to, like new nodes on trees, and brand new records in linked tables
. Never add taxa to the tree via the workbench! See the section on problem solving to see the best way to fix orange highlighted records. Keep in mind, sometimes these records are fine- if you are adding CI via the workbench, you'll see orange highlighted records all up and down the locality name and field number rows. When this verification type shows you data that will be added to tables and not trees, as long as they are additions you expected to see, its fine.
Blue highlighted records simply ask you which one of these nodes you wish to use. In the case above, we will be asked to choose between two nodes. Be sure you choose correctly, as sometimes the choices are like night and day, when you look deeper.
*If I could have this be the first section of this page, I would. It's that important. Folowing these steps is vital to the health of the database. Nobody should ever commit a data set to the database unless they have tested their upload in the test DB, or at the VERY least followed these steps. These are passive tests, so while they are running you can feel free to work on other projects. Enterprise environments (ie, private sector) would never condone inserting data directly into a production database without testing it, and we would be prudent to follow their lead.
Never add taxa to the tree via the workbench! See the section on problem solving to see the best way to fix orange highlighted records.