Logging into Listserv
- Open the Listserv site at the address, https://lists.mccombs.utexas.edu/scripts/wa.exe?INDEX, and click the 'Login' link in the upper right corner of the page.
- On the Login page, enter the @mccombs.utexas.edu email address and the password you set during Listserv registration and click 'Log In.'

- Once logged in, hover over the 'List Management' menu in the upper left corner of the page and click 'Subscriber Management' from the list.


You'll be brought to the Subscriber Management page, where you can select to examine or delete a subscription or add a new subscriber. You can use the Bulk Operations tab to add or remove multiple subscribers. Follow the steps below to do any of these tasks -
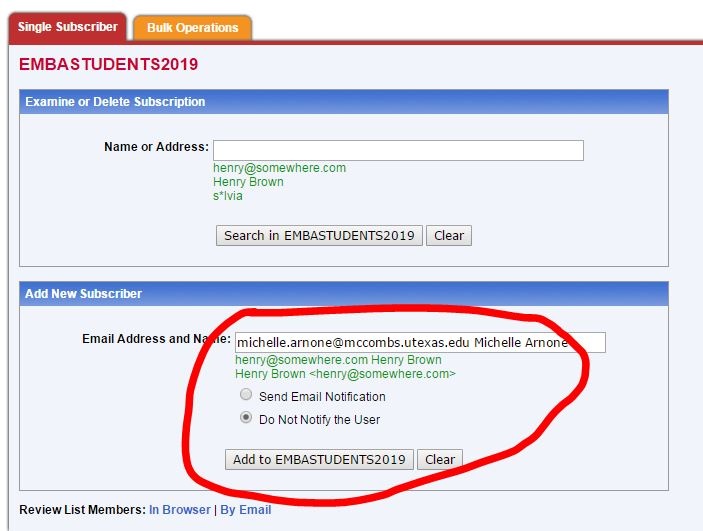
Add a New Subscriber
To add a new subscriber, simply enter the full email address followed by the name of the subscriber. Be sure to leave a space between the email address and the name. Select 'Do Not Notify the User,' then click the 'Add to..' button.
Bulk Add Subscribers
If you need to add a group of new subscribers to your list, you can use the Bulk Operations to add multiple subscribers at one time. To do so, you'll need to prepare a text file before adding the group in the Listserv tool, as detailed in step one.
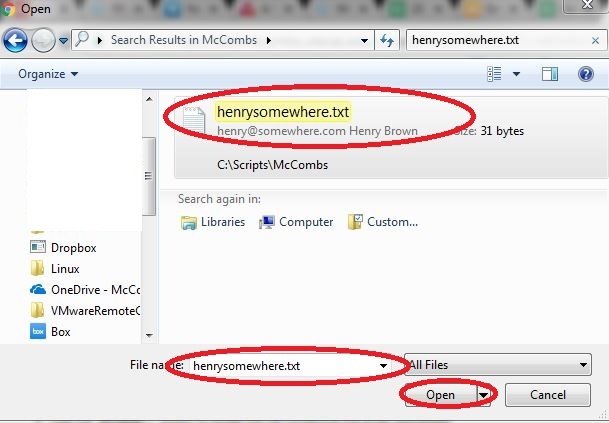
- Create a new text file containing the list of subscribers you'd like to add. You can use Notepad on your Windows PC or TextEdit on a Mac. Be sure to format your text file as shown in the image below, with the full email address followed by the name of the subscriber, one per each line of your text file. Be sure to leave a space between the email address and the name.

- Select the 'Bulk Operations' tab from the Subscriber Management page.

- Select 'Add imported addresses...' function from the Bulk Operations tab and click the button to 'Choose File.'

- Navigate to the text file you created in step one and select it.
- Then click 'Import' to upload your list of new subscribers.

If successful, you'll then see a confirmation at the top of the next page indicating there was no error and the number of recipients added (shown in the second image below).
Delete a Subscriber
- To delete a subscriber, enter the email address in the 'Name or Address' field under the Examine or Delete Subscription heading, then click the 'Search in...' button.

- You'll be taken to the View or Set Subscription Options page. Simply verify the name, email address and that you don't want to notify the user, then click the 'Delete' button at the bottom of the page to remove the subscriber from your list.

Once deleted, you'll be shown a confirmation at the top of the page that the subscriber was removed.
Bulk Delete New Subscribers
If you need to remove a group of subscribers to your list, you can use the Bulk Operations to remove multiple subscribers at one time. To do so, you'll need to prepare a text file before removing the group in the Listserv tool, as detailed in step one.
- Create a new text file containing the list of subscribers you'd like to remove. You can use Notepad on your Windows PC or TextEdit on a Mac. Be sure to format your text file as shown in the image below, with the full email address followed by the name of the subscriber, one per each line of your text file. Be sure to leave a space between the email address and the name.
- Select the 'Bulk Operations' tab from the Subscriber Management page.
- Select 'Remove imported addresses...' function from the Bulk Operations tab and click the button to 'Choose File.'

- Navigate to the text file you created in step one and select it.
- Then click 'Import' to upload your list of subscribers you want to remove.
If successful, you'll then see a confirmation at the top of the next page indicating there was no error and the number of recipients added (shown in the second image below).
Related articles
| Content by Label | ||||||||||||||||||
|---|---|---|---|---|---|---|---|---|---|---|---|---|---|---|---|---|---|---|
|
| Page properties | ||
|---|---|---|
| ||
|