...
Did you skip over the “before you start” section above? If you did, read through that.
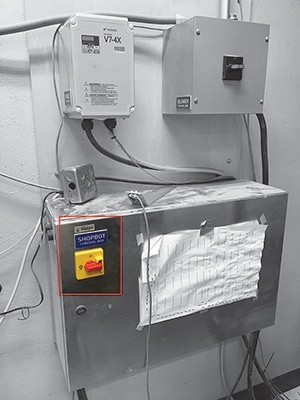
Turn on the Shopbot using the red switch on the wall
Press the blue reset button above the computer

Check that you can hear the fan above the spindle turn on

Run the shopbot control software by clicking on the start menu icon and type 'sb3' in the search bar (if you don’t see the full version, click the question mark and “Switch to FULL”)

Clear bed of any material
Enter c3 command, the CNC will move to the home position
Move the spindle over the work bed approximately where your stock will be using the command j2 12,12
Grab the aluminum plate and touch the plate against the CNC bit. The input 1 should turn green on the Shopbot software. Make sure you see this before proceeding
Place the metal plate on the CNC bed, not on top of your stock.
Enter c2 and then press “ok” on the dialog box once you have double-checked that the aluminum plate is under the CNC bit.
The CNC will move the spindle down to touch the metal plate and zero the Z-axis to the level of the bed.
Put the metal plate back onto the CNC computer station.
Use the JZ command to move the z-axis to a height that is above the thickness of your stock, this will prevent the bit from crashing into your stock as you jog it around. For example, if you are using 3" foam you can use the command JZ 4 to move the z-axis above where your stock will be
Move the spindle out of the way by typing in JX 48 which will move the gantry of the CNC out of the way.
Place your stock on the bed so that the origin of your stock is oriented along the x and y-axis at the 0,0 position

Double-check that the bleeder valve is open

Turn on the appropriate zone valves and close zone valves that do not overlap the workpiece. For most parts, you will likely only need one or two zone valves open

Turn on the vacuum by turning the switch located on the gray box to the right of the spindle display

Close the bleeder valve as long as at least one zone valve is open. (the bleeder valve is closed in the image below)

If your workpiece is small it might not be held down to the table well enough. There should be sheets of hardboard and plywood located next to the CNC that you can use to fill in the empty space around your model zone. Reference the image below.

Push your workpiece firmly to confirm that it won't move. If it does move, re-adjust the pieces of hardboard to cover more of the zone that your material is on.
Type in J2 1,1 to move the spindle over the origin of the stock
Type in Z2 and confirm that the shopbot software shows the X and Y position is 0
We will load your shopbot file by going to File > Part File Load and navigating to your file. I recommend dragging your file beforehand from your USB to the desktop
A yellow window will appear. Drag it out of the way.
Click the big green START button on the screen

- A few pop-up boxes will appear. If a box pops up asking if the right tool is in the spindle, click yes/ok.
- If a box pops up asking you if you have zero'd the bit, hit ok/yes.
A window will then appear asking you to start the spindle. Do not hit ok on that window yet.
Look at the spindle control box to the right of the computer station and make sure the number indicates 150. If it is not, use the up and down arrows to set it to 150.
Press the green start button right above the CNC computer. The spindle will turn on

Let the spindle run at 150 for 2 minutes.
Increase the spindle speed to 225 and run for another 2 minutes
Increase the spindle speed to 300 and run for another 2 minutes
Now that the spindle is warmed up, set the spindle speed to the correct setting for your operation. Make sure to double-check the “CNC Templates for Fusion 360” wiki page to see exactly what
Now you can hit OK on the window that popped up on the computer screen. If you see any additional dialog boxes that appear, hit OK on them as well

The CNC will start moving and cut your part
...