Page History
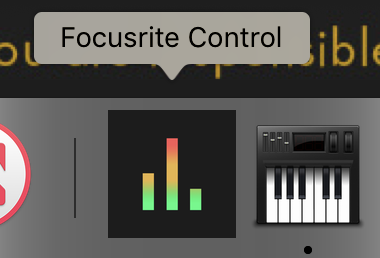
| Open Focusrite Control if you haven't already Note if installing on a new computer you might have to play with the Mac Security settings making sure that you allow access Trick is to log in as admin and re-install making sure that you allow security access No Hardware ConnectedFor No Hardware Connected on macOS– click here. document is also saved on software in the Focusrite folder |
Once installed and running Make sure that the FocusRite is synced to Internal If you don't have it synced correctly no sound will come out. Click on Device Settings Red 4Pre Clock Source make sure it is internal |
|
Click on >File Load Snapshot We have a snapshot for both A and B suites because they are different |
|
Go to >Tempstorage> Templates>Focusrite surround sound setup.ff Click Open Note in case it's lost here are the settings for outputs 3-8 for Suite A
|
|
Note in case it's lost here are the settings for outputs 3-8 for Suite B |
|
Open audio midi setup
Choose >Focusrite Thunderbolt |
|
Configure Speakers |  |
Choose Configuration 5.1 Surround
|
|
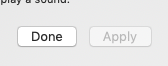
| Choose Apply and >Done |
|
This is how to connect your IPAD skip this part if you don't want to connect an IPAD and the DockIf the Wi-Fi of the computer is already ON, turn the Wi-Fi OFF |  |
| Turn the computer Wi-Fi ON |  |
| Go to the WiFi Icon and choose > Create Network |  |
The default settings (for the Network Name and Channel ID) are fine. Click "Create" |  |
| Confirm that you are connected to the network that you just created |  |
Put your iPad on the ProTools Dock or use the one that is already there. TURN IT ON OR -Wake it up by pressing the "Home" key For more information about using the Dock please refer to the manual: ProTools Dock (for Apple iPad) You can also view a YouTube video which walks you through the functionality of the Dock and the App: |  |
| Go to Settings |  |
| Enable Wi-Fi |  |
| Choose the WI-FI network for the Device you just created. |  |
| Choose to "Join Anyway" | 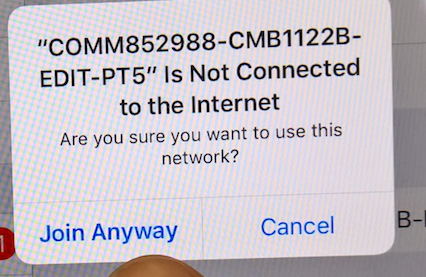 |
On the iPad, open the PT Control Application If you don't have the app installed download it from here |  |
This Step will setup the S3 ConsoleOn the computer, launch the EuControl application. Applications>Euphonix>EuControl Please be patient while launching - it may take a couple of minutes for the application to launch properly. |
|
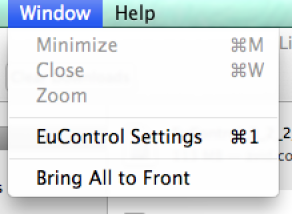
Once the application is running, go to > Window > EuControl Settings |
|
The Surfaces Tab should list 3 devices: AVID S3 PT Dock Your iPad PT Control App It should look similar to the picture on the right. |
|
The Workstations Tab should list the computer that is connected |
|
The Next Steps Will Setup ProTools Surround Sound and finish connection to the S3 and IPad Dock | |
Open ProTools > Create Session or Open existing session |
|
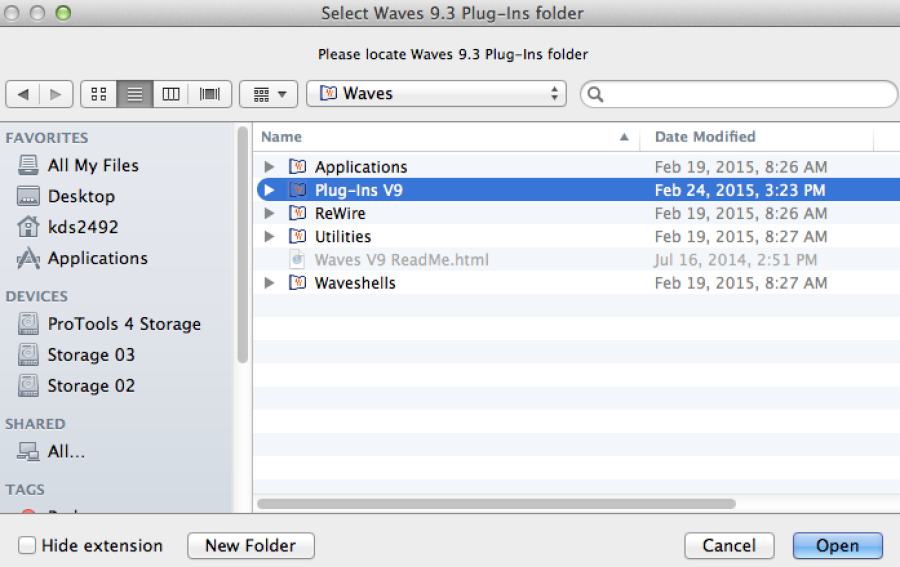
ProTools will ask you where the Waves Plugins are. Go to Applications > Waves > Plugins V9 |
|
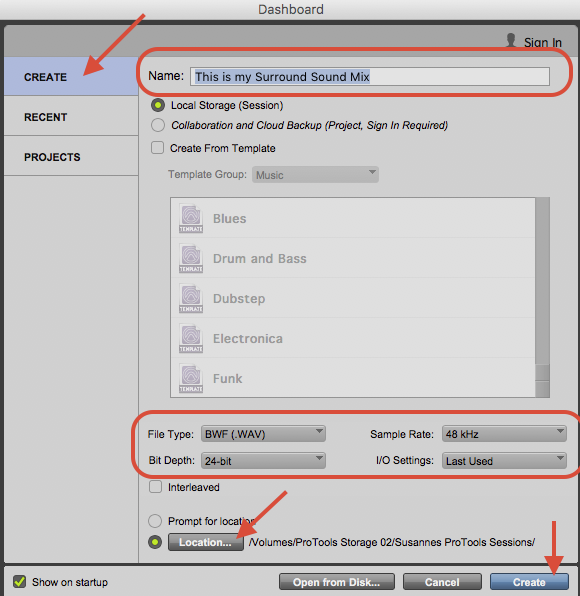
Choose Create Blank Session and or Open an existing session If creating a blank session, Choose - Create Name the session - Local Storage BWF (.WAV) Audio File Type 24 Bit Depth 48kHz Sample Rate Last Used I/O Settings LOCATION (press the location button) CHOOSE one of the ProTools HARD DRIVEs VERY IMPORTANT - you know where you saved your session !!!click Create to create your session | |
Go to > Setup > Peripherals |
|
Navigate to the Ethernet Controllers Tab Enable the Ethernet Port > Ethernet #2
Choose to Enable EUCON |
|
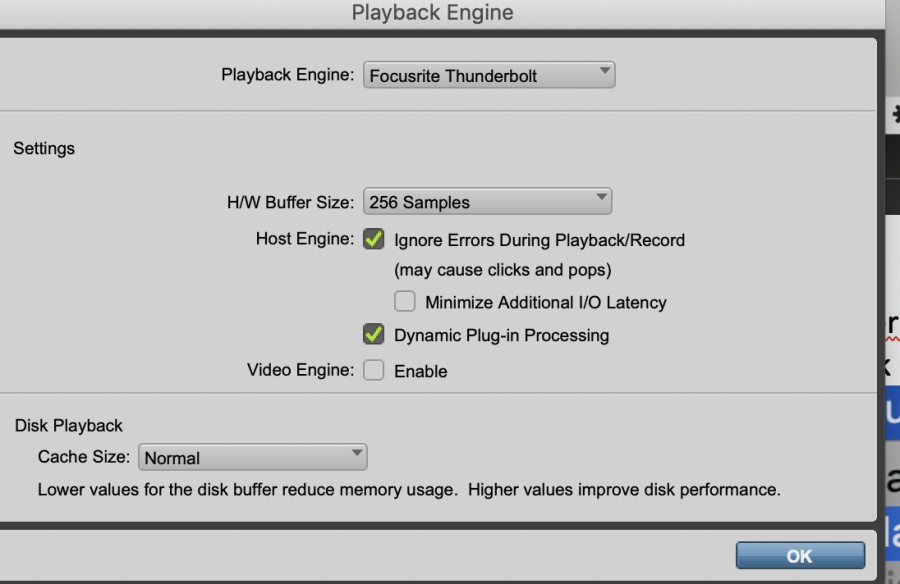
| Then go to >Setup>Playback Engine |
|
| Set to Focusrite Thunderbolt |
|
| Then Import the surround sound template for the input and the output |
|
Choose Import Settings |
|
| Choose >tempstorage>Templates> UT RTF Default .pio |
|
| Choose NO here |
|
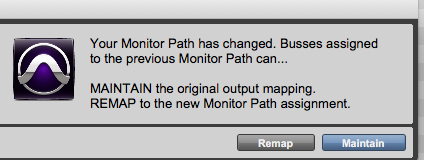
Choose to REMAP to the new Monitor Paths |
|
| Then Click OK Here |
|
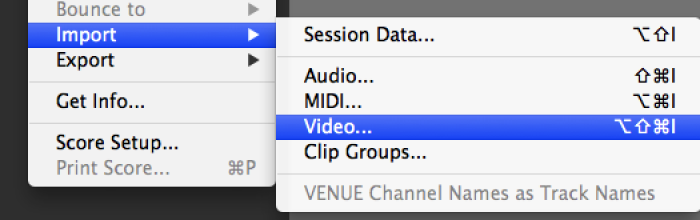
Next Import the video into the project |
|
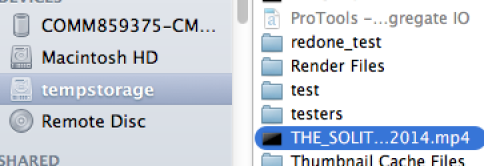
Navigate to the video file that you want to view in the ProTools session |
|
Choose New Track |
|
Choose to import at Session Start |
|
Choose to enable the Video Engine |
|
If you would like to use the audio of the video file choose to save it to the default Audio Drive folder |
|
Video Engine will launch and you should be able to see the image on the projector automatically |
|
|
|
Once the track is imported into the ProTools session change the format of the clip to 720p/23.976 or 1080p/23.976 depending on what kind of file you have so it plays out to the projector. |
|
Next make sure the Video Track is Online and that the menu states that Video Hardware is Enabled. If Disable Video Hardware is showing it is okay Go to Options > Video Track Online |
|
Next Go to the Output and set all the tracks to "Main (5.1) > Main" |
|
Turn on the projector HDMI 1 is the 3rd Computer monitor if you want to see the computer screen on the projector HDMI 2 is the output of the BlackMagic Video Card To see the Video out of ProTools choose HDMI 2 |
|
Press A button depressed - For Surround Sound output from ProTools Press B button pressed - For Surround Sound output from everything else |  |
 | |
| This device in the ISO box needs to be set to Multi at all times |
|


Overview
Content Tools