Download a .pdf of this document click here
AMA (Avid Media Access) is a revolutionary plug-in architecture that greatly accelerates your tapeless video workflows, including RED/RED EPIC, QuickTime, ProRes, AVCHD, HDCAM SR Lite, XDCAM, P2, GFCAM, and Canon XF. With AMA, you can simply connect a supported card/disc or device and begin viewing and cutting footage right away---no need to transcode media or use other software to view or extract the clips. |  |
First thing is to look at what plug ins are installed
Open up the Console Tool |  |
Type in
ama_listplugins |  |
console - list of plug ins installed in AVID MCS on the lab mac | 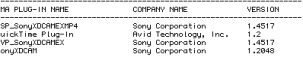 |
Go to >Settings>AMA |  |
Choose Volume Mounting Tab |  |
Choose to Check for additional or updated AMA plugins at AVID.com |  |
Can also go to >Marketplace>AMA Plug-Ins |  |
Go to >Settings>AMA>
BIN
CREATE A NEW BIN:
Creates a new bin, and that new bin can have one of three different names. You select the name you want with the buttons shown below this option:
Default Bin Naming Convention will create a bin with the name of your project and a bin number appended to it, such as "My Project Bin1". This is the default way your editing system names all new bins.
Volume Name will create a bin with the name of the Drive the clips come from, such as "Media D" if Media is the name of your drive D.
Specify Bin Name allows you to enter a specific name for your bin ahead of time. If you then AMA link clips several times, the new material always goes into this bin. If the Bin is closed, it will be opened and filled with the new clips. |  |
AMA Link Preference: Video - This option allows you to select a quality resolution: Highest Quality or Most Compressed before linking your video media.
AMA Link Preference: Audio - This option allows you to select a quality resolution: Highest Quality or Most Compressed before linking your audio media.
Consolidate/Transcode Preference: Video - This option allows you to consolidate/transcode your video media to the Highest Quality or Most Compressed resolution.
Consolidate/Transcode Preference: Audio - This option allows you to consolidate/transcode your audio media to the Highest Quality or Most Compressed resolution.
|  |
|  |
|  |
Single Bin Based On Selected Folder - Places all linked clips into one default bin.
Single Bin Named - Lets you create a new bin and type in a new bin name. Places all linked clips into that bin.
Bin(s) Based on Current AMA Setting - Places the clips in the bin(s) you set up in the AMA Settings Bins tab.
Bin(s) Based on Subfolders – Places the clips in bin(s) based on their subfolders.
Top Bin Window - Places the clips in the active bin. |  |
The AMA files will have a different Icon than the regular Master Clips example shown here |  |
Next go to Bin>Choose Columns to show Setting Movie Attributes |  |
Choose>Source File
to show the original QuickTime movie name is preserved in the SOURCE FILE Column. This is useful if you need to find the original movie to relink to it.
Source Path shows the path location of the original file |  |
The contents of the FIELD MOTION, REFORMAT and IMAGE ASPECT RATIO columns are directly editable by clicking on them in the bin.
Below (left) we are selecting the aspect ratio which should be used to display an NTSC movie inside an HTDV Project. Below (right) we could then go to the REFORMAT column and choose how the conversion should be done – using Stretch, Pillar Box or Centre cut for example. FIELD MOTION will allow us to select INTERLACED or PROGRESSIVE treatment for our clips |
|
NTSC movie inside an HTDV Project |  |
|  |
FIELD MOTION will allow us to select INTERLACED or PROGRESSIVE treatment for our clips |  |
|
Video Tab will show what kind of file we are linking to |  |
3 ways of dealing with media that you need to get into AVID as "Natively" as possible
- Fast Import – Use this for dealing with ProRes files will simply change the .mov into a .mxf
|  |
- Make sure you are using the same resolution as the original ProRes QT
|  |
- Consolidate using AMA – Use this workflow for HDV, XDCAM and P2 native files. All these files are native .mxf data.
|  |
Example of P2 media
This type of media does not need to be transcoded just consolidated
|  |
Go to >Clip>Consolidate/Transcode |  |
Choose Consolidate and pick a destination for the files. The files will then be put in the AVID MediaFiles Folder very quickly. Not taking as much time as a transcode
 |  |
- The final way to ingest AMA data into AVID is to Transcode it. This applies to AVCCAM, AVCHD, H264 and RED. This data is not .mxf and needs to be transcoded to .mxf from whatever the original encoded file is. This is an example of a HMC150's card data and notice it records to a .MTS file.
|  |
Go to >Clip>Consolidate/Transcode |  |
Choose to Transcode
Pick a drive to save the files to under the
"Video/Data" setting
Choose the "Target Video Resolution"
Ex: Apple ProRes MXF
Click "Transcode" to start processing of .mxf rewrap
After the process is complete, new master clips are created in the bin that point to the "Transcoded" media. |  |