Page History
...
Graphics switcher files require alpha channels to know what is transparent and what to show, and they have to be at the precise resolution going into the switcher. Therefore I highly suggest modifying the existing template instead of starting from scratch.
Download the template document here. | |
Open the template document in Adobe Photoshop. |
|
Find the Layers window. |
|
The text layer 'Belo Center for New Media' contains that same text. If you only wish to have text on the screen, select this layer, and use the Text tool to change the words. |
|
If you do not wish to use the existing text, hide the Layers: |
|
Your document should be a checkerboard background (transparent) with an opaque bar at the bottom. |
|
To add your own image, create a new layer by clicking the New Layer button at the bottom of the Layer window. |
|
Double click on the 'Layer 1' text to change the name of the layer. I've changed mine to 'Example Logo.' |
|
With your new layer selected, copy and paste your desired image into the layer. |
|
Press Edit > Free Transform (Command T) to start adjusting the scale of your image. |
|
Grab one corner of the image with your mouse, hold down Shift on the keyboard, and adjust the size to something to the desired size. By holding down Shift, you ensure the image scales proportionally instead of stretching. |
|
Click within the image and drag around the screen to change its position on screen. Press return when you are done to exit Free Transform mode. |
|
In the Layers menu, select the Blending style drop-down menu. It will be set to Normal by default. Change it to 'Linear Dodge (add)'. |
|
Now that we have a logo, I'm going to add text. Repeat the above steps from creating a new layer through changing the Blending style. |


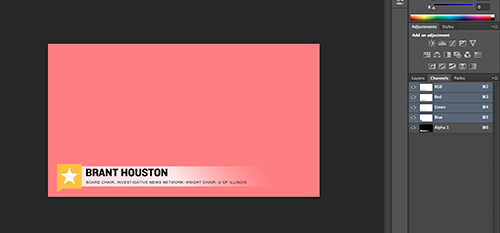
After all your graphics are made, take a look at your alpha channel by choosing the 'channels' tab and clicking the 'eye' on the alpha layer. |
|
This will make the alpha channel appear as pink on your image. Anything that is black in the alpha layer will be translucent. If there is pink over graphics you want to appear when keyed over a background, you may need to edit the alpha channel. Using photoshop editing tools to paint white in the alpha channel will make it opaque when keyed over a background. Shades of grey will appear as semi-opaque. |
|

After you have completed your image, make sure to save it. File > Save (Command S) |
|
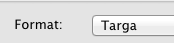
Now, we have to save it in a format that the switcher can recognize. Select File > Save As ... (Command Shift S) |
|
From the Format drop-down menu, change the format from a Photoshop document to a Targa. If you do not do this step, the switcher will not recognize the file. |
|
Name the file something that makes sense to you, and make sure that the 'Alpha Channels' box is checked. |
|
| Make sure you specify 32 bits per pixel when saving the targa with an alpha channel. Targa images are 8 bits of data per color, so 24 bits are available for RGB only images (8*3=24) and 32 bits per channel are needed for RGBA (8*4=32). If you have an alpha channel and only save at 24 bits/pixel, the alpha channel will be eliminated and the graphics will not be able to key over the background. |  |


Overview
Content Tools