Page History
This workflow is created to explain how to link back to your camera originals and then convert the files to DNxHD 175X or DNxHR full res files.
If you are already editing in DNxHD 175 or higher then you don't need to relink to camera originals
...
.
You will create a QuickTime and then go to the Exporting to AAF step in the middle of this wiki document.
| ||
Change from this | ||
To This | ||
Relink to the AMA volume that the raw .r3d files are on. Go to >File>Link to AMA Volume | ||
Locate the original Native Pro Res .movs QuickTimes | ||
Use the settings "Bins Based on Current AMA Setting" | ||
When ready to online reconnect to the native camera files. | ||
Right click the sequence to relink and choose Relink | ||
Use the standard relinking options after the AMA media has been mounted | ||
If that doesn't work choose | ||
Change the timeline Clip Color to show AMA clips as a different color so you can make sure you are linked to the "Native" ProRes .mov QuickTimes | ||
| ||
Notice in this timeline only part of the clips turned purple. You should have the entire timeline show purple clips so that you know all the clips are relinked. | ||
On AVID timeline, you can -Match Frame>Find Bin>Reveal File to double check the files are relinking back to the original camera native files |
| |
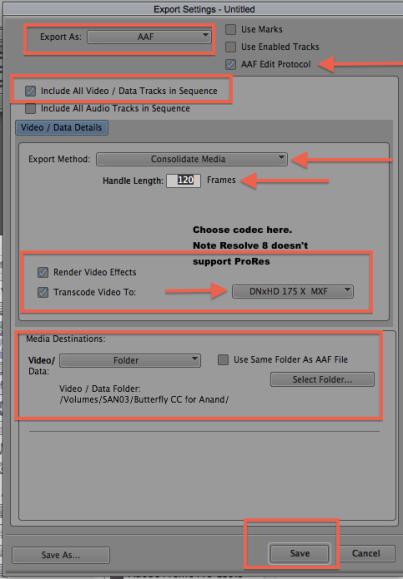
Next go to >File>Output>Export to File> |
|
|
Export as .aaf |
|
|
Choose where to save the .aaf and title it keeping the .aaf extension. Don't worry what the Export Settings Drop down states. We set the "Options" correctly |
|
|
The export when finished will look like this |
|
|
Deliver this folder and the DNxHD quicktime to the colorist or if you are color grading your own project import the .aaf into resolve. |
|
|


Overview
Content Tools