Start by downloading the .zip file located at: Refine
This download link is currently active, although the project is migrating to github.
Check with the projects main website if there is questions as to how to download and install from github. The site can be found at:
(best viewed on Firefox web browser)
Save the file to your desktop, and then double-click on the file google-refine.exe
This will launch Refine in a browser window. If it does not automatically launch, paste this address into the address bar of your web browser: http://127.0.0.1:3333/
Refine will work with many types of files. Because our end goal is to upload into Specify, keeping everything in spreadsheet form is preferred. Refine will work with both .xls and .xlsx files.
First, create a project in Refine by uploading a dataset. 
Once Refine has finished verifying your data, it gives you an intermediary screen that allows you to name your project (1), select which worksheets get imported (2), and some data-handling options (3). Select "Create Project" when you are satisfied with dataset.

Refine, as a default, displays 10 rows. You can have it display up to 50 but not more (1). Refine is not a tool for modifying data within cells one at a time. It is best used for dealing with whole swaths of data. Refine does that by a tool called 'facet' (2), which is an option you find by clicking on the down-arrow on which ever column you wish to facet. Faceting data is like a filter for selecting data that meets a certain criteria- it can be a word, length of an entry, or just lumping data into how many times it occurs. You can also facet many rows at once, to get a very precise set of data which you can then act on. In the example below, the facet was set to 'text facet' (3). Faceting the column this way shows the data in the cells (4), and how many times that data is used . The column 'Type status' (4) will only have a handful of variety (4 choices in this case). Something like 'Collection Number' would have many- 411 choices (5). Please note that the Facets allow you to sort by name or count. 
Taking a closer look at the "Type Status" facet we see many entries that won't upload into Specify. There are 21 entries that read "mentioned*", and six that say "Figured*". By clicking on the 'edit' option that appears when we hover over that selection, the edit box appears and we can change all 6 entries at once. The number of choices now becomes 3, and the number of entries that say 'Figured' has gone from 21 to 27. We can do the same for the entries 'mentioned*'. Specify expects to see 'referred', not 'mentioned*', so we use this same process to change those records. There are many other columns where this can be done, also- Building (adding 'Building' to 122 and 33), you can also use 'edit' to add things to the blanks, such as adding 'dry' to all the blank entries in 'prep type' and so on. Facet by name also helps identify typos and misspelling ('Texas' has 300 entries, while Texsa has 4)
Faceting by words can help mine data out of comments fields. From the drop down on the column you are going to be mining, select 'Facet' then 'Customized Facets' and from that sub menu, select 'Word facet'. You can also facet for patterns (like lat/long entries in hours, min, seconds) using regex.

Moving the data is easy- faceting the Comments column for entries with the word 'cast' shows us which entries were noted in their inventory as being 'casts'. We can see in the Text Facet of the Comments column that the word 'cast' is being used to mean a cast of a specimen. We can then see the records in the PrepType Text Facet is blank for those records. Edit the blank cells in bulk using the edit option in the facet display box. Change (blank) to Cast, and apply the change. This process can be done on any type of data.

When preparing a spreadsheet for upload to Specify, there are many instances where you'll need to combine data from many columns into one, or transpose data from one column into another. Refine makes this very simple, using the 'Transform' option. For example, we are putting the previous storage location information into the Comments section, and renaming this column 'Inventory Remarks' (the field name in Specify). Renaming the columns can be done via the 'Edit Column' drop down, but taking the information from 3 fields and adding it to another field is a little trickier. For this, we will need to combine a few tricks we got from Refine Recipes. The recipe for Merging columns is:
cells["col1"].value + ", " + cells["col2"].value
cells = each cell in whatever is inside the [].
"col1" = the name of first column you want to combine
.value = tells Refine to get the exact value of the cells.
+ = combine this value with
", " = telling Refine to add a comma and a space
+ = combine this value with
cells = (same as above)
"col2" = the name of the second column you want to combine
.value = tells Refine to get the exact value of the cells.
So, it's a coded sentence that is telling Refine "for each cell of this column, take that value and add a ", " to it. Then, take the cells in this other column and add the values to behind the ", ".
First things first though. You are going to want to add a separator in front of any data that is already in the Comments Column. To do this, we'll be using facets to act ONLY on the cells with data in them, and the Transform command to add a character in front of the comments. To do this, we create a facet on the comments section, hover over the (blank) and click on the "include" option. Then select the 'invert' option near the top of the facet title.

This 'flips' the selection, and now you should see only the cells with data in them. From the Comments drop down, select Edit Cells and from the sub menu, select Transform. A new window will appear. Adding information is very simple. Make sure the Language is set to the default value, Google Refine Expression Language (GREL). We are going to add a semi-colon and a space before the existing data.
![]()
Now that we've done that, we can add the previous storage location without ending up with statments in the field that read "SW 269/9Young, Oversized"!
Remember, when we are ADDING data to another column, you have to tell Refine to also add the data from the cells in the column you are working in.
In practice, it looks like this:
![]()
The same 'recipe' is the foundation for how we take our old database numbering style and make it Specify compatible. But first, we have to use the recipe for padding with 0's.
The recipe is:
| Code Block |
|---|
"0000"[0,4-value.length()] + value |
The recipe says to take the value, add as many 0's as are needed to make the field have 4 values stored in it. This will add 4 0's to our value. If we need more, we increase the number of 0's to what we need, then change the number inside the brackets to match.
Specify expects to see 3 values for the Collection, 8 values for the specimen number, a decimal then 3 values for the suffix. Remember here that letters follow the .R00 format, and numbers .001. Suffixes like 'T6' would be set to .T06
To make the Collection have 3 digits, paste this expression into the Transform window for the Collection column-value
| Code Block |
|---|
value +"000"[0,3-value.length()] |
To make the Specimen number have 8 digits, paste this expression into the Transform window:
| Code Block |
|---|
"0000000" + value[0,8-value.length()] |
* Notice how the order has changed a little- the string of 0's is at the start, and the value is added to it. This gives us 0 padding in front of the number. For the Collection, we wanted the 0's to come at the end of the collection acronym so the expression structure was swapped around.
Changing the suffixes is a little more involved. First, facet the column. All the entries for '.' can be bulk edited to "000". Don't put a decimal in just yet. Create a text filter and type this into the box: [a-zA-Z] 
1) Select the 'regular expression' box. We are telling the text filter to show records that have a-z in them, capitol or lower case letters.
1a) Transform on the filtered column:
| Code Block |
|---|
value +"000"[0,3-value.length()] |
Remember, for letters we want A00 B00 and so on.
2) Now change the a-zA-Z to 0-9, leaving the brackets in place.
2a) Transform on the filtered column:
| Code Block |
|---|
"000"+ value[0,3-value.length()] |
![]()
You now have all suffixes transformed and properly formatted.
Now that all are formatted for Specify, combine them into a new column named "Catalog Number". The recipe looks like this: 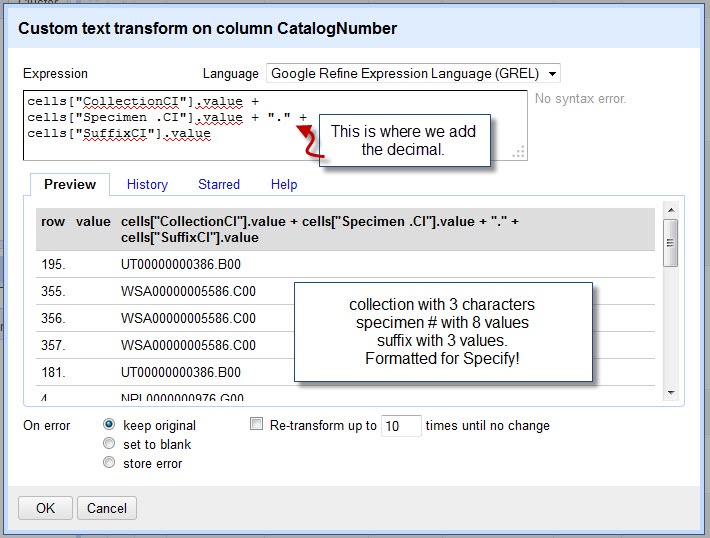
These recipes can be adapted, combined and broken apart to do a variety of actions. Refine is exceptional in that it allows you to undo as much as you need- straight back to the start, if you want.
| Code Block |
|---|