| Info |
|---|
This is an abbreviated FAQ that covers only the basics for setting up CrashPlan on a computer, using the cloud console to review backups for all of your computers, and configuring notifications. For more information please visit https://utbackup.utexas.edu. |
All CrashPlan backups are tied to a specific EID. CrashPlan does not backup any computer you use until you first log into the CrashPlan application on that computer to initiate the process. By default it will only backup your profile (desktop, documents, etc.), but it will also back up other directories if you configure it to do so.
Many backup settings can be configured using either the cloud console or the app on the local computer. However, once CrashPlan has been setup for your computer we recommend you use cloud console where possible, since it provides an overview of all your current and past computers and offers more control over some settings, like notifications.Generally, you only need to log onto the CrashPlan app on a particular computer when you initially set up CrashPlan on that computer and then again only if the cloud console or an alert report that backups are not working on that computer.
Table of Contents maxLevel 3 minLevel 3
How do I access and use the Crash Plan cloud console?
Detailed information about how to log into the CrashPlan cloud or how it works are documented at https://utbackup.utexas.edu. The quick synopsis for logging into the CrashPlan cloud is to go to https://console.us2.crashplan.com and log on with your EID as your username in the form of [EID]@eid.utexas.edu. Specifying your username to CrashPlan in that way will have it direct you to UT's standard EID logon page. Once logged in you can review the information for any computer you configured for backup using your EID.
If you still have any questions about backup concerns please reach out to McCombs Technology Solutions. You can submit a help request ticket at https://mccombs.utexas.edu/about/tech/. For urgent matters you can stop by our Service Desk at GSB 3.132 or call us at 232-6616.
How do I initiate or modify backups on a computer?
This requires that the CrashPlan app be installed on the computer. On a Windows computer you can type "CrashPlan" in the search box in the lower left corner of your screen. On a Mac, you can find it listed as "Code 42" in the application Launchpad. If the app is not installed please submit a help request ticket at https://mccombs.utexas.edu/about/tech/.
Once you launch the CrashPlan app you will be prompted to log in. Log into the app with your EID in the form of {EID]@eid.utexas.edu. If you are prompted to enter a server address, then enter clients.us2.crashplan.com. Once logged in, the app should look similar to this:

How do I review the general status of all my backed up computers?
This is best done in the Cloud CrashPlan cloud console (https://console.us2.crashplan.com). Log into the cloud console with your EID in the form of {EID]@eid.utexas.edu. Once logged in, the cloud console should look similar to this:

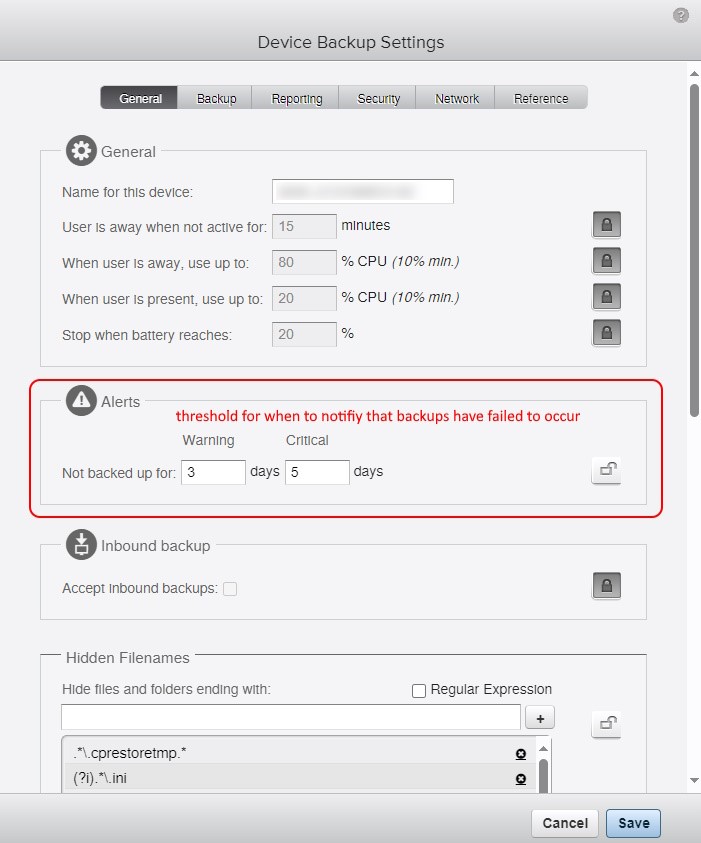
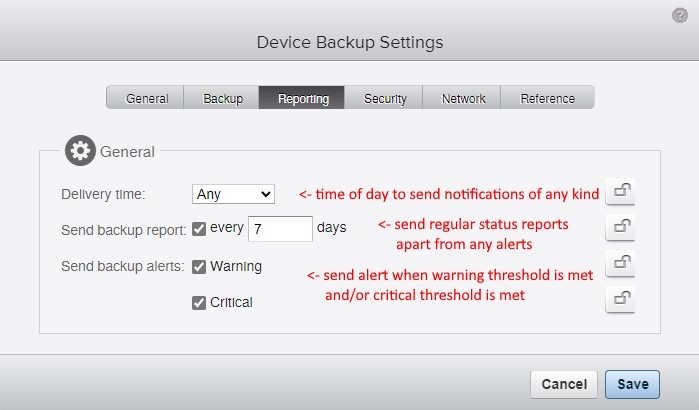
How do I configure notifications about my backups?
You can choose to have CrashPlan send you weekly overall status reports and/or to send you alerts whenever backup issues occur.
The CrashPlan desktop app does offer some basic alert notification settings, but notifications are best configured in the Cloud CrashPlan cloud console (https://console.us2.crashplan.com).
Once logged into the cloud console main window, click the name of the computer you want to configure for notifications. When you do so, a read-only window will appear allowing you to explore various CrashPlan settings for the selected computer. From the drop down menu in the upper right of the cloud console, Use the Edit... menu item to enter edit mode to make changes if you need to.

In edit mode, when you click a settings category you will get a new window allowing you to change settings in that category. The General and Reports categories contains settings used to configure notifications. Below are examples of the the edit windows for General settings and Reporting settings. Configure them as you wish. If you always want to receive notification on a regular schedule to reassure yourself that things are still working, then configure a report to be sent every X number of days. If you only want to be notified when a backup issue occurs and soon as the issue is detected, then only configure alerts to be sent. You can configure both if you wish. Keep in mind that alerts will only be sent if backups were successfully initiated in the first place. We recommend that you initially configure backup reports for every few days and keep that in place until you are satisfied that backups are working as you expect. You can turn of regular reports afterward if you want or increase the reporting interval to every 30 days or longer. You should also ensure the backup report are sent to your Junk Email folder. This will ensure that actual alerts don't go there either.
|
|