...
The Terminal window
- Macs and Linux have a Terminal programs program built-in – find it now on your computer
- Windows needs helpPutty – http10 or later has ssh and scp in Command Prompt or PowerShell (may require latest Windows updates)
- Open the Start menu → Search for Command
- Open the Start menu → Search for Command
| Expand | ||
|---|---|---|
| ||
If your Windows version does not have ssh in Command Prompt or PowerShell:
|
...
...
|
|
...
|
...
More advanced options for those who want a full Linux environment on their Windows system:
|
...
- terminal plus minimal Linux environment
- has ssh, scp but not rsync
|
From now on, when we refer to "Terminal", it is either the Mac/Linux Terminal program, Windows Command Prompt or PowerShell, or the PuTTY program.
...
- a full Linux environment, including X-windows for running GUI programs remotely
- really the best, but complicated to install
...
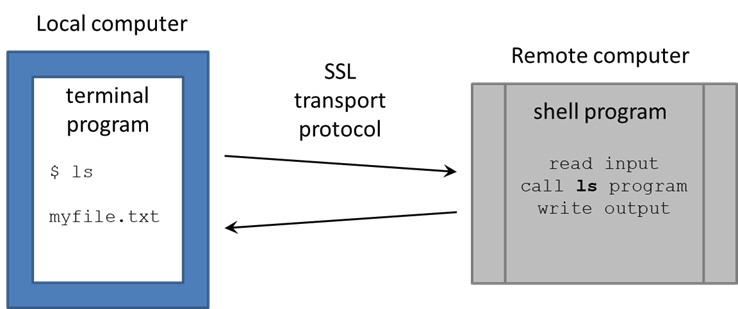
SSH
ssh is an executable program that runs on your local computer and allows you to connect securely to a remote computer. We're going to use ssh to access the Lonestar5 Lonestar6 compute cluster at TACC (Texas Advanced Computing Center), where the remote host name is ls5ls6.tacc.utexas.edu.
On Macs, Linux and Windows (Git-bash or Cygwin), you run ssh from a Terminal window.
In your local Terminal window:
| Code Blockcode | ||||
|---|---|---|---|---|
| ||||
ssh your<your_TACC_userID@ls5userID>@ls6.tacc.utexas.edu # For example: ssh abattenh@ls6.tacc.utexas.edu |
- Answer yes to the SSH security question prompt
- this will only be asked the 1st time you access ls6
- Enter the password associated with your TACC account
- for security reasons, your password characters will not be echoed to the screen
- Get Wait for your 2-factor authentication code to arrive via SMS or from your phone's TACC Token app, then and type it in
| Expand | ||
|---|---|---|
| ||
If you're using |
...
PuTTY as your Terminal from Windows:
|
...
|
...
|
...
|
...
The bash shell
You're now at a command line! It looks as if you're running directly on the remote computer, but really there are two programs communicating:
- your local Terminal
- the remote Shell shell
There are many shell programs available in Linux, but the default is bash (Bourne-again shellBourne-again shell).
The Terminal is pretty "dumb" – just sending your typing what you type over its secure sockets layer (SSL) connection to TACC, then displaying the text sent back by the shell. The real work is being done on the remote computer, by executable programs called by the bash shell .

| Tip |
|---|
The bash command-line environment is extremely powerful, but also complex and unforgiving – a one-character mistake can make all the difference between a command that works and one that doesn't! In spite of the hurdles, learning to get around the Linux command line will pay substantial dividends. A good place to start is with our Linux fundamentals wiki page. |
Setting up your environment
First create a few directories and links we will use (more on these later).
(also called commands, since you call them on the command line).
About the command line
Read more about the command line and commands on our Linux fundamentals page:
- The bash shell REPL and commands
- Getting help
- Literal characters and metacharacters
- About command line input
Setting up your environment
Setup your login profile (~/.bashrc)
Now execute the lines below to set up a login script, called ~/.bashrc. [ Note the tilde ( ~ ) is shorthand for "my Home directory". See Linux fundamentals: pathname syntax ]
When you login via an interactive shell, a well-known script is executed to establish your favorite environment settings. The well-known filename is ~/.bashrc (or ~/.profile on some systems), which is specific to the bash shell.
We've pre-created a common login script for you that will help you know where you are in the file system and make it easier to access some of our shared resources. To set it up, perform the steps below:
| Tip |
|---|
You can copy and paste these |
| Tip |
You can copy and paste these lines from the code block below into your Terminal window. Just make sure you hit Enter after the last line. |
...
| Warning | ||||
|---|---|---|---|---|
If you already have a .bashrc set up, make a backup copy first. cd
| ||||
| title | Create symbolic directory links |
| ||
| Tip | ||||
You can restore your original login script after this class is over. |
If your Terminal has a dark background (e.g. black), copy this file:
| Code Block | ||||
|---|---|---|---|---|
| echo $SCRATCH
| Expand | |||||||
|---|---|---|---|---|---|---|---|
| |||||||
The ln -s command creates a symbolic link, a shortcut to the linked file or directory.
Want to know where a link points to? Use ls with the -l (long listing) option.
|
Set up a $HOME/local/bin directory and link a scripts there that we will use a lot in the class.
| Code Block | ||||
|---|---|---|---|---|
| ||||
mkdir -p ~/local/bin
cd ~/local/bin
ln -s -f /work/projects/BioITeam/common/bin/launcher_creator.py
|
| Tip | ||
|---|---|---|
| ||
The tilde character ( ~ ) is a pathname shortcut that means "home directory". We'll see more of it later. $HOME is an environment variable set by TACC that also refers to your home directory. |
Now execute the lines below to set up a login script, called .bashrc
When you login via an interactive shell as you did above, a well-known script is executed by the shell to establish your favorite environment settings. We've set up a common login script for you to start with that will help you know where you are in the file system and make it easier to access some of our shared resources. To set it up, do the steps below:
| Warning | |||||
|---|---|---|---|---|---|
If you already have a .bashrc set up, make a backup copy first.
You can restore your original login script after this class is over. |
| Code Block | ||||
|---|---|---|---|---|
| ||||
cd
cp /work/projects/BioITeam/projects/courses/Core_NGS_Tools/tacc/bashrc.corengs.ls5  .bashrc
chmod 600 .bashrc |
| Expand | ||
|---|---|---|
| ||
What's going on with chmod?
|
| ||
cp /corral-repl/utexas/BioITeam/core_ngs_tools/login/bashrc.corengs.ls6.dark_bg  ~/.bashrc
chmod 600 ~/.bashrc |
If your Terminal has a light background (e.g. white), copy this file:
| Code Block | ||||
|---|---|---|---|---|
| ||||
cp /corral-repl/utexas/BioITeam/core_ngs_tools/login/bashrc.corengs.ls6.light_bg  ~/.bashrc
chmod 600 ~/.bashrc |
So why don't you see the .bashrc file you just copied when you do ls? Because all files starting with a period (dot files) are hidden by default. To see them add the -l (long listing) and -a (all) options to ls:
| Code Block | ||
|---|---|---|
| ||
# show a long listing of all files in the current directory, including "dot files" that start with a period
ls -la |
(Read more about File attributes)
| Expand | ||
|---|---|---|
| ||
What's going on with chmod? The chmod 600 ~/.bashrc command marks the file as readable and writable only by you. |
Since your ~/.bashrc is executed when you login, to ensure it is set up properly you should first log off Lonestar6 like this:
| Code Block | ||||
|---|---|---|---|---|
| ||||
exit |
Your Terminal has logged off of Lonestar6 and is back on your local computer.
Now log back in to ls6.tacc.utexas.edu. This time your ~/.bashrc will be executed to establish your environment:
| Tip | ||
|---|---|---|
| ||
Your new ~/.bashrc file defines a ll alias command, so when you type ll it is short for ls -la. |
You should see a new command line prompt:
| Code Block |
|---|
ls6:~$ |
The great thing about this prompt is that it always tells you where you are, which avoids you having to execute the pwd (present working directory) command every time you want to know what the current directory is. Execute these commands to see how the prompt reflects your current directory.
| Code Block | ||
|---|---|---|
| ||
# mkdir -p says to create all parent directories in the specified path
mkdir -p ~/tmp/a/b/c
cd ~/tmp/a/b/c

# Your prompt should look like this:
ls6:~/tmp/a/b/c$ |
The prompt now tells you you are in the c sub-directory of the b sub-directory of the a sub-directory of the tmp sub-directory of your Home directory ( ~ ).
Your login script has configured this command prompt behavior, along with a number of other things.
Create some symbolic links and directories
Create some symbolic links that will come in handy laterSince .bashrc is executed when you login, to ensure it is set up properly you should first log off ls5 like this:
| Code Block | ||||
|---|---|---|---|---|
| ||||
exit |
Then log back in to ls5.tacc.utexas.edu. This time your .bashrc will be executed and you should see a new shell prompt:
| Code Block |
|---|
ls5:~$ |
The great thing about this prompt is that it always tells you where you are, which avoids having to issue the pwd (present working directory) command all the time. Execute these commands to see how the prompt reflects your current directory.
| Code Block | ||
|---|---|---|
| ||
mkdir -p tmp/a/b/c
cd tmp/a/b/c

# Your prompt should look like this:
ls5:~/tmp/a/b/c$ |
The prompt now tells you you are in the c sub-directory of the b sub-directory of the a sub-directory of the tmp sub-directory of your home directory ( ~ ).
So why don't you see the .bashrc file you copied to your home directory? Because all files starting with a period (dot files) are hidden by default. To see them add the -a (all) option to ls:
| Code Block | ||||
|---|---|---|---|---|
| ||||
cd
ls -a |
To see even more detail, including file type and permissions and symbolic link targets, add the -l (long listing) switch:
| Code Block | ||
|---|---|---|
| ||
ls -la |
Details about your login script
...
| |
cd  # makes your Home directory the "current directory"
ln -s -f $SCRATCH scratch
ln -s -f $WORK work
ln -sf /work/projects/BioITeam/projects/courses/Core_NGS_Tools CoreNGS

ls # you'll see the 3 symbolic links you just created
|
Symbolic links (a.k.a. symlinks) are "pointers" to files or directories elsewhere in the file system hierarchy. You can almost always treat a symlink as if it is the actual file or directory.
| Tip |
|---|
$WORK and $SCRATCH are TACC environment variables that refer to your Work and Scratch file system areas – more on these file system areas soon. (Read more about Environment variables) |
| Expand | ||||||
|---|---|---|---|---|---|---|
| ||||||
The ln -s command creates a symbolic link, a shortcut to the linked file or directory.
Want to know where a link points to? Use ls with the -l (long listing) option.
| List .bashrc file contents without pausing | |||||
cd
cat .bashrc

# or for larger files...
more .bashrc |
| Tip | ||
|---|---|---|
| ||
| The cat command just echos the entire file's content, line by line, without pausing, so should not be used to display large files. Instead, use a pager (like more or less) or look at parts of the file with head or tail. |
|
Set up a ~/local/bin directory and link a script there that we will use in the class.
| Code Block | ||||
|---|---|---|---|---|
| ||||
mkdir -p ~/local/bin
cd ~/local/bin
ln -s -f /work/projects/BioITeam/common/bin/launcher_creator.py
|
Since our ~/.bashrc login script added ~/local/bin to our $PATH, we can call any script or command in that directory with just its file name. And Tab completion works on program names tooYou'll see the following (you may need to scroll up a bit to see the beginning):
| Code Block | ||||
|---|---|---|---|---|
| ||||
#!/bin/bash
# TACC startup script: ~/.bashrc version 2.1 -- 12/17/2013
#   This file is NOT automatically sourced for login shells.
# Your ~/.profile can and should "source" this file.
# Note neither ~/.profile nor ~/.bashrc are sourced automatically
# by bash scripts.
#   In a parallel mpi job, this file (~/.bashrc) is sourced on every
# node so it is important that actions here not tax the file system.
# Each nodes' environment during an MPI job has ENVIRONMENT set to
# "BATCH" and the prompt variable PS1 empty.
#################################################################
# Optional Startup Script tracking. Normally DBG_ECHO does nothing
if [ -n "$SHELL_STARTUP_DEBUG" ]; then DBG_ECHO "${DBG_INDENT}~/.bashrc{"; fi
##########
# SECTION 1 -- modules
if [ -z "$__BASHRC_SOURCED__" -a "$ENVIRONMENT" != BATCH ]; then
  export __BASHRC_SOURCED__=1
  module load python
  module load launcher
fi
############
# SECTION 2 -- environment variables
if [ -z "$__PERSONAL_PATH__" ]; then
  export __PERSONAL_PATH__=1

# for CCBB summer school courses
  export ALLOCATION=UT-2015-05-18
  export BI=/corral-repl/utexas/BioITeam
  export BIWORK=/work/projects/BioITeam
  export CORENGS=$BIWORK/projects/courses/Core_NGS_Tools
  export PATH=.:$HOME/local/bin:$PATH
  export PYTHONPATH=$BIWORK/ls5/lib/python2.7/site-packages:$PYTHONPATH

  # Turn on coloring by file type in the shell
  export LS_OPTIONS='-N --color=auto -T 0'
  # For better colors using a white background terminal, un-comment this line:
  #export LS_COLORS=$LS_COLORS:'di=1;33:'
  # For better colors using a white background terminal, un-comment this line:
  #export LS_COLORS=$LS_COLORS:'di=1;34:'
fi
##########
# SECTION 3 -- controlling the prompt
if [ -n "$PS1" ]; then
  PS1='ls5:\w$ '
fi
##########
# SECTION 4 -- Umask and aliases
umask 002
alias ll="ls -la"
alias lah="ls -lah"
alias hexdump='od -A x -t x1z -v'
##########
# Optional Startup Script tracking
if [ -n "$SHELL_STARTUP_DEBUG" ]; then DBG_ECHO "${DBG_INDENT}}"; fi |
So what does the common login script do? A lot! Let's look at just a few of them.
the "she-bang"
The first line is the she-bang. It tells the shell what program should execute this file – in this case, bash itself – even though the expression is inside a shell comment (denoted by the # character).
| Code Block | ||||
|---|---|---|---|---|
| ||||
#!/bin/bash
|
environment variables
The login script also sets an environment variable $BIWORK to point to the shared directory: /work/projects/BioITeam, and another environment variable $CORENGS to point to the specific sub-directory for our class.
| Code Block | ||||
|---|---|---|---|---|
| ||||
export BIWORK=/work/projects/BioITeam
export CORENGS=$BIWORK/projects/courses/Core_NGS_Tools |
Environment variables are like variables in a programming language like python or perl (in fact bash is a complete programming language). They have a name (like BIWORK above) and a value (the value for BIWORK is the pathname /work/projects/BioITeam).
shell completion
You can use these environment variables to shorten typing, for example, to look at the contents of the shared /work/projects/BioITeam directory as shown below, using the magic Tab key to perform shell completion.
| Tip | ||
|---|---|---|
| ||
The Tab key is one of your best friends in Linux. Hitting it invokes shell completion, which is as close to magic as it gets!
|
cd

# hit Tab once after typing "laun"
# This will expand to launcher_creator.py
|
Details about your login script
Let's take a look at the contents of your ~/.bashrc login script, using the cat (concatenate files) command. cat simply reads a file and writes each line of content to standard output (here, your Terminal):
| Code Block | ||||
|---|---|---|---|---|
| ||||
cd
cat .bashrc
|
| Tip | ||
|---|---|---|
| ||
The cat command just displays the entire file's content, line by line, without pausing, so should not be used to display large files. Instead, use a pager like more or less. For example: more ~/.bashrc This will display one "page" (Terminal screen) of text at a time, then pause. Press space to advance to the next page, or Ctrl-c to exit more. |
You'll see the following (you may need to scroll up a bit to see the beginning):
| Code Block | ||||
|---|---|---|---|---|
| ||||
#!/bin/bash
# TACC startup script: ~/.bashrc version 2.1 -- 12/17/2013
#   This file is NOT automatically sourced for login shells.
# Your ~/.profile can and should "source" this file.
# Note neither ~/.profile nor ~/.bashrc are sourced automatically
# by bash scripts.
#   In a parallel mpi job, this file (~/.bashrc) is sourced on every
# node so it is important that actions here not tax the file system.
# Each nodes' environment during an MPI job has ENVIRONMENT set to
# "BATCH" and the prompt variable PS1 empty.
#################################################################
# Optional Startup Script tracking. Normally DBG_ECHO does nothing
if [ -n "$SHELL_STARTUP_DEBUG" ]; then DBG_ECHO "${DBG_INDENT}~/.bashrc{"; fi
##########
# SECTION 1 -- modules
if [ -z "$__BASHRC_SOURCED__" -a "$ENVIRONMENT" != BATCH ]; then
  export __BASHRC_SOURCED__=1
  module load launcher
fi
############
# SECTION 2 -- environment variables
if [ -z "$__PERSONAL_PATH__" ]; then
  export __PERSONAL_PATH__=1
  export PATH=.:$HOME/local/bin:$PATH
fi
# For better colors using a dark background terminal, un-comment this line:
#export LS_COLORS=$LS_COLORS:'di=1;33:fi=01:ln=01;36:'
# For better colors using a white background terminal, un-comment this line:
#export LS_COLORS=$LS_COLORS:'di=1;34:fi=01:ln=01;36:'
export LANG="C"  # avoid the annoying Perl locale warnings
export BIWORK=/work/projects/BioITeam
export CORENGS=$BIWORK/projects/courses/Core_NGS_Tools
export BI=/corral-repl/utexas/BioITeam
export ALLOCATION=OTH21164        # For ls6        Group is G-824651
##export ALLOCATION=UT-2015-05-18 # For stampede2  Group is G-816696

##########
# SECTION 3 -- controlling the prompt
if [ -n "$PS1" ]; then PS1='ls6:\w$ '; fi
##########
# SECTION 4 -- Umask and aliases
#alias ls="ls --color=always"
alias ll="ls -la"
alias lah="ls -lah"
alias lc="wc -l"
alias hexdump='od -A x -t x1z -v'
umask 002
##########
# Optional Startup Script tracking
if [ -n "$SHELL_STARTUP_DEBUG" ]; then DBG_ECHO "${DBG_INDENT}}"; fi |
There's a lot of stuff here; let's look at just a few things.
Environment variables
The login script sets several environment variables.
| Code Block | ||||
|---|---|---|---|---|
| ||||
export BIWORK=/work/projects/BioITeam
export CORENGS=$BIWORK/projects/courses/Core_NGS_Tools
|
Environment variables are like variables in other programming languages like python or perl (in fact bash is a complete programming language).
They have a name (like BIWORK above) and a value (the value of $BIWORK is the pathname of the shared /work/projects/BioITeam directory).
To see the value of an environment variable, use the echo command, then the variable name after a dollar sign ( $ ):
| Code Block | ||
|---|---|---|
| ||
echo $CORENGS
|
We'll use the $CORENGS environment variable to avoid typing out a long pathname:
| Code Block | ||
|---|---|---|
| ||
ls $CORENGS
|
(Read more about Environment variables)
Shell completion with Tab
You can use these environment variables to shorten typing, for example, to look at the contents of the shared /work/projects/BioITeam directory as shown below, using the magic Tab key to perform shell completion.
| Tip | ||
|---|---|---|
| ||
The Tab key is one of your best friends in Linux. Hitting it invokes shell completion, which is as close to magic as it gets!
|
Follow along with this:
| Code Block | ||||
|---|---|---|---|---|
| ||||
# hit Tab once to expand the environment variable name
ls $BIW

# hit Tab again to expand the environment variable
ls $BIWORK/

# now hit Tab twice to see the contents of the directory
ls /work/projects/BioITeam/

# type "pr" and hit Tab again
ls /work/projects/BioITeam/pr

# type "co" and hit Tab again
ls /work/projects/BioITeam/projects/co

# type "Co" and hit Tab again
ls /work/projects/BioITeam/projects/courses/Co

# your command line should now | ||||
| Code Block | ||||
| ||||
# hit Tab once after typing $BIWORK/ to expand the environment variable ls $BIWORK/ # now hit Tab twice to see the contents of the directory ls /work/projects/BioITeam/ # type "pr" and hit Tab again ls /work/projects/BioITeam/pr # type "co" and hit Tab again ls /work/projects/BioITeam/projects/co # type "Co" and hit Tab again ls /work/projects/BioITeam/projects/courses/Co # your command line should now look like this ls /work/projects/BioITeam/projects/courses/Core_NGS_Tools/ # now type "m" and one Tab ls /work/projects/BioITeam/projects/courses/Core_NGS_Tools/m # your command line should now look like this ls /work/projects/BioITeam/projects/courses/Core_NGS_Tools/misc/ # now hit Tab once # the shell expands as far as it can unambiguously, # so your command line should look like this ls /work/projects/BioITeam/projects/courses/Core_NGS_Tools/misc/small # now hittype Tab twice # You should see 3 filenames, all starting with "small" # type a period (".") then hit Tab twice again # You're narrowing down the choices -- you should see two filenames"mi" and one Tab ls /work/projects/BioITeam/projects/courses/Core_NGS_Tools/mi # your command line should now look like this ls /work/projects/BioITeam/projects/courses/Core_NGS_Tools/misc/small # finally,now typehit "f" then hit Tab again. It should complete to this: ls /work/projects/BioITeam/projects/courses/Core_NGS_Tools/misc/small.fq |
extending the $PATH
When you type a command name the shell has to have some way of finding what program to run. The list of places (directories) where the shell looks is stored in the $PATH environment variable. You can see the entire list of locations by doing this:
| Code Block | ||||
|---|---|---|---|---|
| ||||
echo $PATH
|
As you can see, there are a lot of locations on the $PATH. That's because when you load modules at TACC (such as the module load lines in the common login script), that makes the programs available to you by putting their installation directories on your $PATH. We'll learn more about modules shortly.
Here's how the common login script adds your $HOME/local/bin directory to the location list – recall that's where we a script we'll use – along with a special dot character ( . ) that means "here", or "whatever the current directory is".
| Code Block | ||||
|---|---|---|---|---|
| ||||
export PATH=.:$HOME/local/bin:$PATH
|
setting up the friendly command prompt
The complicated looking if statement in SECTION 3 of your .bashrc sets up a friendly shell prompt that shows the current working directory. This is done by setting the special PS1 environment variable and including a special \w directive that the shell knows means "current directory".
| Code Block | ||||
|---|---|---|---|---|
| ||||
##########
# SECTION 3 -- controlling the prompt
# for NGS course
if [ -n "$PS1" ]; then
  PS1='ls5:\w$ '
fi
|
...
The first thing you'll want to do is transfer your sequencing data to TACC so you can process it there. Here is an overview of the different storage areas at TACC, their characteristics, and Linux commands generally used to perform the data transfers:
- wget – retrieves the contents of an Internet URL
- cp – copies files located on any local file system
- scp – copies files to/from a remote system
- rsync – copies files on either local or remote systems
...
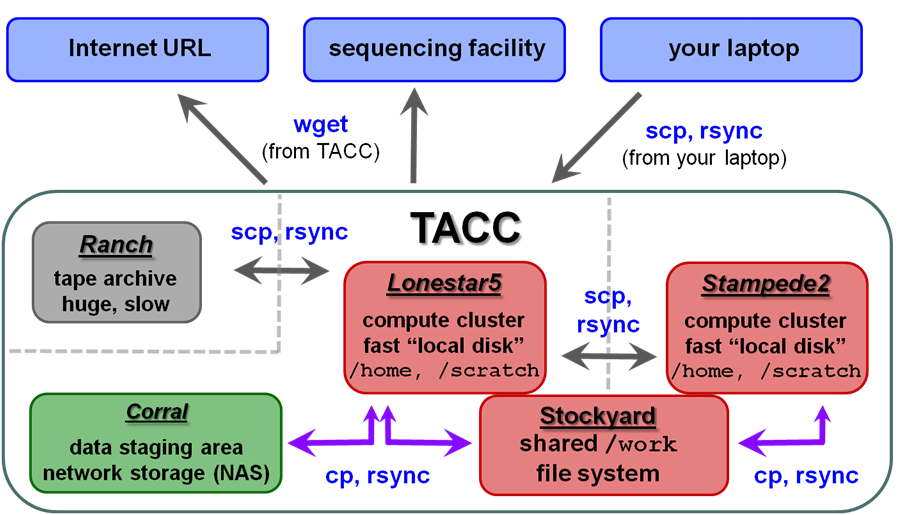
Local file systems
There are 3 local file systems available on any TACC compute cluster (Lonestar5, stampede2, etc.), each with different characteristics. All these local file systems are very fast and set up for parallel I/O (Lustre file system).
On ls5 these local file systems have the following characteristics:
...
When you first login, the system gives you information about disk quota and your compute allocation quota:
| Code Block |
|---|
--------------------- Project balances for user abattenh ----------------------
| Name           Avail SUs    Expires  | Name           Avail SUs     Expires |
| CancerGenetics      4856  2018-09-30 | A-cm10              1096  2018-12-31 |
| UT-2015-05-18       2100  2019-03-31 | genomeAnalysis      2500  2019-03-31 |
------------------------ Disk quotas for user abattenh -------------------------
| Disk         Usage (GB)     Limit    %Used   File Usage       Limit   %Used |
| /home1              0.0      10.0     0.12           91     1000000    0.01 |
| /work             538.5    1024.0    52.59        61053     3000000    2.04 |
| /scratch         3725.9       0.0     0.00         4137           0    0.00 |
------------------------------------------------------------------------------- |
changing TACC file systems
When you first login, you start in your home directory. Use these commands to change to your other file systems. Notice how your command prompt helpfully changes to show your location.
| Code Block | ||||
|---|---|---|---|---|
| ||||
cdw
cds
cd |
| Tip |
|---|
The cd (change directory) command with no arguments takes you to your home directory on any Linux/Unix system. The cdw and cds commands are specific to the TACC environment. |
Stockyard (shared Work)
TACC compute clusters now share a common Work file system called stockyard. So files in your Work area do not have to be copied, for example from ls5 to stampede2 – they can be accessed directly from either cluster.
Note that there are two environment variables pertaining to the shared Work area:
- $STOCKYARD - This refers to the root of your shared Work area
- e.g. /work/01063/abattenh
- $WORK - Refers to a sub-directory of the shared Work area that is different for different clusters, e.g.:
- /work/01063/abattenh/lonestar on ls5
- /work/01063/abattenh/stampede2 on stampede2
A mechanism for purchasing larger stockyard allocations (above the 1 TB basic quota) are in development.
The UT Austin BioInformatics Team, a loose group of researchers, maintains a common directory area on stockyard.
| Code Block | ||||
|---|---|---|---|---|
| ||||
ls /work/projects/BioITeam |
Files we will use in this course are in a sub-directory there:
| Code Block | ||||
|---|---|---|---|---|
| ||||
ls /work/projects/BioITeam/projects/courses/Core_NGS_Tools |
Corral
Corral is a gigantic (multiple PB) storage system (spinning disk) where researchers can store data. UT researchers may request up to 5 TB of corral storage through the normal TACC allocation request process. Additional space on corral can be rented for ~$85/TB/year.
The UT/Austin BioInformatics Team also has an older, common directory area on corral.
| Code Block | ||||
|---|---|---|---|---|
| ||||
ls /corral-repl/utexas/BioITeam |
A couple of things to keep in mind regarding corral:
- corral is a great place to store data in between analyses.
- Store your permanent, original sequence data on corral
- Copy the data you want to work with from corral to $SCRATCH
- Run your analyses (batch jobs)
- Copy your results back to corral
- Occasionally corral can become unavailable. This can cause any command to hang that tries to access corral data!
Ranch
Ranch is a gigantic (multiple PB) tape archive system where researchers can archive data. UT researchers may request large (multi-TB) ranch storage allocations through the normal TACC allocation request process.
There is currently no charge for ranch storage. However, since the data is stored on tape it is not immediately available – robots find and mount appropriate tapes when the data is requested, and it can take minutes to hours for the data to appear on disk. (The metadata about your data – the directory structures and file names – is always accessible, but the actual data in the files is not on disk until "staged". See the ranch user guide for more information: https://www.tacc.utexas.edu/user-services/user-guides/ranch-user-guide.
Once that data is staged to the ranch disk it can be copied to other places. However, the ranch file system is not mounted as a local file system from the stampede or ls5 clusters. So remote copy commands are needed to copy data to and from ranch (e.g. scp, rsync).
Staging your data
So, your sequencing center has some data for you. They may send you a list of web or FTP links to use to download the data.
The first task is to get this sequencing data to a permanent storage area. This should not be your laptop or one of the TACC local file systems! Corral is a great place for it, or a server maintained by your lab or company.
We're going to pretend – just for the sake of this class – that your permanent storage area is in your TACC work area. Execute these commands to make your "archive" directory and some sub-directories.
| Code Block | ||||
|---|---|---|---|---|
| ||||
mkdir -p $WORK/archive/original/2018_05.core_ngs |
Here's an example of a "best practice". Wherever your permanent storage area is, it should have a rational sub-directory structure that reflects its contents. It's easy to process a few NGS datasets, but when they start multiplying like tribbles, good organization and naming conventions will be the only thing standing between you and utter chaos!
For example:
original– for original sequencing data (compressed fastq files)- sub-directories named by
year_month.<project_name>
- sub-directories named by
aligned– for alignment artifacts (bam files, etc)- sub-directories named by
year_month.<project_name>
- sub-directories named by
analysis– further downstream analysis- reasonably named subdirectories, often by project
genome– reference genomes and other annotation files used in alignment and analysis- sub-directories for different reference genomes
- e.g.
ucsc/hg19,ucsc/sacCer3,mirbase/v20
code– for scripts and programs you and others in your organization write- ideally maintained in a version control system such as git, subversion or cvs.
- easiest to name sub-directories for people.
Download from a link – wget
Well, you don't have a desktop at TACC to "Save as" to, so what to do with a link? The wget program knows how to access web URLs such as http, https and ftp.
...
wget
Get ready to run wget from the directory where you want to put the data. Don't press Enter after the wget command – just put a space after it.
| Code Block | ||||
|---|---|---|---|---|
| ||||
cd $WORK/archive/original/2018_05.core_ngs
wget |
Here are two web links:
- http://web.corral.tacc.utexas.edu/BioITeam/yeast_stuff/Sample_Yeast_L005_R1.cat.fastq.gz
- http://web.corral.tacc.utexas.edu/BioITeam/yeast_stuff/Sample_Yeast_L005_R2.cat.fastq.gz
Right-click (Windows) or Control+click (Mac) on the 1st link in your browser, then select "Copy link location" from the menu. Now go back to your Terminal. Put your cursor after the space following the wget command then either right-click (Windows), or Paste (Command-V on Mac, Control-V on Windows). The command line to be executed should now look like this:
| Code Block | ||||
|---|---|---|---|---|
| ||||
wget http://web.corral.tacc.utexas.edu/BioITeam/yeast_stuff/Sample_Yeast_L005_R1.cat.fastq.gz |
Now press Enter to get the command going. Repeat for the 2nd link. Check that you now see the two files (ls).
Copy from a corral location - cp or rsync
Suppose you have a corral allocation where your organization keeps its data, and that the sequencing data has been downloaded there. You can use various Linux commands to copy the data locally from there to your $SCRATCH area.
cp
The cp command copies one or more files from a local source to a local destination. It has the most common form:
cp [options] <source file 1> <source file 2> ... <destination directory>/
Make a directory in your scratch area and copy a single file to it. The trailing slash ( / ) on the destination says it is a directory.
| Code Block | ||||
|---|---|---|---|---|
| ||||
mkdir -p $SCRATCH/data/test1
cp /work/projects/BioITeam/projects/courses/Core_NGS_Tools/misc/small.fq  $SCRATCH/data/test1/
ls $SCRATCH/data/test1

# or..
mkdir -p ~/scratch/data/test1
cd ~/scratch/data/test1
cp /work/projects/BioITeam/projects/courses/Core_NGS_Tools/misc/small.fq  .
ls |
Copy an entire directory to your scratch area. The -r argument says "recursive".
| Code Block | ||||
|---|---|---|---|---|
| ||||
cds
cd data
cp -r /work/projects/BioITeam/projects/courses/Core_NGS_Tools/general/ general/ |
Exercise: What files were copied over?
| Expand | ||
|---|---|---|
| ||
ls general |
| Expand | ||
|---|---|---|
| ||
BEDTools-User-Manual.v4.pdf SAM1.pdf SAM1.v1.4.pdf |
local rsync
...
rsync is a very complicated program, with many options (http://rsync.samba.org/ftp/rsync/rsync.html). However, if you use the recipe shown here for directories, it's hard to go wrong:
rsync -ptlrvP local/path/to/source_directory/ local/path/to/destination_directory/
Both the source and target directories are local (in some file system accessible directly from ls5). Either full or relative path syntax can be used for both. The -ptlrvP options above stand for:
- -p means preserve file permissions
- -t means preserve file times
- -l means copy symbolic links as links
- -r means recursively copy sub-directories
- -v means verbose
- -P means show Progress.
Since these are all single-character options, they can be combined after one option prefix dash ( - ). You could also use options -arvP, where -a means "archive mode", which implies the -ptl options.
| Tip | ||
|---|---|---|
| ||
The trailing slash ( / ) on the source and destination directories are very important! rsync will create the last directory level for you, but earlier levels must already exist. |
| Code Block | ||||
|---|---|---|---|---|
| ||||
cds
rsync -ptlrvP /work/projects/BioITeam/projects/courses/Core_NGS_Tools/ucsc_custom_tracks/ data/custom_tracks/ |
Exercise: What files were copied over?
| Expand | ||
|---|---|---|
| ||
ls $SCRATCH/data/custom_tracks |
Now repeat the rsync and see the difference.
Use the Up arrow to retrieve the previous command from your bash command history.
| Code Block | ||
|---|---|---|
| ||
rsync -ptlrvP /work/projects/BioITeam/projects/courses/Core_NGS_Tools/ucsc_custom_tracks/ data/custom_tracks/ |
| Tip |
|---|
The bash shell has several convenient line editing features:
|
Copy from a remote computer - scp or rsync
Provided that the remote computer is running Linux and you have ssh access to it, you can use various Linux commands to copy data over a secure connection.
The good news is that once you have learned cp and local rsync, remote secure copy (scp) and remote rsync are very similar!
scp
The scp command copies one or more files from a source to a destination, where either source or destination, or both, can be a remote path.
Remote paths are similar to local paths, but have user and host information first:
user_name@full.host.name:/full/path/to/directory/or/file
– or –
user_name@full.host.name:~/path/relative/to/home/directory
Copy a single file to your $SCRATCH/data/test1 directory from the server named gapdh.icmb.utexas.edu, using the user account corengstools. When prompted for a password, use the one we have written on the board.
| Code Block | ||
|---|---|---|
| ||
cds
scp corengstools@gapdh.icmb.utexas.edu:~/custom_tracks/progeria_ctcf.vcf.gz ./data/test1/
ls ./data/test1 |
Notes:
- The 1st time you access a new host the SSH security prompt will appear
- You will be prompted for your remote host password
- The -r recursive argument works for scp also, just like for cp
remote rsync
rsync can be run just like before, but using the remote-host syntax. Here we use two tricks:
- The tilde ( ~ ) at the start of the path means "relative to my home directory"
- We traverse through the BioITeam symbolic link created in your home directory earlier.
- We use the same tilde ( ~ ) in the destination to traverse the scratch symbolic link in your home directory.
Don't forget to change userid below.
| Code Block | ||||
|---|---|---|---|---|
| ||||
rsync -ptlrvP corengstools@gapdh.icmb.utexas.edu:~/custom_tracks/ ~/scratch/data/custom_tracks/ |
Exercise: Was anything copied?
| Expand | ||
|---|---|---|
| ||
No, because all the source files were already present in the destination directory (you copied the same files earlier) with the same timestamps and file checksums. So rsync had nothing to do! |
Scavenger hunt exercise
Here's a fun scavenger hunt for more practice. Issue the following commands to get practice what you've learned so far:
| Expand | ||
|---|---|---|
| ||
Hit Tab Tab as much as possible to save typing! |
To get started:
| Code Block | ||
|---|---|---|
| ||
cd cp -rTab once # There is no unambiguous match, so hit Tab again # After hitting Tab twice you should see several filenames: # fastqc/ small.bam small.fq small2.fq # now type "sm" and one Tab # your command line should now look like this ls /work/projects/BioITeam/projects/courses/Core_NGS_Tools/linuxpractice/what what cd what cat readme |
Where are you when you're all done?
| Expand | ||
|---|---|---|
| ||
|
step by step answers
| Expand | ||
|---|---|---|
| ||
From inside your ~/what directory: Code Block | | |
|
| Expand | |||||
|---|---|---|---|---|---|
| |||||
From inside your ~/what/starts directory:
|
| Expand | |||||
|---|---|---|---|---|---|
| |||||
From inside your ~/what/starts/here directory:
|
misc/small
# small.bam  small.fq

# finally, type "f" then hit Tab again. It should complete to this:
ls /work/projects/BioITeam/projects/courses/Core_NGS_Tools/misc/small.fq |
Extending the $PATH
When you type a command name the shell has to have some way of finding what program to run. The list of places (directories) where the shell looks is stored in the $PATH environment variable. You can see the entire list of locations by doing this:
| Code Block | ||||
|---|---|---|---|---|
| ||||
echo $PATH
|
As you can see, there are a lot of locations on the $PATH.
Here's how the common login script adds the ~/local/bin directory you created above, to the location list, along with a special dot character ( . ) that means "here", or "whatever the current directory is". In the statement below, colon ( : ) separates directories in the list. (Read more about pathname syntax)
| Code Block | ||||
|---|---|---|---|---|
| ||||
export PATH=.:$HOME/local/bin:$PATH
|
Setting up the friendly command prompt
The complicated looking if statement in SECTION 3 of your .bashrc sets up a friendly shell prompt that shows the current working directory. This is done by setting the special PS1 environment variable and including a special \w directive that the shell knows means "current directory".
| Code Block | ||||
|---|---|---|---|---|
| ||||
##########
# SECTION 3 -- controlling the prompt
if [ -n "$PS1" ]; then PS1='ls6:\w$ '; fi
| ||||
| Expand | ||||
| ||||
From inside your ~/what/starts/here/changes directory: Code Block | | |||
|