...
The Terminal window
- Macs and Linux have a Terminal programs program built-in – find it now on your computer
- Windows needs help
- Putty – http://www.chiark.greenend.org.uk/~sgtatham/putty/download.html
- simple Terminal and file copy programs
- download putty.exe (terminal) and pscp.exe (secure copy client)
- Git-bash – http://msysgit.github.io/
- terminal plus minimal Linux environment
- Cygwin – http://www.cygwin.com/
- a full Linux environment, including X-windows for running GUI programs remotely
- complicated to install
- Putty – http://www.chiark.greenend.org.uk/~sgtatham/putty/download.html
SSH
ssh is an executable program that runs on your local computer and allows you to connect securely to a remote computer.
On Macs, Linux and Windows Git-bash or Cygwin, you run it from a Terminal window. Answer yes to the SSH security question prompt.
| Code Block | ||
|---|---|---|
| ||
ssh your_TACC_userID@stampede.tacc.utexas.edu
|
If you're using Putty as your Terminal from Windows:
- Double-click the Putty.exe icon
- In the PuTTY Configuration window
- make sure the Connection type is
SSH - enter
stampede.tacc.utexas.edufor Host Name - click Open button
- answer Yes to the SSH security question
- make sure the Connection type is
- In the PuTTY terminal
- enter your TACC user id after the login as: prompt, then Enter
The bash shell
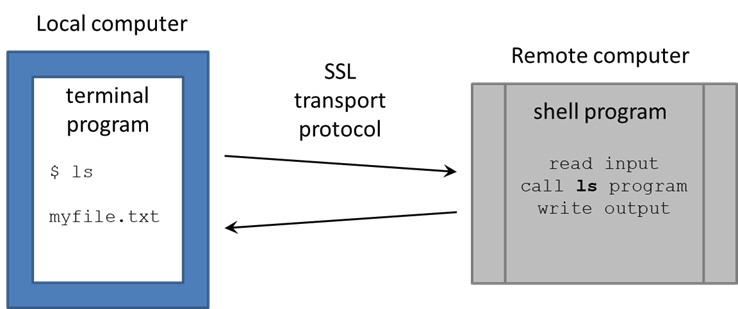
You're now at a command line! It looks as if you're running directly on the remote computer, but really there are two programs communicating: your local Terminal and the remote Shell. There are many shell programs available in Linux, but the default is bash (Bourne-again shell). The Terminal is pretty "dumb" – just sending your typing over its secure sockets layer (SSL) connection to TACC, then displaying the text sent back by the shell. The real work is being done on the remote computer, by programs called by the bash shell.

Setting up your environment
First create a few directories and links we will use (more on these later).
| Tip |
|---|
You can copy and paste these lines from the code block below into your Terminal window. Just make sure you hit "Enter" after the last line. |
| Code Block |
|---|
cd
ln -s -f $SCRATCH scratch
ln -s -f $WORK work
ln -s -f /corral-repl/utexas/BioITeam

mkdir -p $HOME/local/bin
cd $HOME/local/bin
ln -s -f /corral-repl/utexas/BioITeam/bin/launcher_creator.py |
Now execute the lines below to set up a login script, called .profile_user. This script will be executed whenever you login to stampede.
| Code Block |
|---|
cd
cp /work/01063/abattenh/seq/code/script/tacc/stampede_dircolors .dircolors
cp /work/01063/abattenh/seq/code/script/tacc/stampede_corengs_profile .profile_user
chmod 600 .profile_user |
Finally, log off and log back in to stampede.tacc.utexas.edu. You should see a new command prompt:
| Code Block |
|---|
stamp:~$ |
And nice directory colors when you list your home directory:
| Code Block |
|---|
ls |
So why don't you see the .profile_user file you copied to your home directory? Because all files starting with a period ("dot files") are hidden by default. To see them add the -a (all) option to ls:
| Code Block |
|---|
ls -la |
File systems at TACC
Local file systems
There are 3 local file systems available on any TACC cluster (stampede, lonestar, etc.), each with different characteristics. All these local file systems are very fast and set up for parallel I/O (Lustre file system).
On stampede these local file systems have the following characteristics:
| Home | Work | Scratch | |
|---|---|---|---|
| quota | 5 GB | 400 GB | 12+ PB (basically infinite) |
| policy | backed up | not backed up, not purged | not backed up, purged if not accessed recently (~10 days) |
| access command | cd | cdw | cds |
| environment variable | $HOME | $WORK | $SCRATCH |
| root file system | /home | /work | /scratch |
| use for | Small files such as scripts that you don't want to lose. | Medium-sized artifacts you don't want to copy over all the time. For example, custom programs you install (these can get large), or annotation file used for analysis. | Large files accessed from batch jobs. Your starting files will be copied here from somewhere else, and your results files will be copied back to your home system. |
When you login, the system gives you information about disk quota and your compute allocation quota:
| Code Block |
|---|
--------------------- Project balances for user abattenh ----------------------
| Name           Avail SUs     Expires | Name           Avail SUs     Expires |
| CancerGenetics     10627  2014-09-30 | genomeAnalysis     94284  2015-03-31 |
------------------------ Disk quotas for user abattenh ------------------------
| Disk         Usage (GB)     Limit    %Used   File Usage       Limit   %Used |
| /home1              0.0       1.1     0.29          463     1001000    0.05 |
| /work              42.1     250.0    16.85        16281      500000    3.26 |
------------------------------------------------------------------------------- |
Exercise
When you first login, you start in your home directory. Use these commands to change to your other file systems, and see how your command prompt changes to show your location.
| Code Block |
|---|
cdw
cds
cd |
| Tip |
|---|
The cd command with no arguments takes you to your home directory on any Linux/Unix system. The cdw and cds commands are specific to the TACC environment. |
Corral
Corral is a gigantic (multiple PB) storage system (spinning disk) where researchers can store data. UT researchers may request up to 5 TB of corral storage through the normal TACC allocation request process. Additional space on corral can be rented for ~$210/TB/year.
The UT/Austin BioInformatics Team, a loose group of researchers, maintains a common directory area on corral.
| Code Block |
|---|
ls /corral-repl/utexas/BioITeam |
File we will use in this course are in a subdirectory there:
| Code Block |
|---|
ls /corral-repl/utexas/BioITeam/core_ngs_tools |
A couple of things to keep in mind regarding corral:
- corral is a great place to store data in between analyses.
- Copy your data from corral to $SCRATCH
- Run your analysis batch job
- Copy your results back to corral
- On stampede you can access corral directories from login nodes (like the one you're on now), but your batch jobs cannot access it.
- This is because corral is a network file system, like Samba or NFS.
- Since stampede has so many compute nodes, it doesn't have the network bandwidth that would allow simultaneous access to corral .
- Occasionally corral can become unavailable. This can cause any command to hang that tries to access corral data.
Ranch
Ranch is a gigantic (multiple PB) tape archive system where researchers can archive data. UT researchers may request large (multi-TB) ranch storage allocations through the normal TACC allocation request process.
There is currently no charge for ranch storage. However, since the data is stored on tape it is not immediately available – robots find and mount appropriate tapes when the data is requested, and it can take minutes to hours for the data to appear on disk. (The metadata about your data – the directory structures and file names – is always accessible, but the actual data in the files is not on disk until "staged". See the ranch user guide for more information: https://www.tacc.utexas.edu/user-services/user-guides/ranch-user-guide.
Once that data is staged to the ranch disk it can be copied to other places. However, the ranch file system is not mounted as a local file system from the stampede or lonestar clusters. So remote copy commands are needed to copy data to and from ranch (e.g. scp, sftp, rsync).
Staging your data
So, your sequencing center has some data for you. They may send you a list of web links to use to download the data, or if you're a GSAF customer with an account on fourierseq.icmb.utexas.edu, the name of a directory to access.
The first task is to get this data to a permanent storage area. This is not one of the TACC local file systems! Corral is a great place for it, or on a server maintained by your Lab or company.
We're going to pretend – just for the sake of this class – that your permanent storage area is in your TACC work area. Execute these commands to make your "archive" directory and some subdirectories.
| Code Block |
|---|
mkdir -p $WORK/archive/original/2014_05.core_ngs |
Here's an example of a "best practice". Wherever your permanent storage area is, it should have a rational sub-directory structure that reflects its contents. It's easy to process a few NGS datasets, but when they start multiplying like tribbles, good organization and naming conventions will be the only thing standing between you and utter chaos!
For example:
original– for original sequencing data (compressed fastq files)- subdirectories named by
year_month.<project or purpose>
- subdirectories named by
aligned– for alignment artifacts (bam files, etc)- subdirectories named by
year_month.<project or purpose>
- subdirectories named by
analysis– further downstream analysis- reasonably named subdirectories, often by project
genome– reference genomes and other annotation files used in alignment and analysis- subdirectories for different reference genomes
- e.g.
ucsc/hg19,ucsc/sacCer3,mirbase/v20
code– for scripts and programs you and others in your organization write- ideally maintained in a version control system such as git, subversion or cvs.
- easiest to name sub-directories for people.
Download from a link – wget
Well, you don't have a desktop at TACC to "Save as" to, so what to do with a link? The wget program knows how to access web URLs such as http, https and ftp.
Get ready to run wget from the directory where you want to put the data. Don't press Enter after the wget command – just put a space.
| Code Block |
|---|
cd $WORK/archive/original/2014_05.core_ngs
wget |
Here are two web links:
- http://web.corral.tacc.utexas.edu/BioITeam/yeast_stuff/Sample_Yeast_L005_R1.cat.fastq.gz
- http://web.corral.tacc.utexas.edu/BioITeam/yeast_stuff/Sample_Yeast_L005_R2.cat.fastq.gz
Right click on the 1st link in your browser, then select "Copy link location" from the menu. Now go back to your Terminal and either right-click, or Paste. The command line to be executed should look like this:
| Code Block |
|---|
wget http://web.corral.tacc.utexas.edu/BioITeam/yeast_stuff/Sample_Yeast_L005_R1.cat.fastq.gz |
Now press Enter to get the command going. Repeat for the 2nd link.
- 10 or later has ssh and scp in Command Prompt or PowerShell (may require latest Windows updates)
- Open the Start menu → Search for Command
- Open the Start menu → Search for Command
| Expand | ||
|---|---|---|
| ||
If your Windows version does not have ssh in Command Prompt or PowerShell:
More advanced options for those who want a full Linux environment on their Windows system:
|
From now on, when we refer to "Terminal", it is either the Mac/Linux Terminal program, Windows Command Prompt or PowerShell, or the PuTTY program.
SSH
ssh is an executable program that runs on your local computer and allows you to connect securely to a remote computer. We're going to use ssh to access the Lonestar6 compute cluster at TACC (Texas Advanced Computing Center), where the remote host name is ls6.tacc.utexas.edu.
In your local Terminal window:
| Code Block | ||||
|---|---|---|---|---|
| ||||
ssh <your_TACC_userID>@ls6.tacc.utexas.edu

# For example:
ssh abattenh@ls6.tacc.utexas.edu
|
- Answer yes to the SSH security question prompt
- this will only be asked the 1st time you access ls6
- Enter the password associated with your TACC account
- for security reasons, your password characters will not be echoed to the screen
- Get your 2-factor authentication code from your phone's TACC Token app, and type it in
| Expand | ||
|---|---|---|
| ||
If you're using PuTTY as your Terminal from Windows:
|
The bash shell
You're now at a command line! It looks as if you're running directly on the remote computer, but really there are two programs communicating:
- your local Terminal
- the remote shell
There are many shell programs available in Linux, but the default is bash (Bourne-again shell).
The Terminal is pretty "dumb" – just sending what you type over its secure sockets layer (SSL) connection to TACC, then displaying the text sent back by the shell. The real work is being done on the remote computer, by executable programs called by the bash shell (also called commands, since you call them on the command line).
About the command line
Read more about the command line and commands on our Linux fundamentals page:
- The bash shell REPL and commands
- Getting help
- Literal characters and metacharacters
- About command line input
Setting up your environment
Setup your login profile (~/.bashrc)
Now execute the lines below to set up a login script, called ~/.bashrc. [ Note the tilde ( ~ ) is shorthand for "my Home directory". See Linux fundamentals: pathname syntax ]
When you login via an interactive shell, a well-known script is executed to establish your favorite environment settings. The well-known filename is ~/.bashrc (or ~/.profile on some systems), which is specific to the bash shell.
We've pre-created a common login script for you that will help you know where you are in the file system and make it easier to access some of our shared resources. To set it up, perform the steps below:
| Tip |
|---|
You can copy and paste these lines from the code block below into your Terminal window. Just make sure you hit Enter after the last line. |
| Warning | |||||
|---|---|---|---|---|---|
If you already have a .bashrc set up, make a backup copy first.
You can restore your original login script after this class is over. |
If your Terminal has a dark background (e.g. black), copy this file:
| Code Block | ||||
|---|---|---|---|---|
| ||||
cp /corral-repl/utexas/BioITeam/core_ngs_tools/login/bashrc.corengs.ls6.dark_bg  ~/.bashrc
chmod 600 ~/.bashrc |
If your Terminal has a light background (e.g. white), copy this file:
| Code Block | ||||
|---|---|---|---|---|
| ||||
cp /corral-repl/utexas/BioITeam/core_ngs_tools/login/bashrc.corengs.ls6.light_bg  ~/.bashrc
chmod 600 ~/.bashrc |
So why don't you see the .bashrc file you just copied when you do ls? Because all files starting with a period (dot files) are hidden by default. To see them add the -l (long listing) and -a (all) options to ls:
| Code Block | ||
|---|---|---|
| ||
# show a long listing of all files in the current directory, including "dot files" that start with a period
ls -la |
(Read more about File attributes)
| Expand | ||
|---|---|---|
| ||
What's going on with chmod? The chmod 600 ~/.bashrc command marks the file as readable and writable only by you. |
Since your ~/.bashrc is executed when you login, to ensure it is set up properly you should first log off Lonestar6 like this:
| Code Block | ||||
|---|---|---|---|---|
| ||||
exit |
Your Terminal has logged off of Lonestar6 and is back on your local computer.
Now log back in to ls6.tacc.utexas.edu. This time your ~/.bashrc will be executed to establish your environment:
| Tip | ||
|---|---|---|
| ||
Your new ~/.bashrc file defines a ll alias command, so when you type ll it is short for ls -la. |
You should see a new command line prompt:
| Code Block |
|---|
ls6:~$ |
The great thing about this prompt is that it always tells you where you are, which avoids you having to execute the pwd (present working directory) command every time you want to know what the current directory is. Execute these commands to see how the prompt reflects your current directory.
| Code Block | ||
|---|---|---|
| ||
# mkdir -p says to create all parent directories in the specified path
mkdir -p ~/tmp/a/b/c
cd ~/tmp/a/b/c

# Your prompt should look like this:
ls6:~/tmp/a/b/c$ |
The prompt now tells you you are in the c sub-directory of the b sub-directory of the a sub-directory of the tmp sub-directory of your Home directory ( ~ ).
Your login script has configured this command prompt behavior, along with a number of other things.
Create some symbolic links and directories
Create some symbolic links that will come in handy later:
| Code Block | ||||
|---|---|---|---|---|
| ||||
cd  # makes your Home directory the "current directory"
ln -s -f $SCRATCH scratch
ln -s -f $WORK work
ln -sf /work/projects/BioITeam/projects/courses/Core_NGS_Tools CoreNGS

ls # you'll see the 3 symbolic links you just created
|
Symbolic links (a.k.a. symlinks) are "pointers" to files or directories elsewhere in the file system hierarchy. You can almost always treat a symlink as if it is the actual file or directory.
| Tip |
|---|
$WORK and $SCRATCH are TACC environment variables that refer to your Work and Scratch file system areas – more on these file system areas soon. (Read more about Environment variables) |
| Expand | |||||||
|---|---|---|---|---|---|---|---|
| |||||||
The ln -s command creates a symbolic link, a shortcut to the linked file or directory.
Want to know where a link points to? Use ls with the -l (long listing) option.
|
Set up a ~/local/bin directory and link a script there that we will use in the class.
| Code Block | ||||
|---|---|---|---|---|
| ||||
mkdir -p ~/local/bin
cd ~/local/bin
ln -s -f /work/projects/BioITeam/common/bin/launcher_creator.py
|
Since our ~/.bashrc login script added ~/local/bin to our $PATH, we can call any script or command in that directory with just its file name. And Tab completion works on program names too:
| Code Block | ||
|---|---|---|
| ||
cd

# hit Tab once after typing "laun"
# This will expand to launcher_creator.py
|
Details about your login script
Let's take a look at the contents of your ~/.bashrc login script, using the cat (concatenate files) command. cat simply reads a file and writes each line of content to standard output (here, your Terminal):
| Code Block | ||||
|---|---|---|---|---|
| ||||
cd
cat .bashrc
|
| Tip | ||
|---|---|---|
| ||
The cat command just displays the entire file's content, line by line, without pausing, so should not be used to display large files. Instead, use a pager like more or less. For example: more ~/.bashrc This will display one "page" (Terminal screen) of text at a time, then pause. Press space to advance to the next page, or Ctrl-c to exit more. |
You'll see the following (you may need to scroll up a bit to see the beginning):
| Code Block | ||||
|---|---|---|---|---|
| ||||
#!/bin/bash
# TACC startup script: ~/.bashrc version 2.1 -- 12/17/2013
#   This file is NOT automatically sourced for login shells.
# Your ~/.profile can and should "source" this file.
# Note neither ~/.profile nor ~/.bashrc are sourced automatically
# by bash scripts.
#   In a parallel mpi job, this file (~/.bashrc) is sourced on every
# node so it is important that actions here not tax the file system.
# Each nodes' environment during an MPI job has ENVIRONMENT set to
# "BATCH" and the prompt variable PS1 empty.
#################################################################
# Optional Startup Script tracking. Normally DBG_ECHO does nothing
if [ -n "$SHELL_STARTUP_DEBUG" ]; then DBG_ECHO "${DBG_INDENT}~/.bashrc{"; fi
##########
# SECTION 1 -- modules
if [ -z "$__BASHRC_SOURCED__" -a "$ENVIRONMENT" != BATCH ]; then
  export __BASHRC_SOURCED__=1
  module load launcher
fi
############
# SECTION 2 -- environment variables
if [ -z "$__PERSONAL_PATH__" ]; then
  export __PERSONAL_PATH__=1
  export PATH=.:$HOME/local/bin:$PATH
fi
# For better colors using a dark background terminal, un-comment this line:
#export LS_COLORS=$LS_COLORS:'di=1;33:fi=01:ln=01;36:'
# For better colors using a white background terminal, un-comment this line:
#export LS_COLORS=$LS_COLORS:'di=1;34:fi=01:ln=01;36:'
export LANG="C"  # avoid the annoying Perl locale warnings
export BIWORK=/work/projects/BioITeam
export CORENGS=$BIWORK/projects/courses/Core_NGS_Tools
export BI=/corral-repl/utexas/BioITeam
export ALLOCATION=OTH21164        # For ls6        Group is G-824651
##export ALLOCATION=UT-2015-05-18 # For stampede2  Group is G-816696

##########
# SECTION 3 -- controlling the prompt
if [ -n "$PS1" ]; then PS1='ls6:\w$ '; fi
##########
# SECTION 4 -- Umask and aliases
#alias ls="ls --color=always"
alias ll="ls -la"
alias lah="ls -lah"
alias lc="wc -l"
alias hexdump='od -A x -t x1z -v'
umask 002
##########
# Optional Startup Script tracking
if [ -n "$SHELL_STARTUP_DEBUG" ]; then DBG_ECHO "${DBG_INDENT}}"; fi |
There's a lot of stuff here; let's look at just a few things.
Environment variables
The login script sets several environment variables.
| Code Block | ||||
|---|---|---|---|---|
| ||||
export BIWORK=/work/projects/BioITeam
export CORENGS=$BIWORK/projects/courses/Core_NGS_Tools
|
Environment variables are like variables in other programming languages like python or perl (in fact bash is a complete programming language).
They have a name (like BIWORK above) and a value (the value of $BIWORK is the pathname of the shared /work/projects/BioITeam directory).
To see the value of an environment variable, use the echo command, then the variable name after a dollar sign ( $ ):
| Code Block | ||
|---|---|---|
| ||
echo $CORENGS
|
We'll use the $CORENGS environment variable to avoid typing out a long pathname:
| Code Block | ||
|---|---|---|
| ||
ls $CORENGS
|
(Read more about Environment variables)
Shell completion with Tab
You can use these environment variables to shorten typing, for example, to look at the contents of the shared /work/projects/BioITeam directory as shown below, using the magic Tab key to perform shell completion.
| Tip | ||
|---|---|---|
| ||
The Tab key is one of your best friends in Linux. Hitting it invokes shell completion, which is as close to magic as it gets!
|
Follow along with this:
| Code Block | ||||
|---|---|---|---|---|
| ||||
# hit Tab once to expand the environment variable name
ls $BIW

# hit Tab again to expand the environment variable
ls $BIWORK/

# now hit Tab twice to see the contents of the directory
ls /work/projects/BioITeam/

# type "pr" and hit Tab again
ls /work/projects/BioITeam/pr

# type "co" and hit Tab again
ls /work/projects/BioITeam/projects/co

# type "Co" and hit Tab again
ls /work/projects/BioITeam/projects/courses/Co

# your command line should now look like this
ls /work/projects/BioITeam/projects/courses/Core_NGS_Tools/

# now type "mi" and one Tab
ls /work/projects/BioITeam/projects/courses/Core_NGS_Tools/mi

# your command line should now look like this
ls /work/projects/BioITeam/projects/courses/Core_NGS_Tools/misc/

# now hit Tab once
# There is no unambiguous match, so hit Tab again
# After hitting Tab twice you should see several filenames:
# fastqc/ small.bam  small.fq   small2.fq

# now type "sm" and one Tab
# your command line should now look like this
ls /work/projects/BioITeam/projects/courses/Core_NGS_Tools/misc/small

# type a period (".") then hit Tab twice again
# You're narrowing down the choices -- you should see two filenames
ls /work/projects/BioITeam/projects/courses/Core_NGS_Tools/misc/small
# small.bam  small.fq

# finally, type "f" then hit Tab again. It should complete to this:
ls /work/projects/BioITeam/projects/courses/Core_NGS_Tools/misc/small.fq |
Extending the $PATH
When you type a command name the shell has to have some way of finding what program to run. The list of places (directories) where the shell looks is stored in the $PATH environment variable. You can see the entire list of locations by doing this:
| Code Block | ||||
|---|---|---|---|---|
| ||||
echo $PATH
|
As you can see, there are a lot of locations on the $PATH.
Here's how the common login script adds the ~/local/bin directory you created above, to the location list, along with a special dot character ( . ) that means "here", or "whatever the current directory is". In the statement below, colon ( : ) separates directories in the list. (Read more about pathname syntax)
| Code Block | ||||
|---|---|---|---|---|
| ||||
export PATH=.:$HOME/local/bin:$PATH
|
Setting up the friendly command prompt
The complicated looking if statement in SECTION 3 of your .bashrc sets up a friendly shell prompt that shows the current working directory. This is done by setting the special PS1 environment variable and including a special \w directive that the shell knows means "current directory".
| Code Block | ||||
|---|---|---|---|---|
| ||||
##########
# SECTION 3 -- controlling the prompt
if [ -n "$PS1" ]; then PS1='ls6:\w$ '; fi
|
...