Windows 10

If your computer has Windows 10 installed, the login process will vary. We will be available on-site to assist you with this.

Follow this step-by-step guide to login with an EID on your Windows 7 or 8 McCombs computer. Your files and settings will migrate to your new account, but will require some updates covered in these steps. Once you complete this process, please continue to log into your computer with your UT EID and not your McCombs account.

Since you won't have access to your computer when you start these steps, we suggest you either open this page on a mobile device or print it for reference.

If you need technical assistance at any time while following these steps, please contact McCombs Tech Support at 232-6617 or visit the SWAT Service Desk at CBA 1.328. If you'd like us to follow up with you, email techsupport@mccombs.utexas.edu.


Step-by-step guide
 

Please expect to re-enter previously saved passwords.

Saved passwords in your web browser or other applications not covered in these steps will not transfer as part of this migration. Expect to re-enter any saved passwords or credentials in your new user.

  1. Log out of your McCombs user account.
     
  2. You'll then log into your computer with your UT EID account. On your computer's login screen, enter AUSTIN\yourUTEID or yourUTEID@austin.utexas.edu, then enter your EID password and click the arrow or type the Enter key on your keyboard to login.


3. Once logged in, check the following applications and services that will be impacted by your new EID account. If you don't use some of these applications, you can skip those steps.

    1. Outlook - Open Outlook and you will be prompted to log in. Use your McCombs account in the format of <McCombs username>@mccombs.utexas.edu to log in and check the box to remember your password. You will not switch to using your EID for email at this time.


    2. Fileshares, database and other network resources - Your EID should be able to access the same network fileshares, databases and other resources. If you encounter something you can't connect to, please contact Tech Support.

    3. Open your browser and navigate to the Intranet URL, https://intranet.mccombs.utexas.edu. Your browser may log you into the Intranet with your EID. Look in the upper right corner of the Intranet page. If you see your EID after the word "AUSTIN\", then select, select "Sign in as a different user" from the drop down menu below it. Then, log in with your McCombs account in the format of <McCombs username>@mccombs.utexas.edu and check the box to remember your password.


      If instead you receive an Access Denied Error, then click the "Sign In as a different user" on that message box. Then, log in with your McCombs account in the format of <McCombs username>@mccombs.utexas.edu and check the box to remember your password.


      - If you use https://community.mccombs.utexas.edu, you will need to use the step above to log back in with your McCombs account.
      - If you use multiple browsers to access the Intranet, repeat the steps above.


    4. If you use QWS3270 (the mainframe application), then you will need to run a quick repair the first time you log in with your EID.

      Open QWS3270. If you receive an error stating "error creating credentials," quit QWS3270. Then, from the Start menu, navigate to All Programs > Microsoft Systems Center > Configuration Manager > Software Center. Open Software Center and select the "Installation Status" tab from the top (highlighted as 1 in the image below), then select "UTConfigfor3270 - UTConfigfor3270" from the list (highlighted as 2) and click on "REINSTALL" in the lower right corner of the window (highlighted as 3).

      This will launch the mainframe application installer. When the installer gets to the screen asking if you want to modify, repair or remove it, select Repair.


    5. There is an issue that causes Chrome to not load a webpage after migration. This usually happens on Chrome where there user is logged into the browser to sync the data (bookmarks, passwords, history, etc) with their Google account. To fix the issue, you need to recreate the Google Chrome profile. If you do not experience this issue, then you do not need to perform any of the Chrome procedures below, and you can skip this step entirely.

      Open Software Center - from the Start menu, navigate to All Programs > Microsoft Systems Center > Configuration Manager > Software Center. Open Software Center and select "Rename Default Folder in Chrome". This script will rename the Default profile for Chrome so a new one is created for you the next time you use it.


      If this does not resolve your problem then you can try uninstalling and reinstalling Chrome. If you already know how to uninstall Chrome and install the latest version from https://www.google.com/chrome/ then go ahead and do so. if you don't know how, then you can follow the steps below.

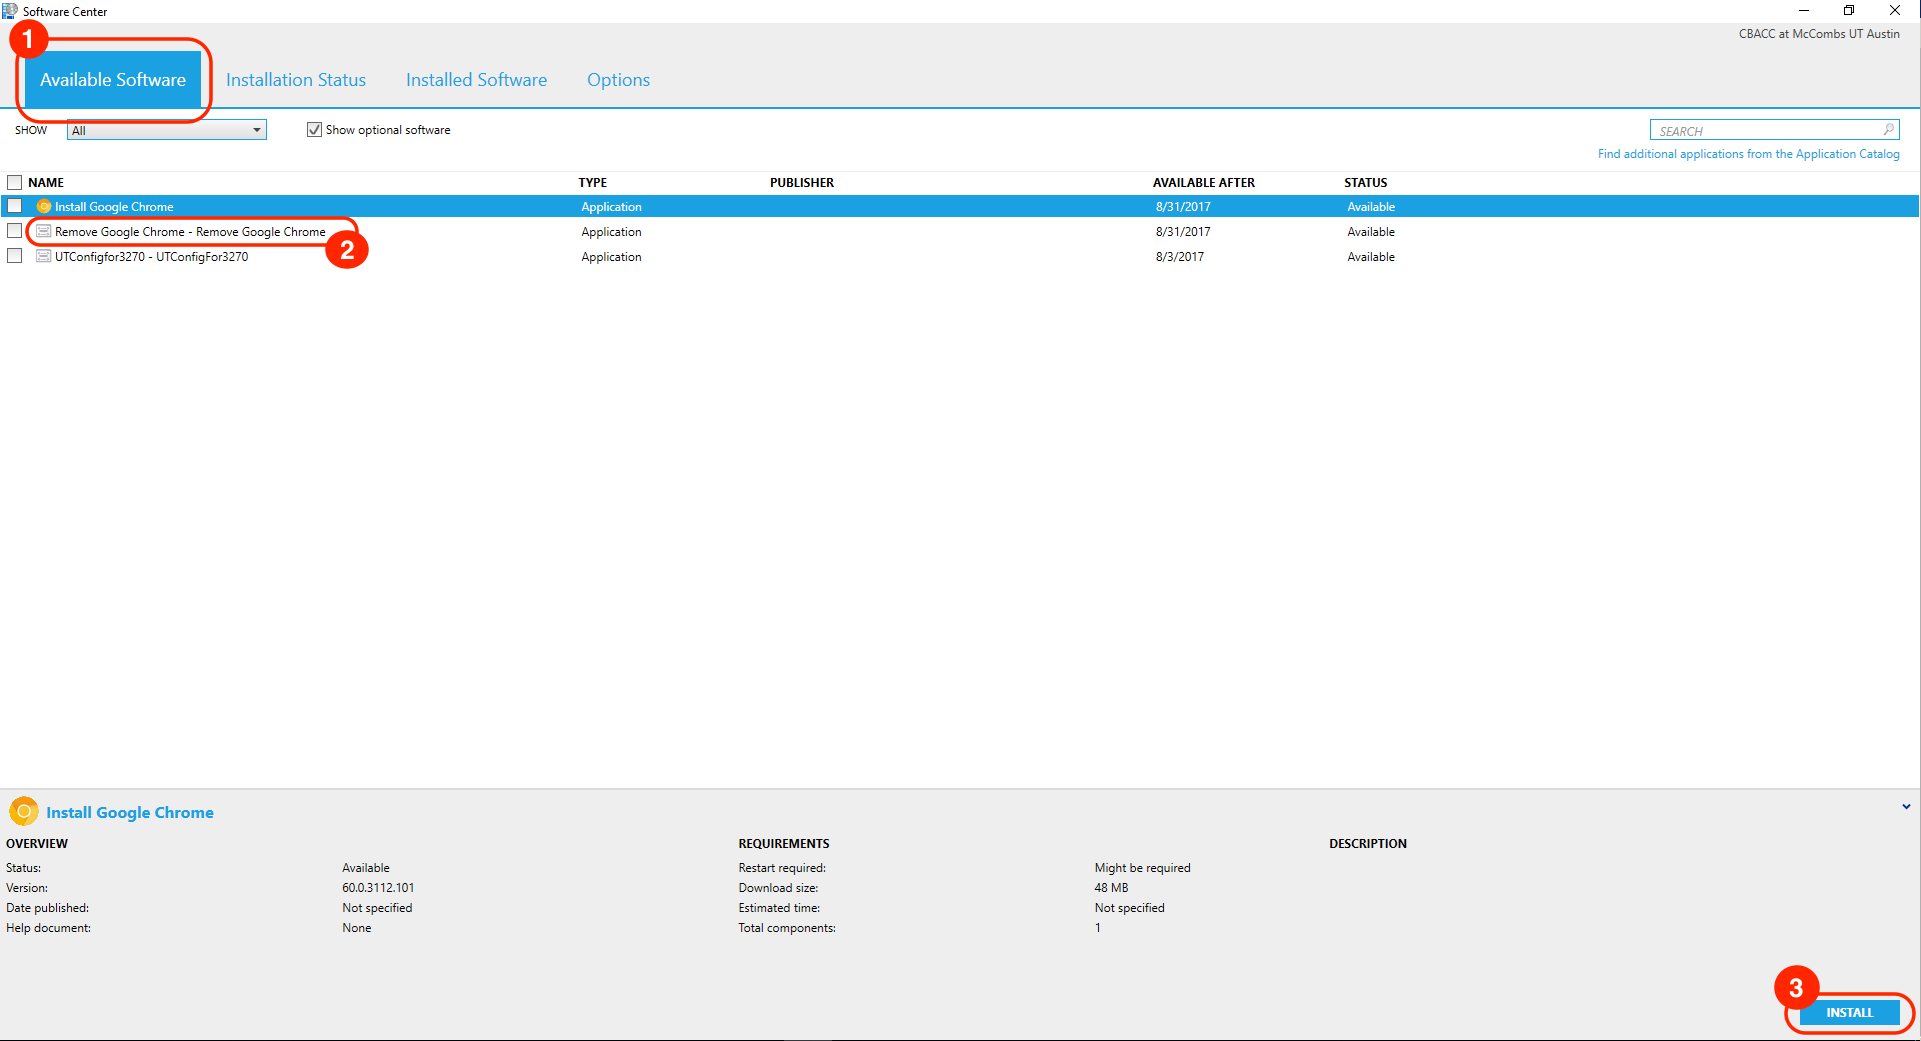
      Open Software Center - from the Start menu, navigate to All Programs > Microsoft Systems Center > Configuration Manager > Software Center. Open Software Center and select the "Available Software" tab from the top (highlighted as 1 in the image below), then select "Remove Google Chrome - Remove Google Chrome" from the list (highlighted as 2) and click on "INSTALL" in the lower right corner of the window (highlighted as 3).


      Once you've completed the steps to remove Google Chrome, then follow a similar process by selecting "Install Google Chrome" from the list and click "INSTALL" again. Chrome will then be re-installed. If you previously logged into Chrome with a Google account, you'll need to log in again to bring back your bookmarks and other settings.


      After removing Chrome, then select Install Google Chrome and click INSTALL


      There is an issue that causes Chrome to not load a webpage after migration. This usually happens on Chrome where there user is logged into the browser to sync the data (bookmarks, passwords, history, etc) with their Google account. To fix the issue, you need to recreate the Google Chrome profile.


      1. Close Chrome. Open Task Manager and end any chrome.exe processes.
      2. Go to Control Panel, make sure to view by Small Icons, and click on Foldter Options, then select the View Tab, then select Show hidden files, folders, drives.
      3. Browse to C:\Users\useraccount\AppData\Local\Google\Chrome\User Data\
      4. Cut the Default folder, go up one folder to Google\Chrome and paste it.
      5. Launch Chrome and have the user sign back in to sync data.
        1. If the user's data does not sync or the user never logged into Chrome to begin with, you can browse to the Default folder you moved and copy/paste/replace the Bookmarks file in the newly created Default folder.


      ***If this doesn't work, follow the steps below to uninstall (or do it manually in Control Panel and redownload Chrome). You can save the Default folder if they don't sign in to sync Chrome data. Make sure that the Chrome folder in C:\Users\useraccount\AppData\Local\Google\ is deleted after uninstalling.


    6. Open Skype for Business and you will be prompted to log in. Use your McCombs account in the format of <McCombs username>@mccombs.utexas.edu to log in and check the box to remember you password. You will not switch to using your EID for Skype at this time.

      If you receive an error stating the "service is unavailable"

      Tech Support will need to assist you in resolving the issue. Please contact McCombs Tech Support ASAP at 232-6617 or visit the SWAT Service Desk at CBA 1.328. If you'd like us to follow up with you at a later time, emailtechsupport@mccombs.utexas.edu.


    7. Your SiteCore logon is completely separate from your MCCOMBS and AUSTIN logons so it is unaffected by the domain migration. However, if you have saved you SiteCore password in your browser then you will probably need to re-enter it the first time you log into SiteCore after you swith to your AUSTIn EID account.


That's it. If you reached this page from a survey link, please return to that page and confirm you are done with the login process. Please continue to log into your computer only with your UT EID. If multiple people use this computer with their own user accounts, they will need to complete these steps to migrate their settings.

If you need technical assistance at any time while following these steps, please contact McCombs Tech Support at 232-6617 or visit the SWAT Service Desk at CBA 1.328. If you'd like us to follow up with you, email techsupport@mccombs.utexas.edu.

If you have general questions about this process, please contact austinmigrationproject@mccombs.utexas.edu.