Recording Lectures in Advance
You can use Zoom to pre-record a lecture in advance for your students.
We recommend that you use the Cloud Recording option, as this will allow you to easily make these recordings available to your students in Canvas.
You can set meetings to automatically be recorded using the Meeting Settings.
To set up for recording a lecture, click the orange "New Meeting" button from the Zoom desktop app

When you have joined the new meeting, click "Record" and then "Record to the Cloud", as shown below.
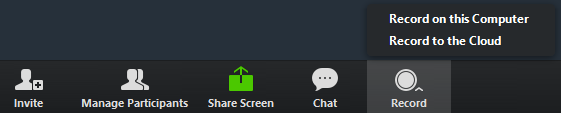
Please be aware that you must be either a host or co-host to begin cloud recording.
If you originated this meeting, you are already the host.
To stop or pause the recording, click "Pause/Stop Recording". Ending the meeting will also stop recording.

You can read in more detail about Cloud Recording here.
Cloud Recording Processing Time
Please note that your recordings will need to undergo a processing time before they are made available to you. This processing time allows Zoom to make the recording available for viewing, as well as generate the audio transcription.
When the recording has finished processing, you'll receive an email similar to the below:

When your Zoom recording is processed, if you plan to share it using the Canvas Zoom integration and the "Publish" feature, you'll first need to import these meetings into Canvas. To do this, follow these steps: You can then choose to click the "Publish" toggle if you'd like the recording to be made available to students in their "Zoom" tab in your course.Importing Your Lectures from Zoom to Canvas
nnn-nnn-nnn button and click "Import Meeting"
Audio Transcription and Captions
Zoom Automatic Audio Transcription
For recordings saved to the cloud, Zoom can automatically create audio transcript that can make your recordings more accessible.
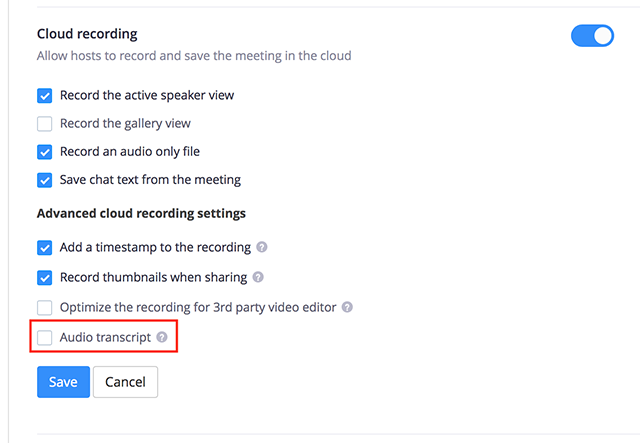
To use the automatic transcription feature follow these steps:
- Visit utexas.zoom.us
- Click "Sign in" and enter in your UT EID and password
- In the left-hand sidebar, click "Settings"
- Click the "Recording" tab
- Scroll to the "Cloud Recording" section and, under the "Advanced cloud recording settings" section, check the box next to "Audio transcript"
With this feature enabled, your cloud recordings will include an automatically-generated audio transcript that will be available shortly after the recording has been processed by Zoom.
Because this transcript is created using automated transcription, it may not accurately reflect the entirety of your recording, especially in moments of unclear or low quality audio or moments where multiple participants are speaking at once. You can edit the transcript to remedy any issues or errors.
Captioning and Transcription Services
The University of Texas Libraries provides a Captioning and Transcription Service that you can take advantage of to make your recordings more accessible.
Please note that this is a costed service.
Publish a Cloud Recorded Meeting for your students to view
Once you record a Meeting in Zoom, it will be saved to the Cloud within Zoom.
Your Cloud Recordings are accessible from the Canvas integration.
To publish a cloud recording for your students to view, follow the steps below:
- Please select the 'Cloud Recordings' tab.

- Find the recorded Meeting you want to Publish and enable it by turning on the 'Publish' toggle next to the listed recording.
- 'Publish' means students can find it in Canvas via the student's Zoom tab within Canvas.
Overview
Content Tools