Wiki created with help from Matt Lennon
First Step is you need to make a new track to put the titles on so if you have only one video track you will add a V2 track Go to >Timeline>New>Video Track |
|
To Add a Title to Your Timeline Navigate to where you want your title in your timeline. Mark and In point and an out point on the V2 track or the topmost track that you created in our example it is V2 | |
Select the Avid Titler+ button in the toolbar menu just above your timeline Highlighted with the red square | |
| Make sure the Monitor Icon is on V2 so you can see your title |
|
This will apply the effect to the selected clip and open the Titler+ menu - where you can change font type, font size, font color, outline, shadow etc. |
|
| To change the color of the title double click on the square next to the "Fill" |
|
| Then the color wheel pops up to choose the color |
|
NOTE: If you accidentally click out of the menu and can’t find it, do the following. First, move the playhead over the clip when the Avid Titler+ is applied. Make sure you are in Effect Mode Click on this icon to get into effect mode
Then, select >Tools > Avid Titler + That will bring the menu back up. |
|
After selecting your font type and any other starter settings, select the T to “Add Text Field.” |
|
Navigate over to your Program Monitor and click where you want your title to be placed. You will get a white bounding box where you can start typing your title |  |
NOTE: Don’t worry about the text placement fully at first. You can always adjust the title’s location later. Type out your title. | |
Add the Safe Title and Safe Action and placement guides to show you how to place the title centered in the window. |  |
To move the title click on the white bounding box around the title You can drag from the corner dot or any white dot to make bigger or smaller Also dragging with the white line will move the title around the image |
|
| You can also type in the amount you'd like to scale the text in the Scale X,Y box |
|
This Tool "Move" tool Will Move Text to reposition and will Move the entire text layer Also select the Move tool and click on the text layer "ONE TIME" to change the color or the font and any other attributes |
|
Use the Alignment Tools shown here to center vertically and horizontally |
|
To add a background to the title Select Background and turn it ON as shown here |
|
To change the color of the background click on the box next to the background |
|
Double click it to open the color wheel. |
|
To Save the Title as a Template to re-use later Click and drag the Avid Title+ Icon from the effect editor to an open bin |
|
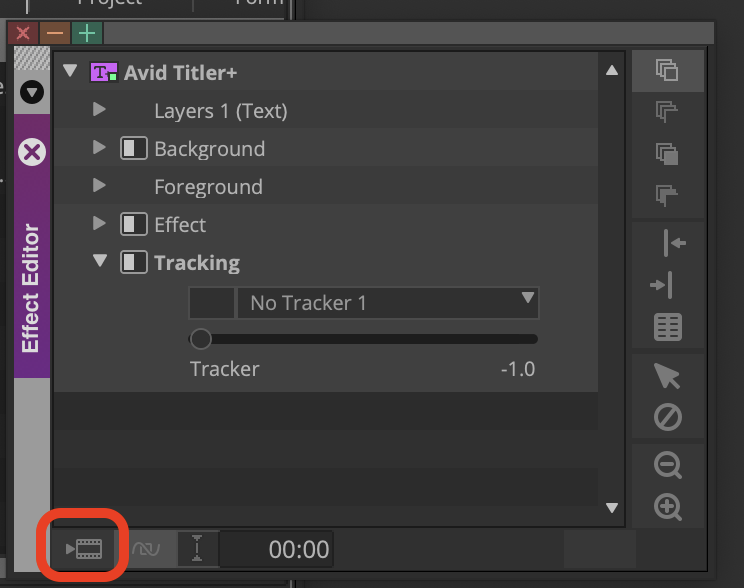
It is also recommended that you render the title before exporting Click the "render" icon in the lower left of the "AVID Titler"
|
|
To add a dissolve put your timeline cursor at the beginning of the title Then click on the dissolve icon show in this example with the red box around it. |
|
Note the track the dissolve is applied to V2 Dissolve is the effect you are adding Position option choose centered on cut or starting or ending at cut Duration 10 or 15 frames or whatever you choose Choose the drive that you are rendering the effect to Choose Add and Render to apply the dissolve |
|


Overview
Content Tools