Performing a 3D Scan with NextEngine and ScanStudio

                                                                                                          by: Chase Shelburne


In 2015, NPL acquired a NextEngine (model 2020i) 3D surface scanner, thanks to a successful crowd-sourcing campaign via the University of Texas crowd-funding source, HornRaiser. The NextEngine scanner we purchased, along with upgraded software, allows us to scan fossils with a high fidelity (down to  0.127 mm). Scans can be exported in a variety of file types. The following pages will take you through the process of scanning a specimen in the associated program, ScanStudio, including a step-by-step guide, as well as settings and additional features of the equipment and program.


Trouble with terms? See the Glossary section at the end.


Orbital movement (Left click) – Moves the model around its central axis

Translational movement (Left + Right click) – Moves the model while keeping the same surface facing you

Zoom in/out to mouse cursor (Right click on model) – This zoom option will zoom into wherever your mouse cursor is pointed

Zoom in/out to model center (Scroll wheel forward/backward OR Right click off model) – This zoom option will zoom you to the model’s central axis

Scan – This green button will take you to the scan screen

Browse – This button will allow you to browse for files

Tools (Align, Trim, Fuse, Polish, CAD, Output) – These buttons take you to their respective screens. Specific tools are covered elsewhere in this document.

Settings – This settings button, (which is not to be confused with settings options in the menu bar), has a single tool option called Cull.

  • Pressing the Cull button shows only the front (visible) side of the mesh. It can be toggled on and off.

Support – This button will take you to NextWiki, the NextEngine support site.

Close – This red button will close the current model.

Back – This button is not on the main screen, but can be found on every other screen. This blue button will always return you to the main screen.

Note: Selecting some tools, or tool options, will open sub-windows. Saving adjusted settings within these windows is inconsistent. Sometimes pressing OK and sometimes pressing Apply will save adjusted settings. Most settings will be retained between scans, even after closing ScanStudio. When in doubt, press [x] at the top right-hand corner of any window to close out without saving any settings.

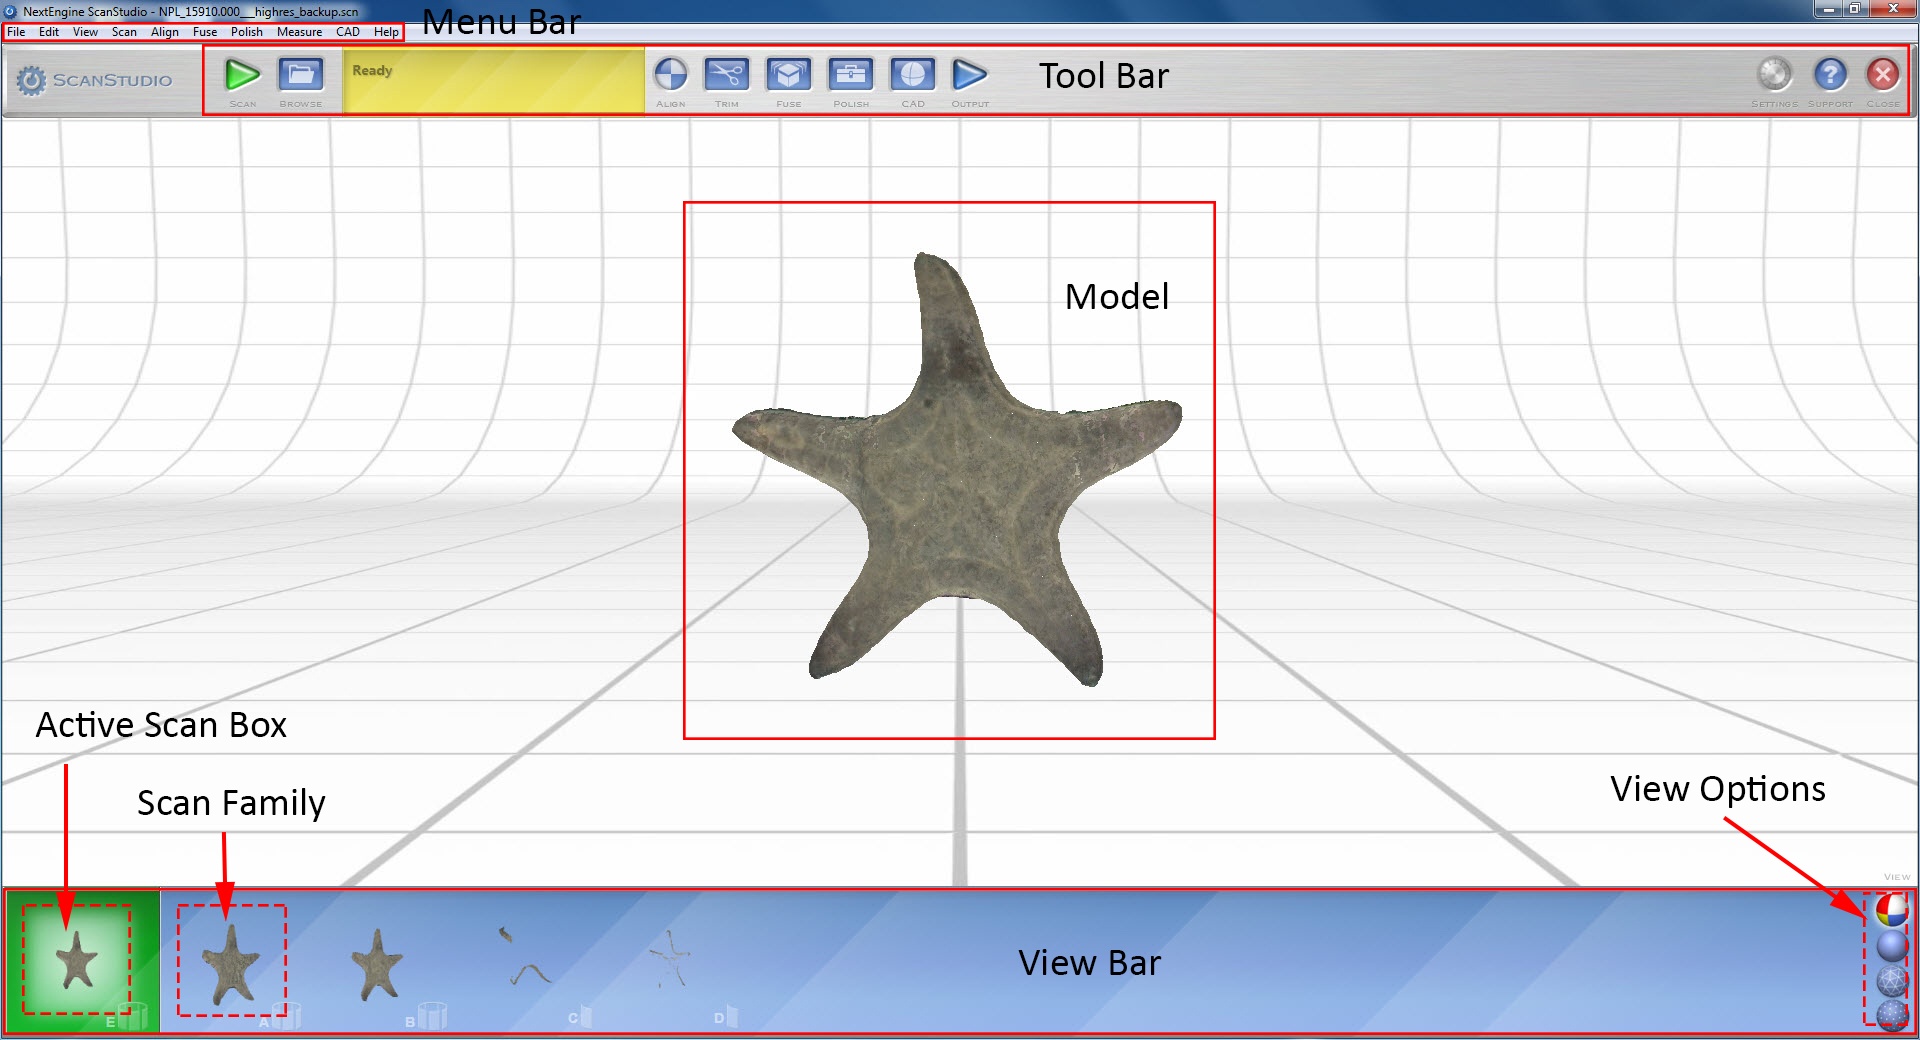
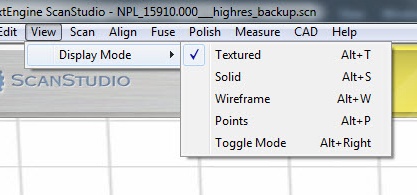
Note: View options are displayed as circular balls in the lower right hand of the main screen, on the right-most side of the view bar. There are also keyboard commands to switch between them. These options can also be changed through View → Display Mode in the menu bar.

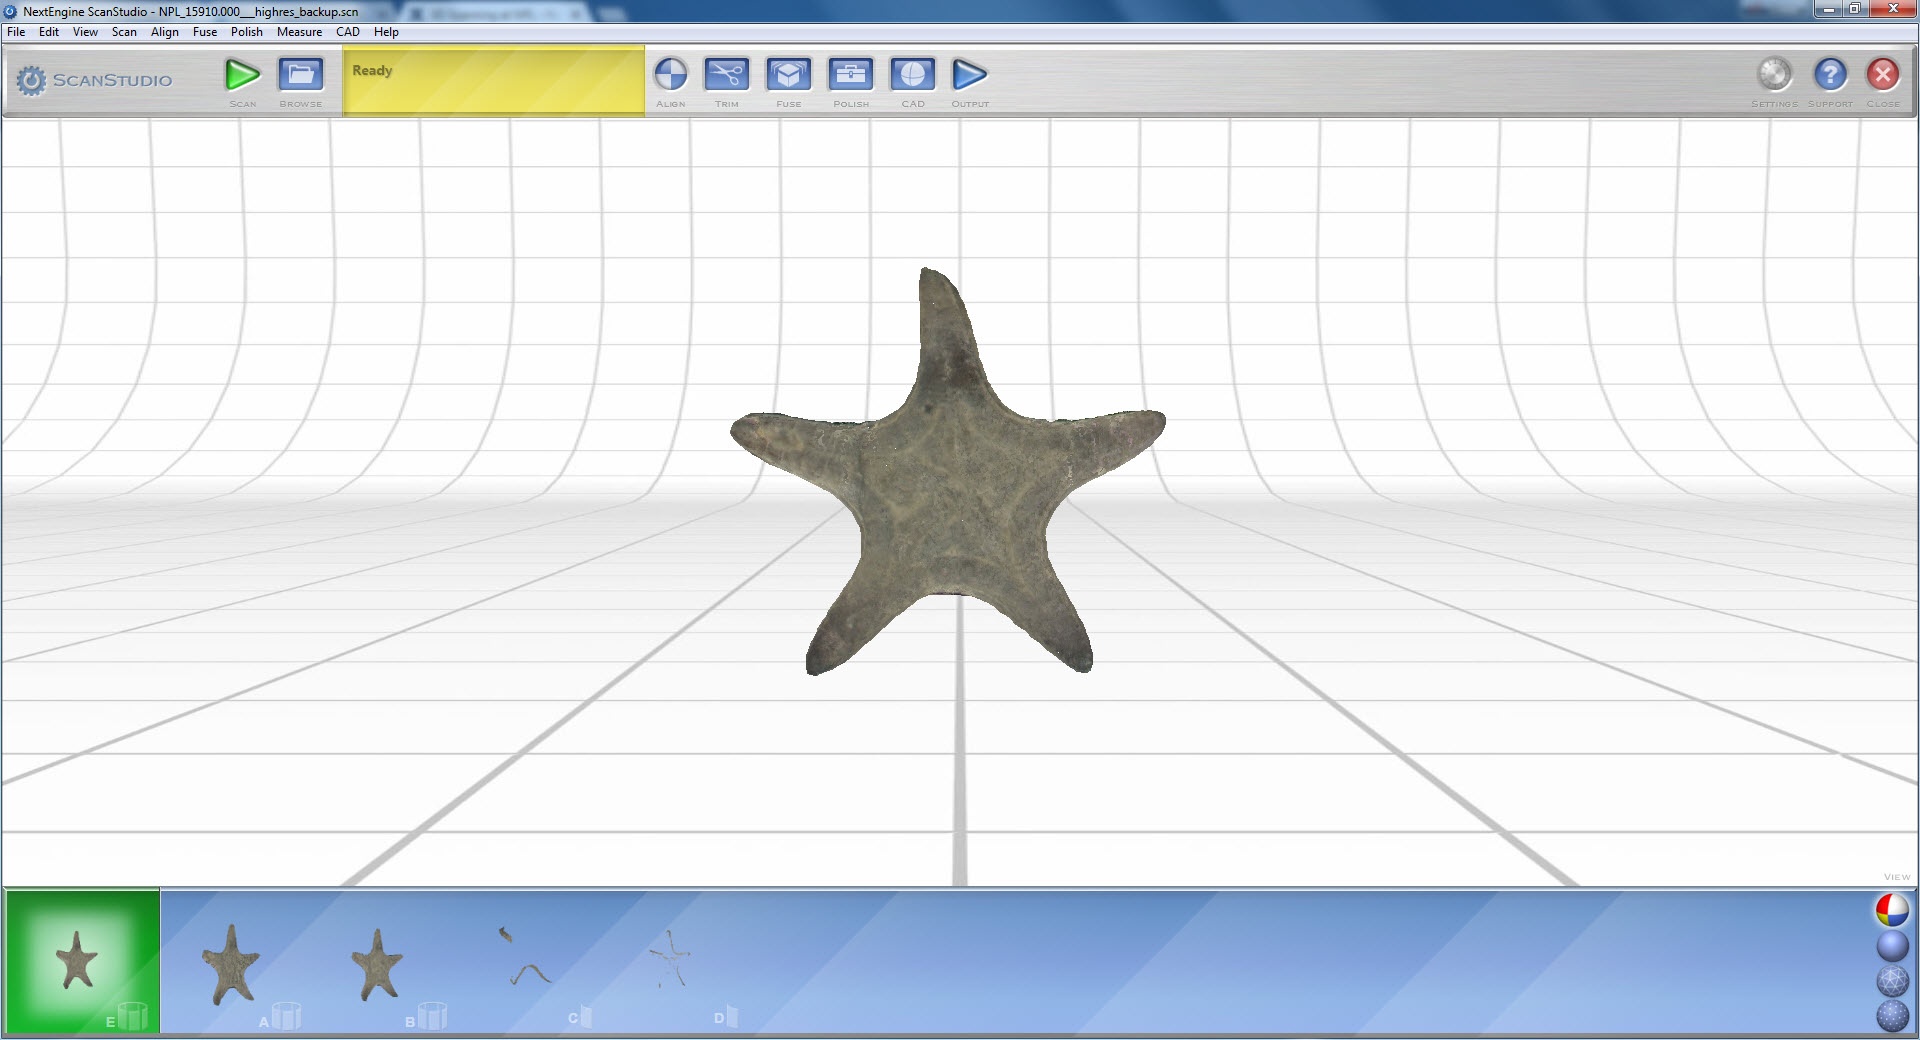
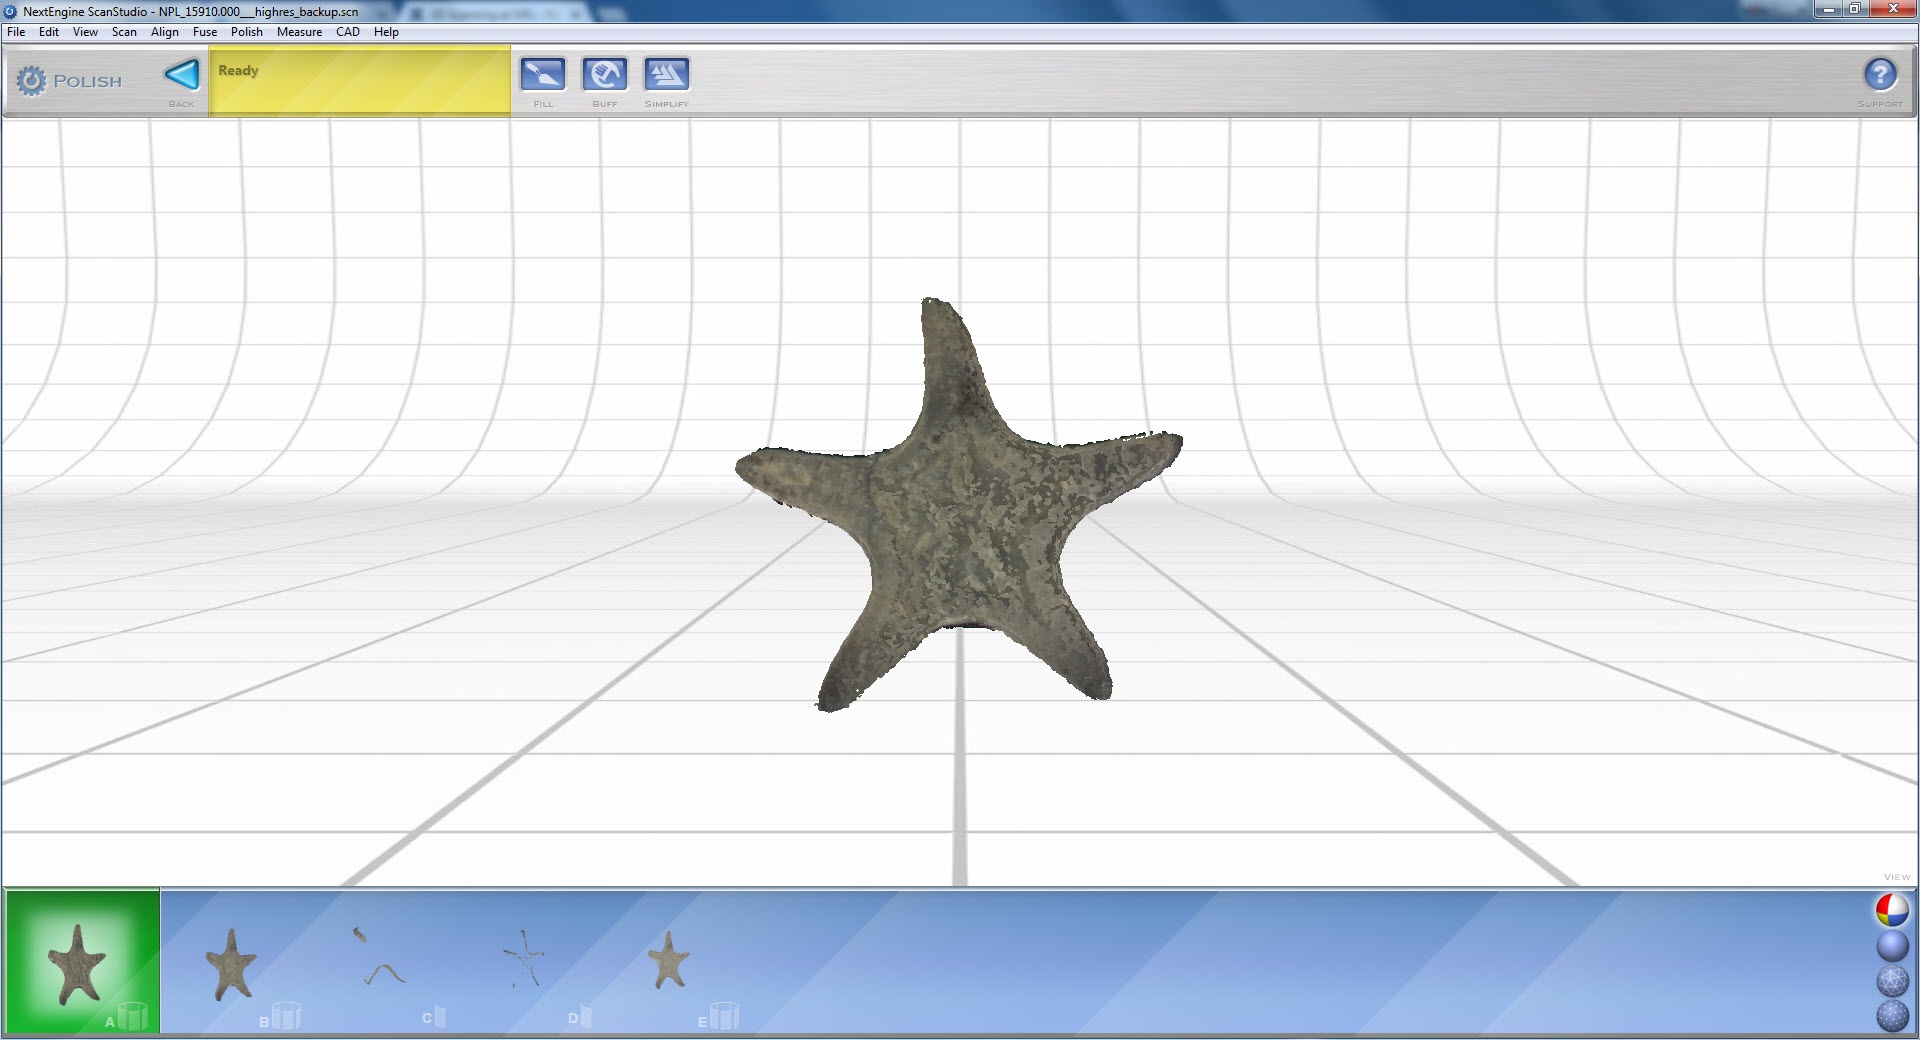
Color (Alt +T) – Shows the model with the surface texture (color). This allows you to notice color disparities between the specimen and the stage more easily. Sometimes the edge of a scan should be deleted due to it being unusually dark.

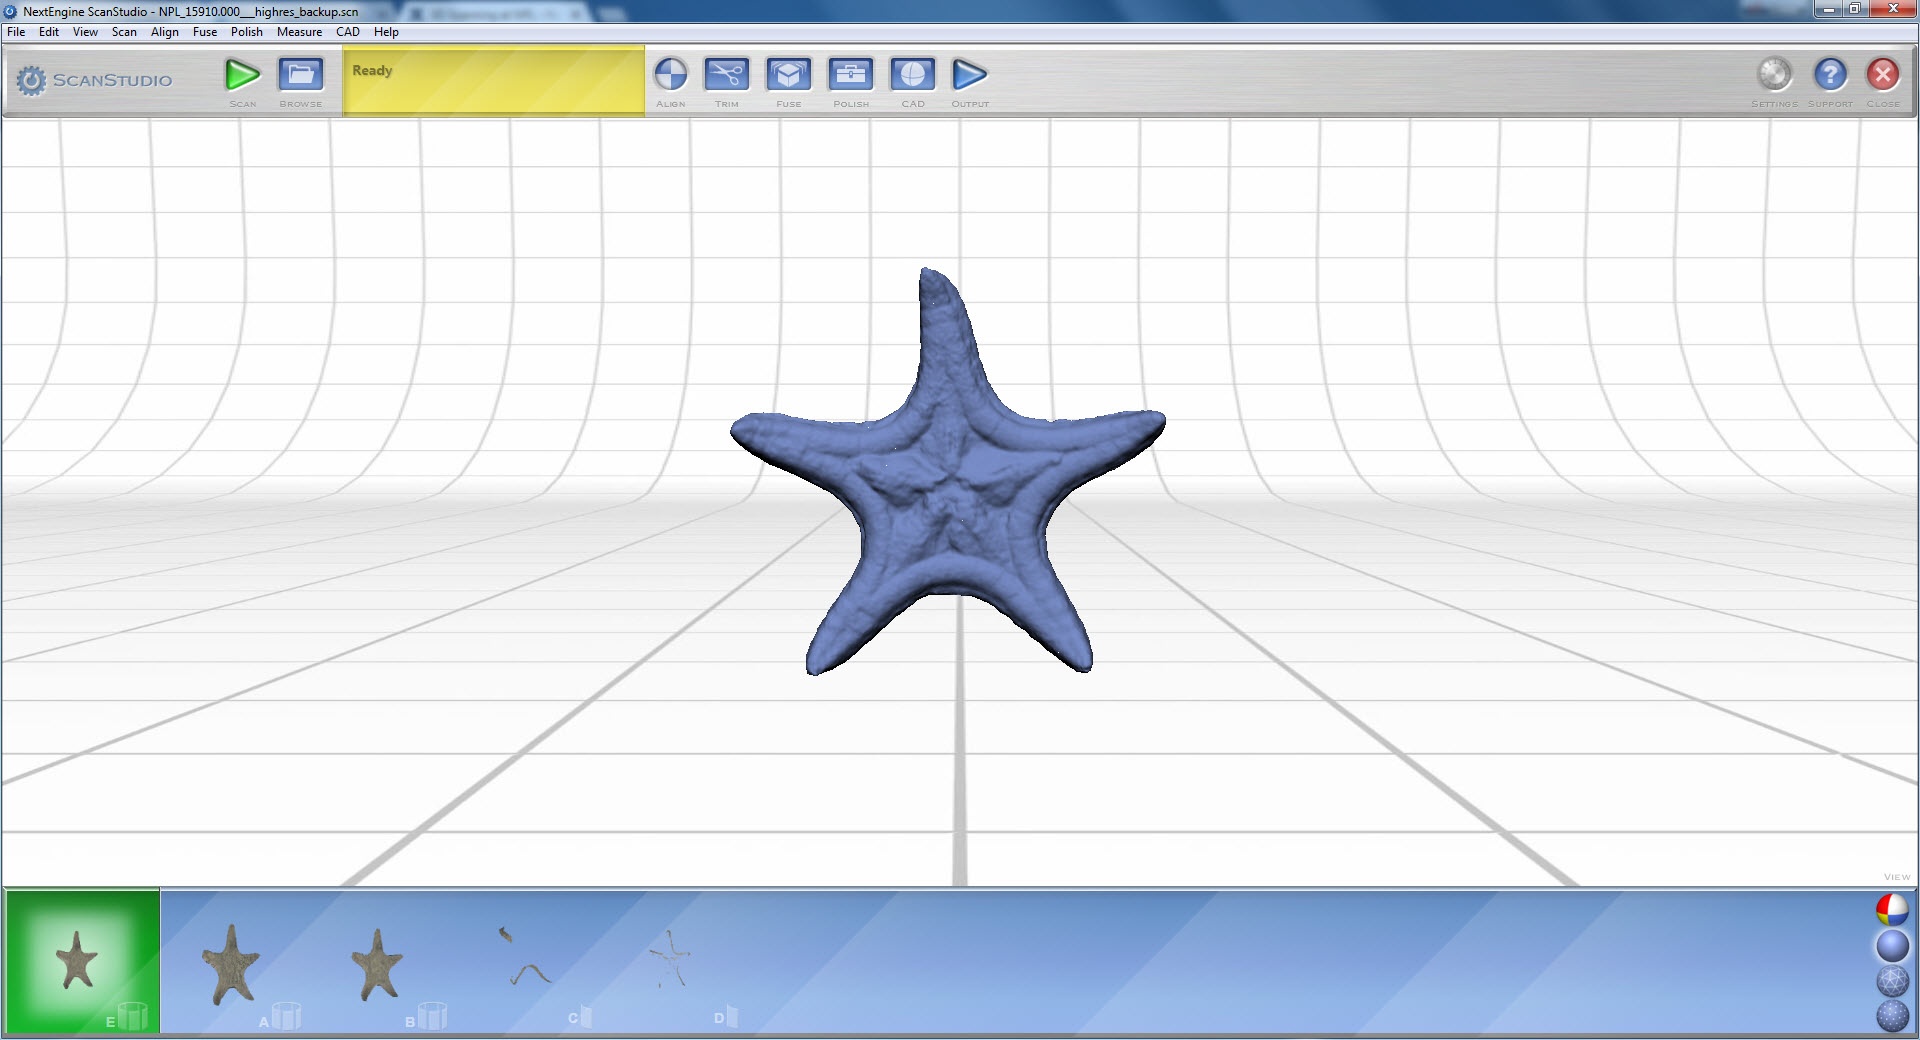
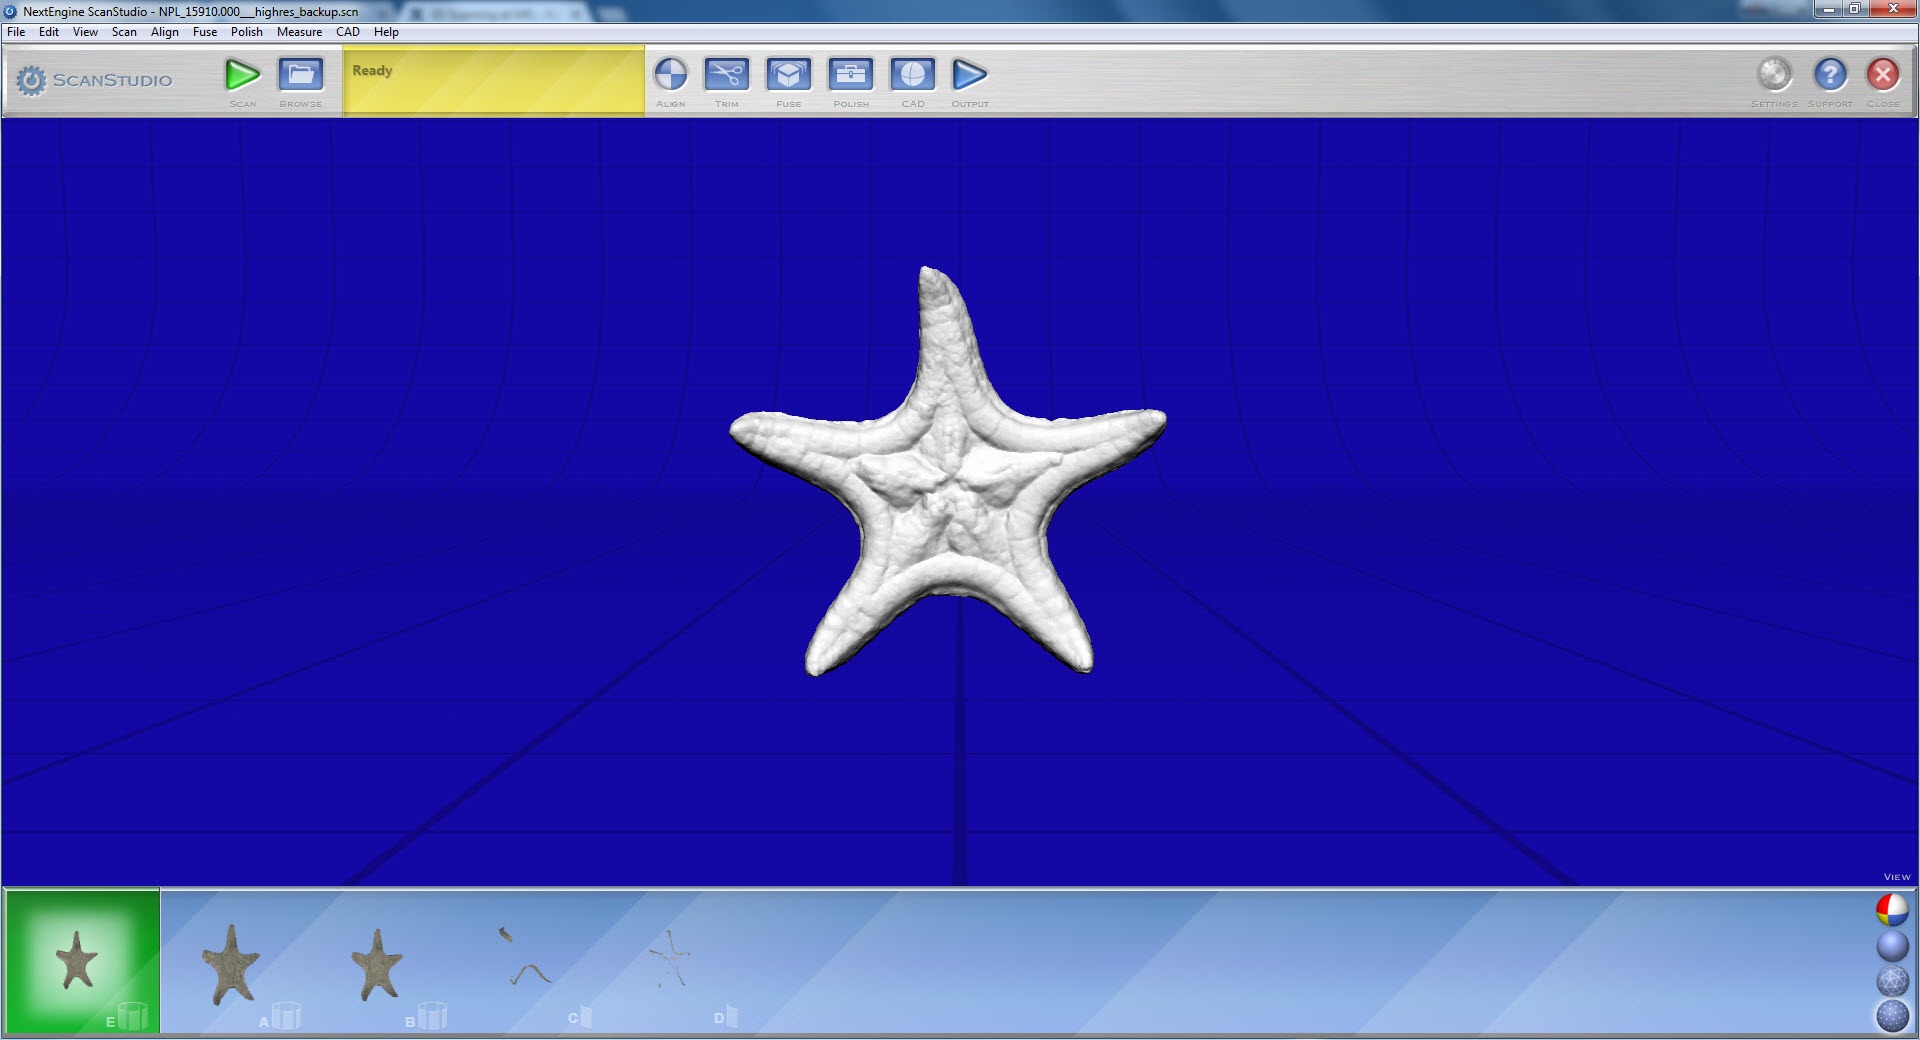
Shaded (Alt + S) – Shows the model without the surface texture, in solid blue. This mode makes it easier to see abnormalities in the shape of the specimen.

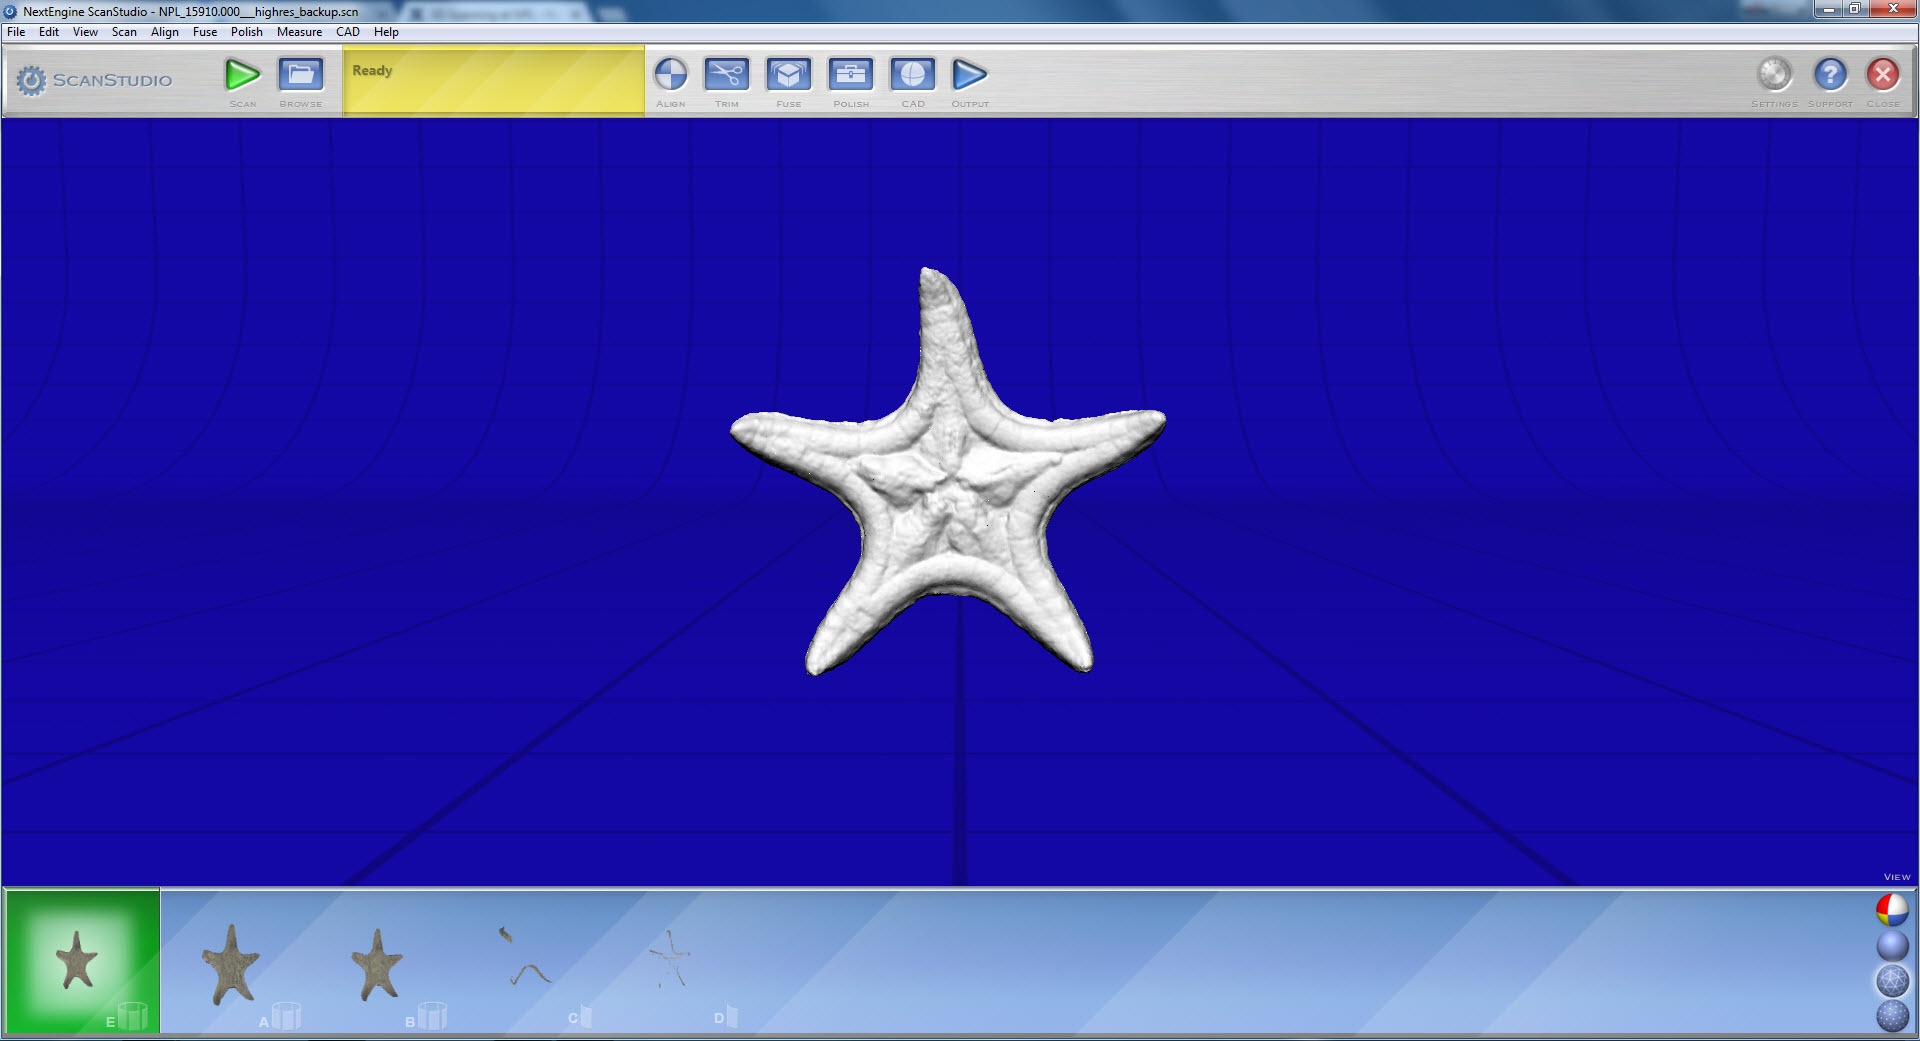
Mesh (Alt + W) – Shows you the model as a series of silver, interconnected points. Due to the contrast between the data and the background, this mode makes it easy to spot small, stray bits of data separate from the model itself.

Points (Alt + P) – Nearly identical to mesh view. Shows the model as a series of silver points, without connections between them.

Toggle View (Alt + Right) – Allows you quickly cycle through the four view options.

Colored view

Shaded view

Mesh view

Points View


  • Before starting, create a file folder on your desktop for saving temporary files. Name it something along the lines of Temp 3D Cache.
    • Press Edit Preferences Browse and select this folder. All autosaves and temporary data caches will be directed here.
  • Determine whether you want ScanStudio to autosave after every process. It generally isn’t advised, because it consumes a lot of time and creates an unnecessary amount of files.
    • To toggle autosave on or off, press Edit à Preferences, and check the box Enable Model Backups.
  • Save frequently, at least after every few steps performed. ScanStudio has a tendency to crash unexpectedly, and it’s very easy to lose data and time.
  • To save a model, press File Save As… from any screen in ScanStudio. By default, models are saved as .scn files.
  • When performing a save, always create a new folder to save the model into, (within Temp 3D Cache folder). It’s easiest to name these sub-folders Project 1, Project 2, etc.
    • Saved models save texture files, (as .jpg’s), alongside the .scn file, as well as some .raw files.
    • A .scn file must be in the same folder as its associated .jpg’s for the texture to appear on the model in ScanStudio.
  • If multiple models are saved into the same folder, ScanStudio can confuse their associated texture files, creating a multitude of glitches, including loss of texture data. Saving each file in a separate folder alleviates this issue.


The following is a guide indicating the necessary steps of completing a 3D scan. This does not does not describe every option available in ScanStudio. See Additional Post-Processing for descriptions of other, less necessary options available in ScanStudio not described here.


Step 1: Select the specimen to be scanned

I: Small to medium-sized (fist sized) specimens are easiest to scan. Larger specimens become increasingly difficult to scan, and create proportionally larger file sizes, slowing down the program.

II: Avoid glossy or otherwise reflective specimens. The lasers have a difficult time detecting the surface of these specimens. Avoid specimens with translucent surfaces for a similar reason.

  • If a glossy or translucent specimen must be scanned, smoke or pigment it beforehand

III: Dark-colored specimens tend to scan better than lighter colored specimens.

IV: Avoid specimens with a large amount of internal structure. The lasers have a difficult time penetrating beyond the surface of most specimens, even if it seems like it should be able to.

V: Avoid exceptionally fragile specimens

  • If a highly fragile specimen must be scanned, ensure beforehand that it properly consolidated


Step 2: Open the ScanStudio program


Step 3: Position the specimen on the stage or scanning surface

I: Press the green Scan button in the tool bar. This will open a separate scan screen. The right hand of the screen will be occupied by a preview window that shows you what the scanner can see. Use this for reference when adjusting the position of the specimen.

  • Try and maximize the amount of specimen surface exposed to the scanner. Often this is achieved by positioning the specimen at oblique angles, though it depends entirely on the specimen being scanned.

II (A): Small and medium sized specimens can be placed on the accompanying stage.

  • Small specimens can be placed on the elevated stage. Secure the specimen using the adjustable arm attached to the pole. Prop up the specimen with clay as necessary to ensure the specimen is stable.
  • Medium-sized specimens can be placed on the larger stage base. In this case, unscrew the elevated stage from the base and set it aside. You won’t have access to the adjustable arm in this configuration, so make extra-sure the specimen is stable on the stage base before beginning scanning. If the stage base is too low for the scanner to see, elevate it on a box or other stable elevator.

II (B): Large specimens may have to be placed on a scanning surface other than the stage

  • If a specimen is too large for the accompanying stage, place it on a secure surface, such as a nearby table, lined with foam.
  • Make sure the background the specimen is lying on or propped up against contrasts the color of the specimen.
  • Specimens scanned in this configuration will not be able to rotate, and will only be able to be scanned through a series of single scans. This will negatively affect the quality of the surface color, and can be more time consuming. Take this into account before starting.

III: Adjust the distance of the scanner from the specimen and select the appropriate setting.

  • Macro - Most small and medium-sized specimens will be using the Macro setting in the scan settings. For specimens of this size, the front surface of the specimen, (the surface of the specimen facing the scanner), should be at least 7.5 in. from the scanner. 9.5 in. from the scanner is the ideal distance. The specimen should be no more than 11.0 in. away from the scanner.
  • Wide - If a specimen doesn’t fit within the scan preview window with the Macro setting selected, then it is likely too large for the Macro setting. For specimens of this size, the front surface of the specimen should be at least 22.0 in. from the scanner. 25.0 in. from the scanner is the ideal distance. The specimen should be no more than 28.0 in. away from the scanner.
  • Extended - For particularly large specimens, the Extended setting can be used. For specimens of this size, the front surface of the specimen should be at least 22.0 in. from the scanner. 25.0 in. from the scanner is the ideal distance. The specimen should be no more than 40.0 in. away from the scanner.
  • Note: specimens, (or parts of specimens), which fall outside the range of a particular scan setting will see a dramatic drop in scan quality. Always try and make sure the specimen falls within the appropriate range of distance. The further the specimen is from the scanner, the lower the quality of the surface detail will be.


Step 4: Adjust scan settings and begin scanning

I: Press the green Scan button in the tool bar (if you haven’t already) to open up the scan screen. Keep Scan Family set to Auto.

II: Select the type of scan Positioning

  • 360 – This scan type cause the stage to rotate a full 360°, in increments equal to the number of Divisions you have selected (see Step 4; III).
    • Only specimens small enough to be safely placed on the rotating stage can be 360 scanned.
  • Bracket – This scan type causes the stage to rotate partially, based on the number of Divisions you have selected (see Step 4; III). This allows you to only scan a particular section of the specimen.
    • The axis facing the scanner acts as the center point of rotation for the stage.
    • The angle of stage rotation is inversely related to the number of Divisions you have selected. The greater the number of Divisions, the lower the angle of rotation. (Example: 16 Divisions = 1/16 rotation, 4 Divisions = 1/4 rotation, etc.)
    • 3 scans will always be taken – one at the widest left angle, one along the center axis, and one at the widest right angle.
    • Only specimens small enough to safely be placed on the rotating stage can be Bracket scanned.
  • Single – This scan type takes a single scan of the specimen, regardless of the number of Divisions selected. The stage does not rotate.
    • This scan type is most useful for scanning specimens too large to fit on stage, and to fill in unscanned sections of smaller specimen.

III: Select number of Divisions.

  • This number will determine the number of scans taken in a 360 scan, and the angle of rotation in the Bracket scan. It has no effect during a Single scan.

IV: Select Points/in2

  • This value defines the overall quality of the scan. The higher the value, the higher fidelity the scan will be.
  • This value varies based on the Range setting selected
    • Macro – 1.2k Points/in2 – 268k Points/in2 (highest quality)
    • Wide – 125 Points/in2 – 29k Points/in2
    • Extended – 14 Points/in2 – 3.3k Points/in2 (lowest quality)
    • Note: Avoid setting to the highest Macro value (268k Points/in2). This will slow down the program and make your model file unnecessarily large without any noticeable increase in quality. The second highest value (67k Points/in2) is generally high enough.

V: Select Target color

  • Select the color type that best matches the color of the target specimen. For white or light-grey specimens, select Light. For grey, tan, and light-brown specimens, select Neutral. For black or dark-brown specimens, select Dark.
    • Note: Dark specimens tend to scan better than light specimens.

VI: Select the appropriate Range, if not done so already (See: Step 3; III). This is the distance the specimen should be placed away from the scanner.

  • Macro – 7.5  in. – 11.5 in. from scanner. 9.5 in. is ideal.
  • Wide – 22.0 in. – 28.0 in. from scanner. 25.0 in. is ideal.
  • Extended – 22.0 in. – 40.0 in. from scanner 25.0 in. is ideal

VII: Use the grey Turn buttons at the top of the screen to double-check that the specimen remains visible to the scanner throughout the entire scan within the preview window

  • As the stage spins, the specimen may fall into or out of the visibility of the scanner. Spinning the specimen allows you to see what the scanner will see at every point in the scan via the preview window.
    • Click the arrow buttons to turn the stage a small amount clockwise or counterclockwise
    • Click the vertical rectangular button to turn the stage one quarter turn clockwise or counterclockwise
    • Hold down the arrow buttons to perform a single, continual turn clockwise or counterclockwise. The stage will stop spinning when it reaches its starting point.
  • Drag and pull with the mouse in the preview window to constrain the size of the area scanned, (delineated with a dotted-lined box). This allows you to cut out background and superfluous information, reducing scan time and file size.

VIII: Press the green Scan button at the top of the screen to start the scan

  • Note the time and memory values (represented at the bottom left of your screen) before starting.
    • Time – This gives you an approximate time for how long the scan should take. It is not 100% accurate. Expect the actual time to be at least several minutes longer than the time presented. It may take even longer if the memory usage is particularly high.
    • Memory – This is how much available RAM is being used by ScanStudio. The closer the memory usage is to 100%, the longer the scan will take, and the slower your computer will perform during the scan. This will also increase the likelihood of the program crashing during your scan.
  • Upon beginning the scan, the program will return you to the main screen.
  • While a scan is occurring, you can continue navigating the program, including rotating and manipulating the existing model. This is not recommended. The program may crash if you continue using it while a scan is being performed, so it’s best to minimize it and not use the program while a scan is running.
  • For very large specimens and other scans with a lot of data, the entire computer may become slowed by the program, and using other programs on the computer may slow down the scan or cause the program to crash. In these cases, it’s best to not use the computer for other functions while performing a scan.
  • A scan in progress can be stopped by pressing the red Stop button, or by pressing Scan → Stop a 3D scan… in the menu bar, but it is finicky. Sometimes pressing the button simply doesn’t work, other times it will crash the program.
  • Note: While a scan is being performed, avoid bumping the specimen, stage, or table. Keep lighting consistent, (don’t turn the overhead lights on or off). Don’t let anything pass in front of the lasers or obstruct the view of the NextEngine.
  • Note: Completed scans are stored as scan families in the view bar across the bottom of the screen.
    • The number of individual scans in a Scan Family is equal to the number of Divisions for 360 scans. For Bracket scans, there will always be 3 scans in a Scan Family. For Single scans, there will only be 1.
    • You can move Scan Families in and out of the green active scans box in the bottom left of the screen. Multiple, attached scans can occupy this space at the same time (See: Step-by-Step Guide; Step 6). Scans should only be attached after they’ve been aligned.
    • Double clicking on any scan family allows you to see and work with each individual scan, including deleting, trimming, fusing, aligning, etc. Pressing Up will collapse the individual scans back into the original Scan Family. It’s rare that you’ll have to interact with scans in this way.

Step 5: Trim excess data

I: Press the blue Trim button at the top of the screen. This will take you to a separate trim screen.

II: Select the parts of the model you want to delete using the tools available in the toolbar at the top of the screen

  • Pointer mode – This tool allows you to rotate the model as you would normally. Within the trim screen, this tool must be selected to rotate the model. The model may still be shrunk or enlarged using the scroll wheel on the mouse from any tool mode.
  • Circle brush selector – A basic circular selector tool. Pressing the mouse allows you to ‘paint’ areas of data you intend to delete. These areas will be colored in red.
  • Square brush selector – Identical to the Circle brush selector, but square. Useful for more angular models.
  • Rectangular region selector – By holding down the mouse and dragging, you can create a box of any size. Anything inside the box when you release the mouse will be selected.
  • Polygon region selector – By clicking the mouse at arbitrary points, you can create a polygon of any shape. When you place a point (the final point) on your starting point, anything inside the polygon will be selected.
  • ALL – Pressing this button will select the entire model.
  • De/Select – Allows you to switch between selecting data to delete and deselecting data you do not want to delete.
    • ( – ) – This is the default selection. Any data you select while in this mode will turn red to indicate it is ready to be deleted.
    • ( + ) – This mode allows you to de-select data you have already selected.

III: Press the blue Trim button at the top of the screen when all of the excess data has been selected

  • This will trim any data you have selected in red
  • This process be undone via the Re-Generate Scans option, (See: Additional Post Processing; Re-Generating Scans), but the restored data may be corrupted. Always double check before trimming to make sure you’re not trimming relevant data. Assume it’s irreversible.
  • Note: Sometimes excess data can be hard to see. Switch between the View options in the bottom right of the screen to check and make sure all of the appropriate data has been deleted. The Mesh view is particularly useful for spotting stray bits of data on a dark background. (See: Introduction; View Options)
  • Note: Another hint for telling that all excess data has been deleted is by rotating the model. A model will tend to rotate near its center of mass. If a model is rotating at a point outside of the model itself, it means there is stray data separate from the main body of the model that needs to be trimmed.
  • Note: Avoid trimming aligned or fused models when possible. Trimming these models takes substantially longer than trimming a single scan family.

IV: Press the blue Back button at the top of the screen to return to the main screen


Step 6: Align your scan families

I: Ensure you have at least two completed scan families to align. Scan families are aligned two at a time, regardless of how many you have.

II: Press the blue Align button at the top of the screen. This will take you to a separate Align Screen.

III: Press Edit Preferences Align Settings in the menu bar to adjust the alignment settings as necessary. (See: Settings and Preferences; Alignment Settings)

  • Most of these settings can be kept as default, but may need to be adjusted if the alignment is running slowly, or if the program is misaligning your scan families.

IV: Select the scan families to align. The scan family currently occupying the green active scans box will occupy the left half of the screen. The right half of the screen will be occupied by whichever other scan you have selected.

V: Place pins on each model at corresponding surface features of each model.

  • Drag and drop pins from the top left of each portion of the screen onto surface features of each model. Make sure pins of the same color correspond to the same feature on either model
  • A minimum of three pins must be used for alignment to work properly, but as many pins may be used as necessary.
    • After placing three pins, three more will appear for use, if you need them.
    • It isn’t recommended you place too many pins. The more exact you try to make the manual alignment, the more likely the alignment is to be off. Three pins is generally adequate.

VI: Press the blue Align button to begin the automatic alignment

  • If nothing happens when you press the button, first click in the left-hand side of the screen, then press the align button again.
  • There is no time indicator, but alignment can take anywhere from a few minutes to nearly an hour. It depends on the size of the model.
  • When a model is aligned, both Scan Families will occupy the green active scans box together. If the model is misaligned, remove one of the scan families from the active scans box, and try again.
  • If a model is misaligned, try placing more pins, or pins on different parts of the model. If misalignment still occurs, you may have to adjust some of the settings. (See: Settings and Preferences; Alignment Settings)

VII: Press Align Settings when the scan families are properly aligned. This will open a new window. Select the aligned scan families from the appropriate tab, and check Fixed (will not be moved by alignment).

  • Checking this box locks the respective scan family’s position, ensuring that aligned scan families will not become misaligned by future additional alignments.
  • Repeat this step each time you align a new scan family.

VIII: Press the blue Back button at the top of the screen to return to the main screen


Step 7: Fuse your scans

I: Ensure you have performed all of the scans you intend to perform, and have trimmed and aligned all of the scan families before proceeding.

  • You can trim a fused scan or align additional scan to an already fused scan, but it takes much longer. Fusion is generally treated as one of the final steps in a scan.

II: Press the blue Fuse button at the top of the main screen. This will take you to the fuse screen.

III: Press the grey Settings button in the tool bar. This will open a separate settings window. Adjust the settings as appropriate. (See: Settings and Preferences; Fuse Settings)

  • Most of the Fuse settings can be kept as default, but if this is your final fusion, make sure Create Watertight Model is selected.

IV: Press the blue Fuse button at the top of the screen to begin the fusion.

  • Fusing requires a lot of computer memory to perform. It’s best to close background programs and avoid working on the same computer while a fuse is happening. For large models, this becomes a necessity, as ScanStudio often crashes during this step.
  • Fusing is one of the most time consuming steps.
  • Once a model is fused, it will create a new Scan Family. The scans that went into making the fused model will still be available in the scan bar at the bottom of the page. If the fusion went poorly, the fused model can be deleted and retried.


Step 8: Remesh the scans

I: Press Polish Remesh (fill holes)… in the menu bar. This will open up a separate remesh settings window.

II: Adjust the Remesh setting as appropriate. (See: Settings and Preferences; Remesh Settings)

  • Most of these settings can be kept as default. Just makes sure the Fill Holes option is checked.

II: Press Remesh to begin remeshing the model.

  • Remeshing deconstructs and reconstructs the model. In the process it improves the quality of the mesh, fixes imperfections and misalignments, and fills holes.
  • Like fusing, remeshing can take a long time, and puts a strain on the computer’s resources. Avoid performing too many tasks on a computer while a remesh is taking place.


Step 9: Save the final model

I: Press File Save as… and save a final .scn backup file including the fused and remeshed model, as well as all of the separate scan families.

II: Delete all of the scan families except for the final, fused and remeshed model.

III: Save the final .scn file containing only the fused model. This file should be smaller than the backup. Deleting the excess scan families helps save file space.

IV: Press the blue Output button in the tool bar to save .obj and .stl files

V: Press the blue OBJ file button to save a copy of the model as a .obj file

VI: Press the blue STL file button to save a copy of the model as a .stl file

  • When the STL Format Selection screen appears, select Binary, then press OK


Step 10: Update the database record

I: Open Specify

II: Open the appropriate Collection Object record

III: Scroll down to the Preparations section

IV: Add a preparation for the 3D model file

  • Set the number of pieces to 0
  • Copy the file path into the Preparations Remarks field

V: Save the record


In order to print the models created in the program, they ultimately have to be water tight. In order to ensure this, all of the surface holes have to be filled in. In addition to Remesh (fill holes) (See: Step-By-Step Guide; Step 8), there are additional options for filling holes.


Option 1: Fill

I: Press the square Polish button in the tool bar

II: Select the square Fill button

  • The program will automatically go to work detecting holes in the mesh. Hole will be displayed on the model as light-blue spots. This visual representation will remain even if you back out of this setting and work under other tool options. The process may take a while to complete.

III: Use the tools in the tool bar to select holes you want filled.

  • These tools are identical to those outlined under Trim (See: Step-By-Step Guide; Step 6).
  • Selected holes will appear as orange.

IV: Press the square Fill button in the tool bar

  • It’s best to only use this tool to fill small holes, as large holes filled in this way will appear abnormal, resulting in a sloppy model.

Option 2: Fill Holes 

I: Press Polish Fill Holes… in the menu bar. A window will pop up with additional options.

  • Fill Method – This option indicates how the surface will be constructed covering a hole.
    • Flat – This option will fill in holes with a flat surface.
    • Smooth – This is the default option. This option will fill in holes with a slight, rounded curvature.
    • Curvature – This option will give holes a rounded appearance, making a bumpy surface. It is generally not the preferred fill option.
  • Smooth boundaries – Keep this option selected
  • Keep Largest Hole – Select this option if you want to keep the largest hole in your model unfilled.
  • Leave holes larger than [x] inches in circumference – Select this option if there are multiple holes you want to keep in your model. Specify the size of the holes you want to remain in inches.

II: Press Fill Holes button at the bottom of the pop-up window to fill the selected holes

Smoothing is used to smooth out rough and jagged surfaces of a model. There are two options for smoothing models: Using the Buff tool, and using the Buff (smooth) option. Be careful when smoothing models as it makes the surface data less accurate. Only use this when necessary to fix problem spots.


Option 1: Buff

I: Press the Polish button in the tool bar.

II: Press the Buff button in the next tool bar.

III: Use the tools in the tool bar to select the areas you want to have smoothed.

  • These tools are identical to those found under Trim (see Step 6 above for in-depth description).
  • Selected areas will appear in red.

IV: Press the Perform Buff button in the tool bar. A window will pop up with additional options.

  • Buff Weight – This slider determines how smooth the selected area of the model will be after buffing. The higher the number, the smoother it will be.
  • Deviation Tolerance – This is set at a default of 0 inches, but can be adjusted.
  • Max iterations – This is set at a default of 10 iterations, but it can be adjusted.
  • Smooth Boundaries – This option is set by default, and ensures that the edge of your selected area will blend smoothly into non-selected areas.
  • Preserve Sharp Edges – Selecting this will prevent sharp edges from being smoothed out.

V: Press the Buff button at the bottom of the window to perform the buff action.

  • This process may take quite a bit of time. The model will be reconstructed and a new scan family will be produced.

Option 2: Buff (smooth)

I: Press Polish Buff (smooth)… in the menu bar. A window will pop up with additional options.

  • The options in this window are identical to those described in Option 1. The main difference is that you will not be able to select specific areas of the model. Any changes will be applied to the entire model.

II: Press the Buff button at the bottom of the window to perform the buff action.


In addition to manually trimming a model (See: Step-By-Step Guide; Step 6), there is an option to trim unwanted data from a model automatically. This option can only be applied to entire scans, scan families, or models. It cannot be used to select specific parts of a model.


Auto Trim

I: Press Polish Auto Trim in the menu bar bar. A window will pop up with additional options.

  • Select whether the trim will be applied to a single scan, a scan family, or the entire model.
  • Maximum Triangle Angle – Adjust this slider to trim data based on the angle of the model triangles. The higher the number, the more data will be deleted.
  • Maximum Triangle Size – Adjust this slider to trim data based on the size of the model triangles (in inches). The higher the number, the more data will be deleted.

II: Press the Auto Trim button to begin the trimming process.

Models the contain a large number of scan and scan families often result in very large files, which can slow the computer down and cause the program to crash. It can also create issues when trying to move the model outside of the program, or upload it into other imaging programs. Simplifying the mesh allows you to reduce the file size to more manageable levels by reducing the complexity of the mesh.


Simplify

I: Press the Polish button in the tool bar, or press Polish Simplify (reduce triangles…) in the menu bar

II: Press the Simplify button in the next tool bar.

III: Use the tools in the tool bar to select the areas you want to have smoothed.

  • These tools are identical to those found under Trim (See: Step-by-Step Guide; Step 6), except for one; the Simplify slider
  • Selected areas will appear in red.

IV: Use the Simplify slider to adjust how simplified you want to make the mesh. By default, it is set to a tolerance of 0.0050”, and can be increased to 0.2000”. Increasing this will increase the size of the triangles, thereby increasing the degree of simplification.

  • It’s best to keep it at the default setting. Simplification can be performed multiple times if necessary, but a simplified model cannot be undone.

V: Press the Simplify button to begin the simplification process.


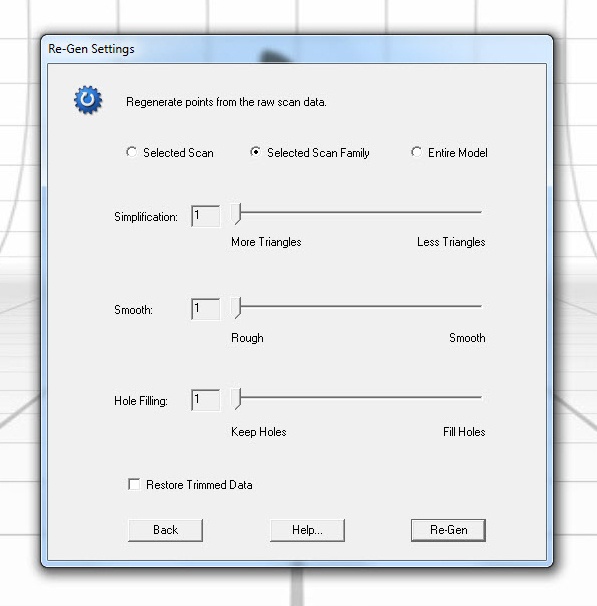
Another option for improving scan quality is re-generating the scans. This slightly different option allows you to smooth, trim and fill the holes in a model while the program deconstructs and reconstructs the model. It is similar to remeshing, but re-generating cannot be performed on an already fused model, as this technically counts as a fuse option itself.


Re-generate Scans

I: Press Fuse Re-Generate Scan(s)… in the menu bar. A window will pop up with additional options.

  • Select whether the re-generation will be applied to a single scan, a single scan family, or the entire model.
  • Simplification – Shift this slider between 0 and 10 to adjust the level of simplification. 0 is no simplification, 10 is maximum simplification.
  • Smooth – Shift this slider between 0 and 5 to adjust the how smoothing will be applied to the model. 0 is no smoothing, 5 is maximum smoothing.
  • Hole Filling – Shift this slider between 0 and 6 to adjust the extent of hole filling. 0 is no hole filling, 6 is all holes filled.
  • Restore Trimmed Data – Selecting this option will return any data previously trimmed off a model. Restoring trimmed data doesn’t always work appropriately, and restored data may be stretched, discolored, or misaligned.

II: Press the Re-Gen button to begin the re-generation process. This process may take a while, depending on the size of the scans.

 Measuring the model allows you to see, in square inches, the size of the model. The measuring tool in ScanStudio is not robust, so you cannot measure individual portions of a model without using external programs.


Measure

I: Press Measure Surface Area… in the menu bar. A window will pop up with additional options.

  • Select whether you’re measuring a single scan or an entire scan family

II: Press Calculate to determine the surface area in square inches.

III: Press OK to exit the window.


File

  • New (Ctrl + N) – Closes the current file without saving
  • Open (Ctrl + O) – Opens a window to let you browse for files to open. Identical to File Import. Also identical to the Browse button in the main screen Tool Bar.
  • Close – Closes the current file without saving
  • Save (Ctrl + S) – Saves the current file
  • Save as… – Allows you to save a new version of the file
  • Import – Opens a window to let you browse for files to open. Identical to File Open. Also identical to the Browse button in the main screen Tool Bar.
  • [Previous files] – The last four files opened in ScanStudio should be saved just below the Import option, labeled 1 thru 4. These files can be opened from here.
  • Model Information – Opens a window showing you the full file location, the model ID, the number of points and triangles in the entire model, and the number of points and triangles in the attached scans (in the green Active Scans box).
  • Clean up temp files (*.scn~) – Automatically removes any temporary files created by ScanStudio.
  • Exit – Closes the program. Identical to the Close button in the Main Screen tool bar, as well as the close button in the top right corner of the screen (on PC).


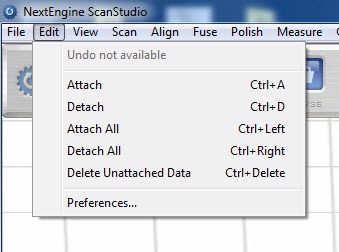
Edit

  • Undo – Reverses the last action performed. If no action has been performed, this option will be replaced with Undo not available.
  • Attach (Ctrl + A) – Attaches selected scan family (highlighted in white).
  • Detach (Ctrl + D) – Detaches selected scan family (highlighted in white).
  • Attach All (Ctrl + Left) – Attaches every scan family.
  • Detach All (Ctrl + Right) – Detaches every scan family.
  • Delete Unattached Data (Ctrl + Del) – Deletes every detached scan family.
  • Preferences – Opens ScanStudio Preferences sub-menu. (See: Settings and Preferences; Preferences)

View

  • Display Mode – Allows you to switch between different model viewing options (See: Navigation; View Options).

Scan →

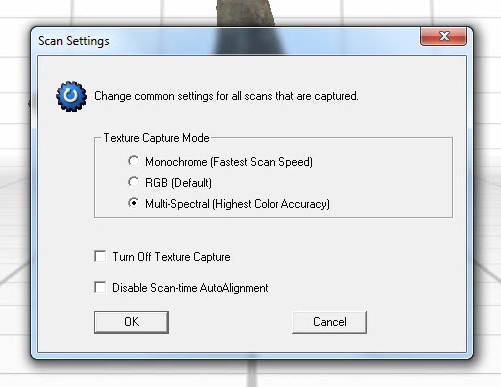
  • Settings
    • Texture Capture Mode
      • Monochrome (Fastest Scan Speed) – Model textures will be scanned in black and white
      • RGB (Default) – Normal color setting
      • Multi-spectral (Highest Color Accuracy) – High-quality color setting; slightly increases scan times.
  • Turn off Texture Capture – Scans will not capture any texture data when scanning specimens. Scan times will be reduced.
  • Disable Scan-time AutoAlignment  - Individual scans will not be auto-aligned when performing a 360 or Bracket scan.
  • Start a 3D Scan – Begins a 3D scan
  • End a 3D scan – Stops a 3D scan in progress

Align

  • Start – Begins an alignment. Can only be selected from the Align Screen, and only after pins have been placed.
  • Stop – Ends an alignment in progress.
  • Refine Alignment – Automatically improves the quality of the alignment of the scans within a single Scan Family, (if expanded), or between two attached Scan Families.
  • Settings – Allows you to adjust settings for alignment (See: Settings and Preferences; Alignment Settings)
  • AutoFix Aligned Scans – Automatically attempts to improve the quality of manually aligned scans
  • Remove All Align Info – Removes all placed pins from all aligned scans and scan families.
  • Calibrate MultiDrive – [only selectable if using MultiDrive]

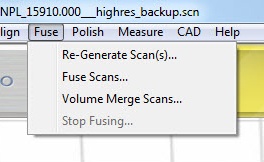
Fuse

  • Re-Generate Scan(s)… – Allows you to re-generate a selected scan or scan family. (See: Additional Post Processing; Re-Generating Scans)
  • Fuse Scan(s)… – Takes you to the Scan Screen. (See: Settings and Preferences; Fuse Settings)
  • Volume Merge Scans… - Performs a volume merge fusion on selected scan families. (See: Settings and Preferences; Fuse Settings)
  • Stop Fusing – Ends a fuse in progress.

Polish

  • Auto-Trim… – Allows you to perform an automatic trim function on a selected scan or scan family (See: Additional Post-Processing; Trimming)
  • Remesh (fill holes)… – Allows you to perform the remesh function on a selected scan or scan family (See: Step-by-Step Guide; Step 8)
  • Simplify (reduce triangles)…  – Allows you to simplify the mesh on a selected scan or scan family (See: Additional Post-Processing; Simplification)
  • Buff (smooth)… – Allows you to smooth out portions of a model (See: Additional Post-Processing; Smoothing)
  • Fill Holes… – Allows you to fill holes in the mesh (See: Additional Post-Processing; Fill Holes)
  • Clean Defects – Any minor anomalies and defects in the mesh will be automatically detected and fixed.
  • Stop Polish – Ends a polishing function in progress

Measure

  • Surface Area… - Allows measurement of the surface area of a selected scan or scan family (See: Additional Post-Processing; Measuring)
  • Volume (ScanStudio CAD TOOLS) – [Requires CAD Tools functionality]

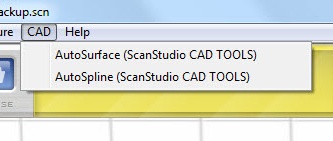
CAD

  • AutoSurface (ScanStudio CAD TOOLS) – [Requires CAD Tools functionality]
  • AutoSpline (ScanStudio CAD TOOLS)– [Requires CAD Tools functionality]

Edit Preferences

  • Scan
    • Directory to Save Scans into… – This option sets the default folder where temporary files and auto-saved backups are saved to. Press the Browse button to select the folder you want.
  • Align
    • Align Settings – Allows you to adjust the settings for alignment (See: Align Settings)
  • Polish
    • Enable Model Backups – Checking this box will make ScanStudio auto-save a copy of the file after every process performed, (alignment, trimming, fusion, etc.). Backups will be saved to the folder selected in the Directory to Save Scans into… option. It’s generally best to leave this option unchecked, as auto-saves add a lot of processing time.
    • Display Settings for Auto-Trim – Checking this box will allow you to adjust the Auto-Trim settings, (Polish Auto-Trim…). Leaving this box unchecked will cause the Auto-Trim to take place automatically when the option is selected.
    • Unload Model While Polishing (to save memory for large models) – Checking this box will cause models to temporarily disappear while performing polish functions, saving processing time and memory. It’s generally best to leave this box checked.
  • 2D Texture Display (turn off to save memory for large models)
    • Full Resolution – This option ensures the highest quality model color and texture.
    • Low Resolution – This option saves time and memory, but results in lower-quality model textures.
    • No Textures – This option saves the most time and memory, but no textures will be produced with the model.
    • Map 2D Textures to Polish Tools (Fuse, Simplify, Buff, etc.) – Checking this box will apply polish fucntions to both the mesh, as well as the overlying texture.
  • Performance – Pressing this button will open a separate System Performance Preferences window.
    • Prompt to Upgrade Memory – Checking this box will cause ScanStudio to prompt you with a message when your memory is low.
    • Prompt to Upgrade Graphics Card – Checking this box will cause ScanStudio to prompt you with a message when you need a dedicated graphics card.
    • Monitor Memory Usage – Checking this box will cause ScanStudio to prompt you with a message when you’re low on RAM space.
    • Monitor Hardrive Space – Checking this option will cause ScanStudio to prompt you with a message when you’re low on hard drive space.
    • Graphics Card Caching (requires ScanStudio restart) – Checking this box will cause ScanStudio to cache temporary files to the GPU instead of the CPU. It’s best to leave this box unchecked, as GPU memory is used to process data.
    • Disable Decimated Point-Cloud – Checking this box removes the visual point cloud effect when rotating models. Models will instead remain solid when rotating them.

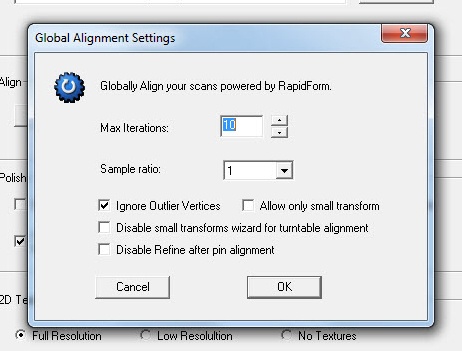
Edit Preferences Align Settings

  • Max iterations – This determines how many times the program will process an alignment. The more iterations, the more refined the alignment will be, but the longer it will take. By default, this is set to 10 iterations.
  • Sample Ratio – This determines what proportion of the model will be sampled for alignment. On very large models, it saves processing time to sample only a portion of the model. By default this is set to 1, meaning the entire model will be sampled.
  • Ignore Outlier Vertices – Checking this box makes the program not include statistical outliers in the data when aligning scans or scan families. It’s best to keep this option checked so that stray data doesn’t throw off your alignment.
  • Allow only small transform – Small transform is a process in the program that takes into account an entire overlapping region when performing an alignment, and assumes the initial alignment is accurate. This process is mediated by the small transforms wizard, which determines when and when not to apply it. Checking this box makes this the sole process of alignment and ensures it always occurs during alignment. It is useful for alignments where distinct, overlapping geometric features are scarce or nonexistent.
  • Disable small transforms wizard for turntable alignment – Checking this box turns off the small transforms wizard, (described above). This option should only be checked if scan families are failing to align properly.
  • Disable refine after pin alignment – Checking this box will eliminate the auto-refine feature. Aligned models will be aligned exactly where pins are placed. Check this box if the auto-refine feature is misaligning scans, despite multiple attempts. When auto-refine is turned off, alignment takes less time as well.

Align settings

Align Settings

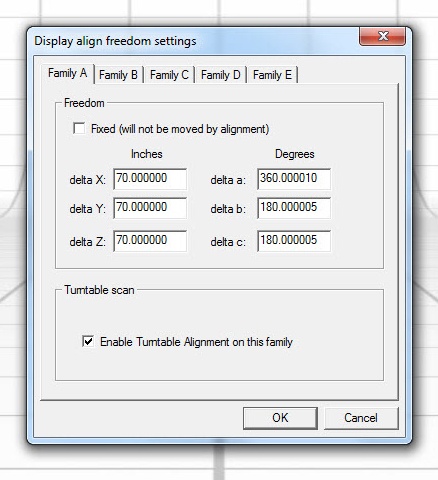
  • Scan [Family] (A, B, C, etc.) – These tabs allow you to cycle between the scan or scan family you’re working on. If you have a particular scan family expanded, the individual scans will appear here. If you do not, all of your scan families will be represented instead.
  • Fixed (will not be moved by alignment) – Checking this box will lock a scan or scan family in its alignment position, ensuring it will not be moved by future alignments. It’s useful to check this box for each scan family when you have aligned them appropriately, as future alignments can, occasionally, mess up previous unfixed alignments.
  • delta (X, Y, Z, a, b, c) – These values do not function, and are a legacy of a previous ScanStudio build that have not been removed. Altering them does not affect anything.
  • Enable Turntable Alignment on this family – Checking this box ensures that individual scans in a 360 or Bracket scan family will be automatically aligned. It’s generally best to leave this box checked.

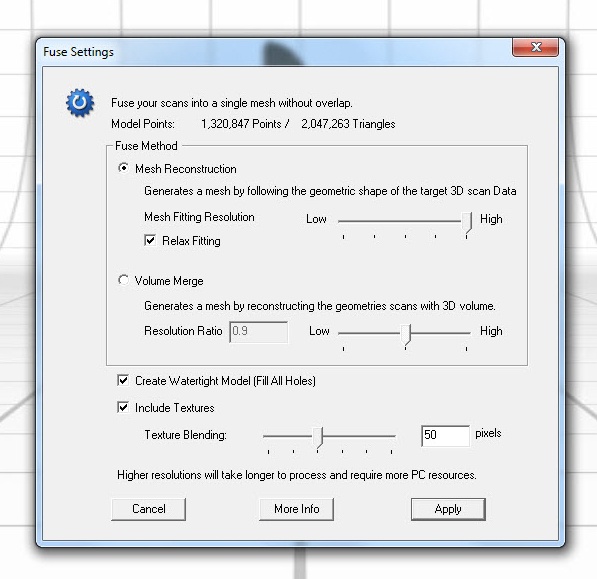
Fuse Fuse Scan(s)… Settings (Fuse screen tool bar button)

  • Note: This same screen can be accessed by pressing the Fuse button in the Main Screen tool bar.
  • Note: The number of points and triangles in your model can be viewed from this screen.
  • Fuse Method
    • Mesh Reconstruction – This is the standard fuse method. This option fuses models by creating a new mesh based on data points of the fused scan families. A new, reconstructed mesh is created in the process.
      • Mesh Fitting Resolution – Determines the quality of the fused model, but also determines how long the fusion will take. Generally, one tick-mark below the maximum resolution is suitable for most models. For larger models, the program may crash if you set this option to maximum.
      • Relax Fitting – Check this box to ensure stray data is assimilated into the model more evenly. Not selecting this option often leads to models with jagged or globular surfaces.
      • Create Watertight Model – Check this box to automatically fill any holes in the fused model. Generally it’s best to select this option, as models often have many small holes that you cannot see. However, if you’re expecting to perform multiple fusions, or if you want to keep a hole in the model for whatever reason, leave this option unselected.
  • Volume Merge – This less commonly used option merges scan families based on their overlapping scan data.
    • Note: Volume merging can also be performed by pressing Fuse Volume Merge Scan(s)… in the menu bar. The options available are different when accessed this way, so see below for additional details.
    • Resolution Ratio – This option controls the size and amount of triangles in the fused mesh. By default it is set to 0.9, (medium resolution), but it can be adjusted to 0.5, (high resolution), or 1.0, (low resolution).
    • Include Textures – Check this box to include textures on the fused model. If you leave this box unchecked, the fused model will be solid black.
    • Texture Blending – Adjust the slider to determine the degree of blending in the fused model. Very low numbers will result in obvious color delineations on the fused model. Very high numbers will make the surface appear smudged. Generally a value between 10 and 20 will result in a good texture blend.
    • Press Apply to save the settings. Your applied settings will save even after shutting down the program.

Fuse settings

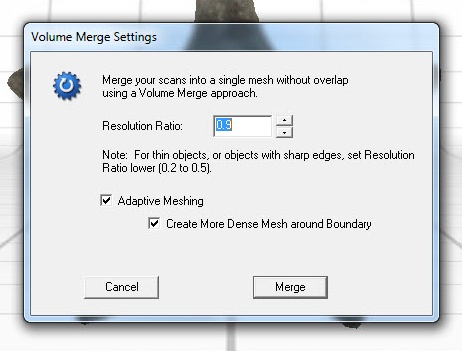
Fuse Volume Merge

  • Note: This is the same process described above, but the settings available here differ slightly. Using this method, textures cannot be preserved, (the model will be black), and a watertight model cannot be created, (the model will retain holes).
  • Resolution Ratio - This option controls the size and amount of triangles in the fused mesh. By default it is set to 0.9, (medium resolution), but can be adjusted up and down to any number. The larger the number, the larger the triangles, and the lower the resolution.
    • For models with narrow edges, smaller values, (between 0.2 and 0.5), are advised.
    • Adaptive meshing – Check this box to have the program intelligently reduce the number of points in the point cloud to save on memory and file size.
      • Create More Dense Mesh around Boundary – Check this box to have Adaptive Meshing retain more points around the edge of the model.
  • Press Merge to begin the fusion

Polish Remesh (fill holes)…

  • Resolution – This determines the size and number of triangles. The bigger the number, the larger the triangles, and the lower the resolution. By default, it is set to 0.9, but lower numbers will increase resolution and processing time.
  • Fill Holes – Check this box to fill holes while the model is remeshing.
  • Hole Fill Setting… – Select this to open up a separate hole fill settings window
    • Fill Method – This setting determines how holes will be filled.
      • Flat – Fills holes with a flat surface.
      • Smooth – Fills holes with a slight, rounded curvature. This is the default, and generally best, option.
      • Curvature – Fills holes with a distinct convex curvature.
  • Smooth Boundaries – Checking this box will ensure the program tries to blend the boundary between the filled hole mesh and the actual mesh of the model.
  • Keep Largest Hole – Select this option if you want to keep the largest hole in your model unfilled.
  • Leave holes larger than [x] inches in circumference – Select this option if there are multiple holes you want to keep in your model. Specify the size of the holes you want to remain in inches, which corresponds to the circumference of the hole.
  • Press OK to save these settings and return to the previous screen
  • Press Remesh to begin remeshing the model.


Active Scan Box – The green box in the bottom-left hand corner of the main window. The left-most portion of the View Bar. Whatever scan families are here will be represented as a model on screen. Any scan families located here are said to be attached.

Align – The process of accurately orienting two or more Scan Families with each other.

Align Screen – The screen you see when using the align tool to align scan families.

Attach – Scans are said to be attached when they occupy the green active scan box. Scans should only be attached if they’ve first been aligned.

Collapse – A scan family that has been expanded to show its individual scans can be collapsed back into a scan family by pressing the prominent Up button in the View Bar.

Detach – Scans are said to be detached when they’re removed from the green active scan box. Also called ‘unattached.’

Expand – A scan family can be expanded to display individual scans within. Double-clicking any scan family will expand it to its individual scans.

Fuse – The act of creating a new mesh by combining multiple, aligned Scan Families. The process is called fusion.

Fuse Screen – The screen you see when using the Fuse tool.

Main Screen – The screen you see when you first open the program.

Menu Bar – The grey bar of options across the very top of the screen (includes: File, Edit, View, Scan, Align, Fuse, Polish, Measure, CAD, Help).

Mesh – The network of interconnected points that compose a scan or model. Composed of triangles.

Model – The visual 3D representation of a series of scans or scan families on screen. Also used to refer to the file containing the scanned object data, or a collective group of aligned scan families.

NextEngine – The name of the 3D laser scanner. Model 2020i.

Polish – A description of several post-processes in ScanStudio, including Buff, Auto-Trim, and Remesh.

Preview Window – The window that occupies the right half of the scan screen. This window shows the specimen you’re scanning in real time.

ScanStudio – The name of the associated program.

Scan – An individual scan taken by the NextEngine. Usually these are a part of a scan family. They can be accessed by double-clicking on any scan family.

Scan Family – A group of associated scans taken in series from a 360 or Bracket scan.

Scan Screen – The screen that appears when you go to begin a scan.

Select – A selected scan or scan family is the one any functions you perform will be carried out on. You can select scans or scan families from the view bar by clicking on them once. This scan doesn’t have to be the scan in the active scans box. A selected scan will be highlighted in white. Only one scan or scan family can be selected at a time.

Simplify – The process of reducing the number of triangles in the model, thus reducing its quality and file size.

Specimen – The physical object being scanned.

Stage – The auto-rotating platform where the specimen sits while being scanned.

Texture – How the program refers to the color information overlain onto a model. Note that texture does not refer to surface relief of the model, but strictly the color data.

Tool bar – The series of grey and/or blue tool buttons present near the center-top of most screens. The tools present differ depending on what screen you’re currently in. They are generally represented by a variety of shapes and icons.

Triangle(s) – The geometric mesh that the model is composed of. The larger the triangles, the lower the quality and smaller file size. The smaller the triangles, the higher the quality and larger file size.

Trim – the act of removing data from a scan or scan family.

Trim Screen – The screen that appears when using the Trim tool.

View Bar – The bar across the bottom of most screens where scan families are stored. The far left of the bar is occupied by the green active scans box. The far right is occupied by view options.