2. Use >Current Settings and make sure that “Make Movie Self-Contained is unchecked
DVD STUDIO PRO-SURROUND DVD AUTHORING WORKFLOW
Written by Susanne Kraft, susanne.kraft@austin.utexas.edu
1. In Final Cut Pro export a quicktime reference movie

2. Use >Current Settings and make sure that “Make Movie Self-Contained is unchecked

3. Open Compressor Software
4. Click on “Add File” and navigate to the QuickTime Reference that was just made.

5. Select the DVD encoding settings to apply. Go to the Settings Tab>Apple>DVD>DVD:Best Quality 90 minutes. Drag the “MPEG-2 6.2 Mbps 2 pass” setting from this folder to the “Batch Window” to apply the encoding settings to the video Quicktime Reference.

6. Select the MPEG-2 clip to change the properties of the encode in the “Property Inspector”

7. The Inspector window will show the settings for the MPEG 2 that is going to be encoded. If you don’t see the inspector window go to >Window >Show Inspector 
8. Set the MPEG 2 encoding settings: Click on the Video Format tab and that should show the native information about the file. Will show the format, frame rate, aspect ratio, and native field dominance of the quicktime (SD will be lower field HD will be upper.) 23.98 WILL BE PROGRESSIVE. NOTE: DO NOT CHANGE ANY OF THE VIDEO FORMAT SETTINGS. JUST LEAVE THIS TAB ALONE. COMPRESSOR WILL DEFALT TO NATIVE SETTINGS OF THE FILE

9. Now click on the Quality Tab.

10. Mode should be set to Two pass VBR Best. Change the Average Bit Rate to 6.5 and the Maximum Bit Rate to 7.7. Change Motion Estimation to Best.
11. The above settings are generally OK but if you want to get more accurate bit rate settings (and better results) see this link for the DVD Bit Rate Calculator.
http://www.videohelp.com/calc.htm
12. Then click on the GOP tab and change the GOP Structure to IP and the GOP size to 6

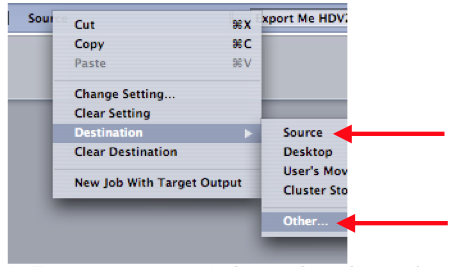
13. Choose the Destination for the mpeg2 file to be saved. Right click “Source” in the “Batch Window” and set the Destination to Source (where it defaults) or other and then save it to another folder if needed.

14. The next step is to set up the Surround Sound Channels for compression into a Surround AC3 file.
15. In the Compressor Batch Window select the “Add Surround Sound” icon

16. The next window that opens will allow the selection of the surround audio files to be assigned to the appropriate channels. 
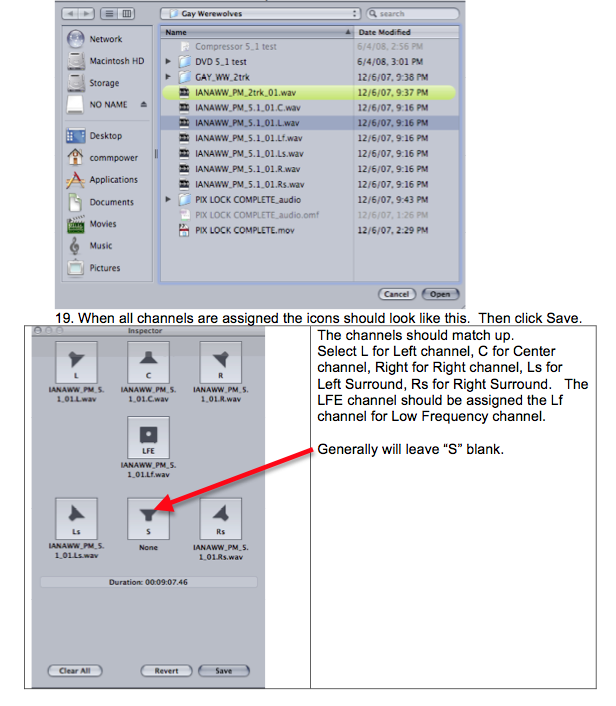
17. When the icon for the channel is selected a dialog box will ask what file to assign.
18. Browse for and select the corresponding channel then select “Open” to assign.
Do this for all 6 channels. May not have a “Sub” or “S” channel.


NOTE: If you experience your surround disk has too much bass turn off "Enable Low Frequency Effects 


