
Students can create their own Zoom meetings. Here are instructions for creating and managing a meeting.
Create a Zoom Meeting
- Access your UT Zoom account at utexas.zoom.us
- Click on the "New Meeting" button to create a new meeting

- Click on the "Invite" button to invite others to your meeting and share your Meeting ID with them

Managing Zoom Meetings
Zoom has extensive controls for managing meetings. Here are some abbreviated instructions to give you an idea of what is available. For further instructions you may access helpful short videos and directions under Video Tutorials in your utexas.zoom.us account
The Participant Window
- Access this via the link in the Zoom toolbar at the bottom of your live Zoom session.
- This window will list the names of attendees and allows students to raise their hands and react without having their camera on using non-verbal icons
- Remember that students with raised hands are moved to the top of the window
- TIP: This is where the host can access the handy "Mute All" function in case people's mics are on and causing distractions
The Chat Window
- Access this via the link in the Zoom toolbar at the bottom of your live Zoom session.
- In this window, students can ask and answer each other’s questions in a chat thread
- Chat can be saved
The Whiteboard
- The whiteboard is under Share (right after the desktop)
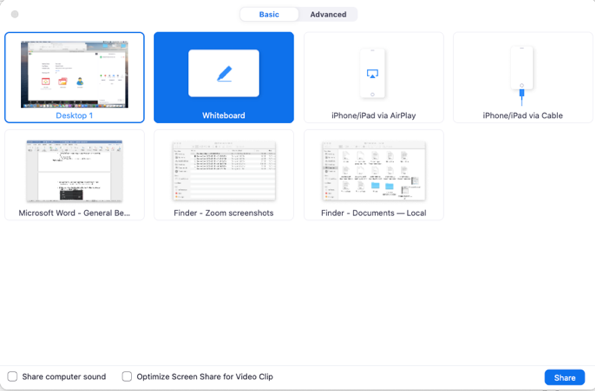
- You need the whiteboard controller open to use the whiteboard

- Participants in the meeting can annotate the whiteboard and the whiteboard can be saved
Basics of Screen-Sharing
- Make sure that you have your PowerPoint deck open and ready to go
- When you are ready to display your slides, share your screen by clicking the Share Screen button at the bottom of your Zoom window. Then select your PowerPoint deck from the available options to share

This video walks you through the steps

- Click the Slide Show tab at the top of the PowerPoint window that opened when you selected your PowerPoint deck, and then click the Set Up Slide Show icon

- In the Set Up Show window under "Show type," select "Browsed by an individual (window)" then click OK

- After these setup procedures you may Play your PowerPoint deck and begin your presentation
- Once you are finished you can stop your screen share by clicking the red Stop Share button at the top of your Zoom window
Recording a Zoom Meeting
- Students are able to record Zoom Meetings but they cannot save their recordings to the cloud
- To record a meeting, click the Record button on the bottom toolbar and choose the option to Record on this Computer to save your recording locally (to your computer)
- When you want to stop your recording click Stop Recording in the upper left portion of your meeting window. The recording will save to your computer's hard drive and you can then move it to UTBox or Canvas from there

Optimizing Applications You're Sharing
Screen-sharing Excel Files
- The quality of your meeting experience will depend on the participant’s Internet speeds and bandwidth, which may be variable and unreliable.
- To ensure a good experience, the fewer changes that you have in your video feed the better for the online participants.
- If there are a lot of data calculations in an Excel file (Solver and Regression), there may be a delay when sharing and visibility can be fuzzy for your participants.
- Simple Excel computations (case analyses) will work fine
Screen-sharing PowerPoint
- If you have concerns about your bandwidth, save your PowerPoint slides to a PDF file.
- Keep in mind that the PPT slides in Presentation Mode will take up your entire screen and may cause issues seeing other files and the Zoom controls, chat window, etc. The slides in PDF format will result in a good instructor/student experience.
- See link below for ways to share a ppt deck: https://support.zoom.us/hc/en-us/articles/203395347-Screen-Sharing-a-PowerPoint-Presentation
- We highly recommend that you have a PDF document of the PowerPoint deck as a back-up to be shared easily at low bandwidths.
Screen-sharing Video
Group presentations
- When two or more students are at one computer presenting as a group in a Zoom meeting, multiple students can be on the mic (6-7 are usually fine) and one can share the presentation screen with the class. The others can talk and the presenter can advance the slides
- Have the host make presenters co-hosts during their presentation so that they may control the participant window and can handle raised hands and unmute other students to take questions
Zoom Student Group Meetings
The best way to create a series of student group meetings is to create a recurring meeting. By doing this the meeting ID never changes and you do not need to send out invites for every meeting. This creates meetings that repeat as often as you choose. For more information please visit Zoom Student Group Meetings
The Annotate Feature
UT has changed the default settings for all of our UT Zoom accounts to prevent individuals not affiliated with the university from interrupting meetings by using features like Annotate. However, Annotate can be re-enabled for your use. To retrieve the Annotate button:
- Sign in to Zoom at utexas.zoom.us
- Click on the Settings tab on the left side of the screen
- About halfway down the page (it’s a long page) you will see the Annotation setting. Click the button to turn it on.

- The next time you share your screen in a meeting you should see the Annotate button.
NOTE: You will want to “Disable participant annotation” at the beginning of each call to prevent others from drawing or writing on your screen. You can do this by:
- Click the “More” button on the control bar
- Select “Disable participants annotation”

Still need help?
Go to the Student Troubleshooting page first. If that doesn't help:
For McCombs students, please contact Media Services via email or phone:
For all other UT students, please contact your respective college or school