
When you get trough the prompts
Open a New Project or Existing Project


Find the clip with the 5.1 interleaved audio that was exported
Right click it and choose "Add into Media Pool"

Choose to Change the frame rate
Click "Change"


Right click in the Media Pool area
>Choose >Timeline>CreateNew Timeline

Set the Timeline to be 1 Video Track
1 audio track that is 5.1
Uncheck Empty Timeline
Click on "Create"
Now add you video on to the timeline with the surround sound audio file set to 5.1

Next go to >Fairlight>Bus Format

Bus 1
Choose Format 5.1
Click on OK

To Start the Self Contained QuickTime export of the Final Resolve Project click on the Deliver Tab

In the upper left corner click on Render Settings
Choose >ProRes>ProRes 422 HQ

Make Sure Single Clip is selected and
Title the Filename and choose a location to save the file

Click Browse to navigate to the folder you want to save the QuickTime

Pick a Storage Drive and folder to save the file
Click OK

Make sure the Export Video is checked
Choose Format=QuickTime
Codec Apple ProRes 422 HQ (use for RTF Screenings)
Or what ProRes Codec you'd rather use for lower or higher quality
1920 x 1080 HD (use for RTF Screenings)

Or if you would like to export a UHD 3840 x 2160 version choose that setting
FPS 23.976 (or 24 or whatever frame rate your timeline is)

Choose Advanced Settings
Make sure Retain Sub-black and Super White Data is checked

Scroll back up in the tool and choose the Audio Tab
Check the Export Audio box and set to Linear PCM, 24 Bit and Bus 1 stereo


Finally, if you are trying to playout via VLC OR ARE ADDING CAPTIONS you will need to change the timeline Start Timecode setting to start playback at 0 hour.
Finally, if you are trying to playout via VLC OR ARE ADDING CAPTIONS you will need to change the timeline Start Timecode setting to start playback at 0 hour.
Go to DaVinci Resolve locate the sequence you want to change in the Bin


Choose to Start Render to create the QuickTIme

Once the file renders open in Quicktime and choose
>Window>Show Movie Inspector


Should see audio settings as surround 5.1 (C, L, R, Ls, Rs, LFE)
Back in your timeline...
To export the generated subtitles as a .srt file, navigate to the subtitle track and right click
Click on Export Subtitle...
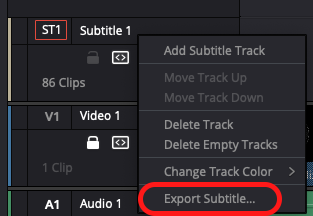
This menu should be called up
Name your file and make sure you're saving it to the right destination
Click Save
