SET UP NEW OUTLOOK PROFILE - WINDOWS 7/10

SET UP NEW OUTLOOK PROFILE
- Exit out of Outlook completely.
- Click Windows Start button and type in "Control Panel" in the Search Bar (at the 'magnifying glass icon').
- Click on Control Panel in the Start Menu search results to open it.
- In the top right corner of the Control Panel window, you will see a search bar ('magnifying glass icon'). Type in "Mail".
- When your search results display in the window, click on on Mail (32-bit).
- A small 'Mail Setup' window will open. Click on Show Profiles and another 'Mail' window will open.

- You should see at least one profile in the list if you already have email setup in Outlook - for most of you the default profile is named 'Outlook'
- Click on Add. A small dialogue box will open: Type the letters "EID" (as the new Profile Name). Click OK.
- Another window will open for adding the e-mail account.
- If you are logging into the computer with your EID, your information should auto populate. If it does not, type in your McCombs email address (firstname.lastname@mccombs.utexas.edu OR firstname.lastname@mba19.mccombs.utexas.edu) in the provided blank and nothing else in the other blanks including password.
- If you are still logging into your computer with your McCombs account, please follow the provided steps in previous email communication regarding EID migration or contact the SWAT Desk at techsupport@mccombs.utexas.edu to schedule a time if you need assistance.
- Click Next and it will begin to search for your account. This process could take a few minutes while it's searching for your email settings.
- A small log-in window will appear with your McCombs email address pre-filled as the username. Enter your EID password for the password. Select the 'Remember my credentials' check box and the click OK
- Some people may not see the log-in window and instead the account will setup successfully on its own (the setup tries to use the credentials you logged into the computer with which should be your EID and EID password).
- Another dialogue box may open asking to 'Allow this website to configure @mccombs.utexas.edu server settings'. Check 'Don't ask me about this website again' (if it's an option). Click ALLOW.

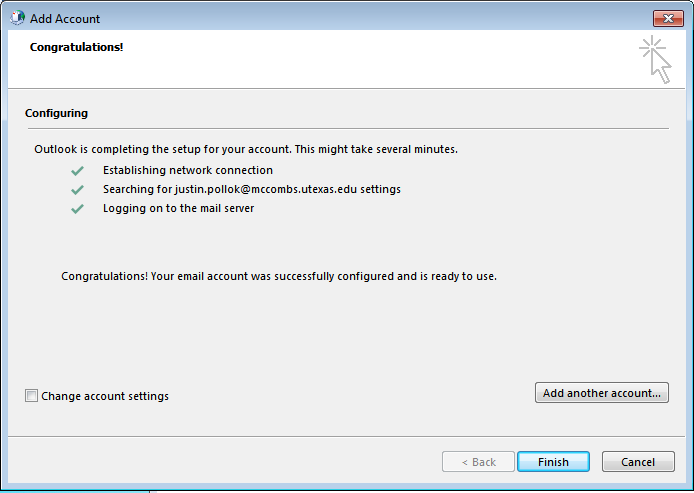
- You should see three green check marks if it successfully configured the account. Click FINISH.
- Under 'When starting Microsoft Outlook, use this profile', select 'Always use this profile'. Drop down the menu options and select the EID profile you just created. Click Apply and OK

- Open Outlook and it will begin the process to setup the new mailbox. This may take a few minutes.
- If this process goes over 10 minutes, close the small Outlook launch window (top right X). Reopen Outlook again.

- If this process goes over 10 minutes, close the small Outlook launch window (top right X). Reopen Outlook again.
- Outlook should fully open and start syncing your mailbox with the Exchange server. This will take some time and can take up to a couple of hours for large, complex mailboxes.
- Outlook will need to remain open to continue this sync process. If near the end of the day, keep Outlook open and don't log off, sleep or shut down, just lock your workstation (Windows key + L). If you do close Outlook, it will resume syncing on next launch.
- If you aren't seeing all of your e-mail, click here and follow the steps to adjust how much email is cached to the computer (instead of Outlook needing network access and to be told to retrieve older email). By default, Cached Exchange Mode is turned on and set to 12 months. If you would like all email cached locally (uses more hard drive space), change the slider to ALL.
- Congratulations! You have configured your new mail account. Please let it fully sync (status at the bottom of Outlook) and make sure your mailbox looks correct. Check calendar and contacts as well. Follow the steps provided on the Wiki for rules and additional mailboxes.
- If "All folders are up to date" displays at the bottom of Outlook and you are missing email or other items, please verify your desired Cached Exchange Mode settings in Step 17. Send a test email to yourself to verify send/receive functionality. If you are still having issues, please contact Tech Support or 232-6616 for further assistance.
FAQ
SUPPORT
HOME