GENERAL INSTRUCTIONS!
This article includes instructions for how to remote login to your on-campus computer via common methods RDP, VNC, and SSH.
NOTE: Prerequisites do not apply to those attempting to access wincompute/Stat Apps Server. Please follow the instructions under "Signing into the Stat Apps Server" below.
Connect from a Mac
Connect from Mac to Mac/Linux via VNC
- Connect to the UT VPN.
- Using the Spotlight Search (the magnifying glass icon in the upper right corner), search for and open Screen Sharing.
- In the window that appears, enter the computer name or IP address of your computer. Click Connect.
- When asked for a username and password, use your EID and EID password and click OK.
Connect from Mac to PC via RDP
You'll need the Microsoft Remote Desktop app which is available for free in the Apple App Store.
- Open the Microsoft Remote Desktop app.
- Go to Microsoft Remote Desktop > Preferences.
- Under the User Accounts tab:
- Click the + to add an account.
- Username: AUSTIN\your-eid
- Password: your EID password
- Friendly name: your EID or a name of your choosing
- Repeat Step 3 if you are not signing into the remote computer using your EID.
- If signing into remote computer using a local account, enter the username as: .\username
- Under the Gateways tab:
- Click the + to add a gateway
- Gateway name: rdg.austin.utexas.edu
- Friendly name: UT RDG or a name of your choosing
- User Account: Your EID account created in Step 3
- Close the Preferences Menu.
- In the upper left, choose the + icon and choose Add PC.
- Enter the computer settings:
- PC Name: computer name or IP address
- If you're connecting to the Stat Apps Server, the computer name is: wincompute.cns.utexas.edu
- User account: the Friendly name of the account you sign into the remote computer with, created in Step 3 or 4.
- Friendly name: computer name or a name of your choosing.
- Gateway: the Friendly name of the gateway created in Step 5.
- If signing into the remote computer using your EID: the checkbox should be cleared
- If signing into the remote computer using a local account: the checkbox should be checked
- Clear the checkbox next to Reconnect if the connection is dropped.
- Click Add.
Connect:
- Open the Microsoft Remote Desktop app.
- Double click the Desktop you created above.
- Authenticate with Duo:
- Duo Mobile: Open the Duo Mobile app to approve the automatic push notification.
- Phone Call: If you don't have a smartphone, you'll receive a phone call to your primary phone. Answer the call and press any number on the keypad.
Connect from Mac to Mac/Linux via SSH
- Connect to the UT VPN.
- Open Terminal.
- Run either of these commands based on whether you're using the computer name or IP address:
ssh username@computer-name
ssh username@IP-address
Enter your password and click Return.
Connect from a PC
Connect from PC to PC via RDP
Set up your connection:
- Open Remote Desktop Connection.
- Click Show Options in the lower left corner.
- Under the Advanced tab, click Settings under Connect from anywhere.
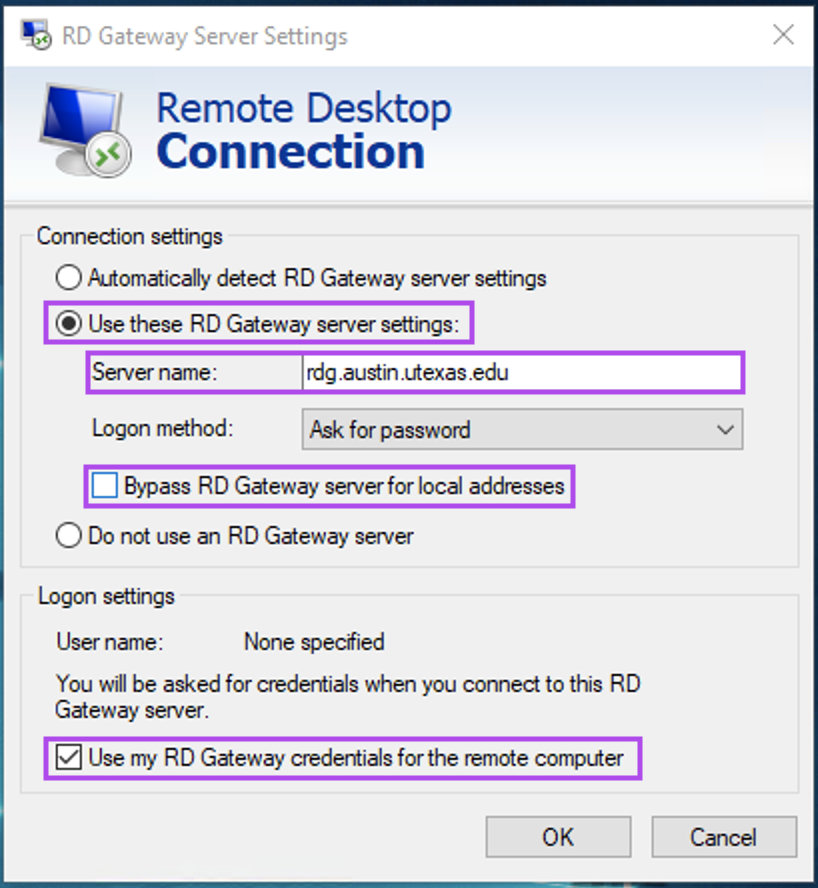
- On the RD Gateway Server Settings window:
- Select Use these RD Gateway server settings
- Server Name: rdg.austin.utexas.edu
- Logon method: Ask for password
- Check/clear the Bypass RD Gateway server for local addresses checkbox as follows:
- If signing into the remote computer using your EID: the checkbox should be cleared
- If signing into the remote computer using a local account: the checkbox should be checked
- Check/clear Use my RD Gateway credentials for the remote computer as follows:
- If signing into the remote computer using your EID: the checkbox should be checked
- If signing into the remote computer using a local account: the checkbox should be cleared
- Click OK.
- Under the Experience tab, Clear the checkbox next to Reconnect if the connection is dropped.
- Under to the General tab:
- Computer: computer name or IP address
- If you're connecting to the Stat Apps Server, the computer name is: wincompute.cns.utexas.edu
- Username:
- If signing into the remote computer using your EID: AUSTIN\eid
- If signing into the remote computer using a local account: leave blank
- Click Save As to create a shortcut. Name it something identifiable and save it somewhere convenient such as the Desktop.
Connect:
- Double click the shortcut created above.
- Enter your EID password for the Gateway.
- Authenticate with Duo:
- Duo Mobile: Open the Duo Mobile app to approve the automatic push notification.
- Phone Call: If you don't have a smartphone, you'll receive a phone call to your primary phone. Answer the call and press any number on the keypad.
- If using a local account, you'll be prompted for the account password.
Connect from PC to Mac/Linux via VNC
You'll need the VNC Viewer application or another VNC application.
- Connect to the UT VPN.
- Open VNC Viewer.
- In the text box at the top of the window, enter your computer name or IP address and click the Enter key.
- If a message comes up saying the connection is insecure or unencrypted, click OK.
- Enter your EID or username and password.
After connecting for the first time, the connection will be remembered. Then, you can double click the desktop image to connect.
Connect from Linux
Connect from Linux to Linux/Mac via VNC
You'll need the Remmina app or another RDP client. Remmina is included in most Linux distributions.
Set up your connection:
- Open Remmina and click the + icon in the top left corner or go to Remmina > Create a New Connection Profile.
- Enter your settings:
- Name: a name of your choosing
- Protocol: Remmina VNC Plugin
- Under Basic:
- Server: your computer name or IP address
- Username: your EID
- Password: your EID password
- Color Depth: High color (16 bpp) or True color (32 bpp)
- Click Save.
Connect:
- Connect to the UT VPN.
- Open Remmina and double click the connection created above.
Connect from Linux to PC via RDP
You'll need the Remmina app or another RDP client. Remmina is included in most Linux distributions.
Set up your connection:
- Open Remmina and click the + icon in the top left corner or go to Remmina > Create a New Connection Profile.
- Enter your settings:
- Name: a name of your choosing
- Protocol: RDP
- Under Basic:
- Server: your computer name or IP address
- If you're connecting to the Stat Apps Server, the computer name is: wincompute.cns.utexas.edu
- Username: your EID or account username
- Password: your EID password or account password
- Domain:
- If signing in with your EID: AUSTIN
- If signing into a local account: localhost
- Under Advanced:
- Remote Desktop Gateway server: rdg.austin.utexas.edu
- Remote Desktop Gateway username: your EID
- Remote Desktop Gateway password: your EID password
- Remote Desktop Gateway domain: AUSTIN
- Click Save.
Connect:
- Double click your connection created above.
- Authenticate with Duo:
- Duo Mobile: Open the Duo Mobile app to approve the automatic push notification.
- Phone Call: If you don't have a smartphone, you'll receive a phone call to your primary phone. Answer the call and press any number on the keypad.
Connect from Linux to Linux/Mac via SSH
- Connect to the UT VPN.
- Open Terminal.
- Run either of these commands based on whether you're using the computer name or IP address:
ssh username@computer-name
ssh username@IP-address
Enter your password and click Return.
OR
Set up a connection:
You'll need the Remmina app or another RDP client. Remmina is included in most Linux distributions.
- Open Remmina and click the + icon in the top left corner or go to Remmina > Create a New Connection Profile.
- Enter your settings:
- Name: a name of your choosing
- Protocol: SSH - Secure Shell
- Under Basic:
- Server: your computer name or IP address
- Username: your EID
- Password: your EID password
- Click Save.
Connect:
- Connect to the UT VPN.
- Open Remmina and double click the connection created above.
FAQs
Should I use RDP, VNC, or SSH?
RDP and VNC are graphical desktop-sharing methods meaning you'll see the remote computer's desktop as if you were sitting in front of it.
SSH is a command-line desktop-sharing method that allows you to interface with the remote computer through Terminal.
What is my computer name?
Use the fully qualified host name which looks like a web address. It often takes this form: computer-name.austin.utexas.edu.
If you need help identifying your computer's name, create a ticket with CNS IT by sending an email to help@cns.utexas.edu and be sure to include your computer's UT Tag number.
To find your computer name:
Note: follow these steps on the computer you want to remote into.
On Mac:
- Open Terminal.
- Run the command: hostname -f
- If the name doesn't end it ".utexas.edu", append the output with ".austin.utexas.edu" to get your full computer name.
On Windows:
- In the Start Menu, search for and right-click on This PC. Choose Properties.
- Use the Full Computer Name.
On Linux:
- Open Terminal.
- Run the command: hostname -f
- If the name doesn't end it ".utexas.edu", append the output with ".austin.utexas.edu" to get your full computer name.
I used to be able to use my computer's IP to connect, but now it's not working. Why? What do I do?
Most IP addresses on campus are assigned using DHCP— the network gives the computer an available IP address and network settings so the computer can get online. These IP addresses can change even when the computer hasn't been restarted or had any settings changed.
If your on-campus computer is connected to ethernet, submit a ticket with CNS IT including your on-campus computer's UT Tag number and we can find the IP address it's currently using.
If your on-campus computer is only connected to the WiFi, we recommend using an ethernet connection which is more stable and reliable for remote logins. For assistance setting up an ethernet connection, submit a ticket with CNS IT including your on-campus computer's UT Tag number, the building and room it's in, and the label on the nearest wall port.
What is Remote Desktop Gateway?
The Remote Desktop Gateway (RDG) allows secure remote access to Windows computers on the UT Network via RDP without needing to connect to the VPN. In compliance with the Information Security Office's Multi-Factor Authentication Policy, the RDG requires authentication with Duo and requires that you have a default device configured.
For more information about the RDG, see the documentation from ITS.
What Duo authentication methods can I use for remote connections?
The UT VPN supports the following Duo authentication methods:
- Duo Mobile push
- Duo Mobile codes
- Phone call
- SMS code
- Code-generating token
The UT RDG supports the following Duo authentication methods:
- Duo Mobile push
- Phone call
When connecting to my on-campus PC, I get an error that it can't connect. What do I do?
Make sure your on campus computer is turned on and connected to the Ethernet.
Make sure the computer name or IP address you're using is correct.
If you're still unable to connect, create a ticket with CNS IT including your on-campus computer's computer name or IP address.
I connect to the WiFi on my on-campus computer. Can I still remote access it from off campus?
Occasionally, connecting to an on-campus computer that is only connected to the WiFi will work. However, it's unreliable as the computer can change IP addresses or disconnect from the WiFi.
If you'd like to remote login to your on-campus computer, we recommend using an Ethernet connection. If you need to set one up, create a ticket with CNS IT including your on-campus computer's UT Tag and the label on the Ethernet wall port.
Questions? Create a ticket with CNS IT by using our form, sending us an email, or giving us a call at 512-232-1077.