This document explains the process to live stream from the JVC GY-HM660U remote camcorder through a personal user's hotspot to the control room.
Will you be on campus or off campus?
ON CAMPUS - The following instructions are for on campus use. This uses the utexas-iot wifi.
BEFORE YOUR SHOOT CHARGE THE BATTERIES PLUG IN THE CAMERA WITH THE BATTERIES IN THE Camera and let it charge till all the batteries are charged The orange light will be blinking on the camera while the batteries are charging. 4 blinks = less than 25% charged 3 blinks = less than 50% charged 2 blinks =less than 75% charged 1 blink = less than 100% charged |
|
Setup the remote camera like you normally would. Probably with a tripod. |
|
Plug your lav or handheld into Input 1. If you do not, the control room will not have audio from you. |
|
Make sure your input settings are correct. Channel 1 should be set to Input 1. |
|
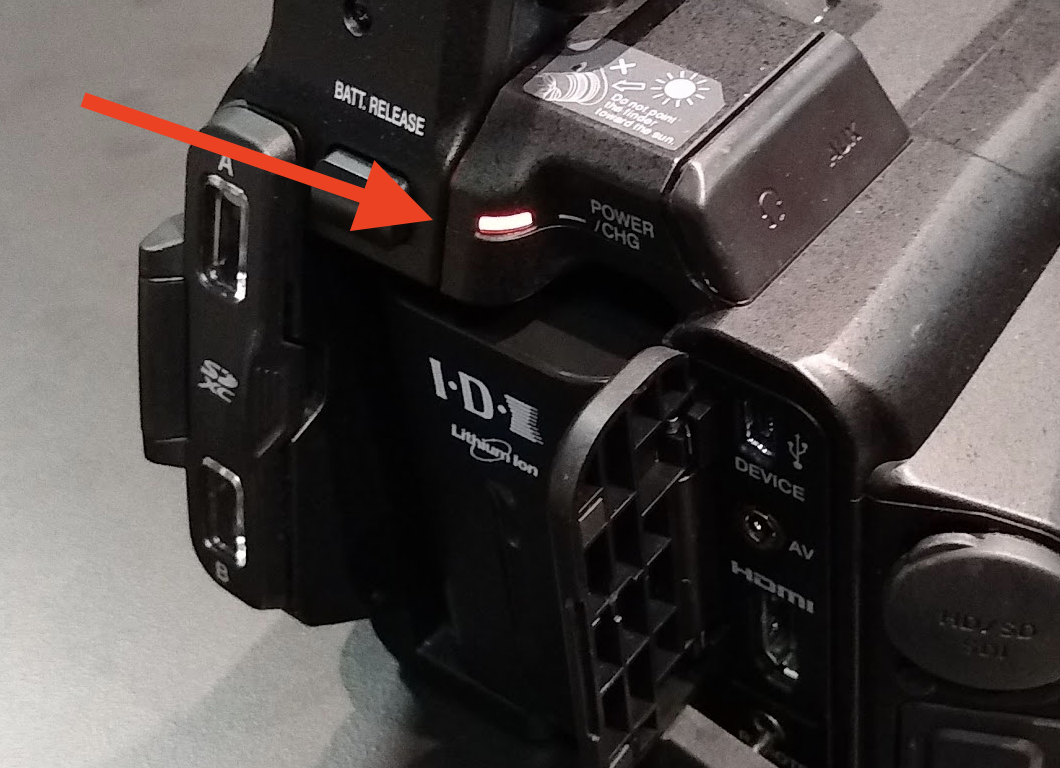
| Power On the camcorder by pushing in the blue release button and sliding the switch to the ON position |
|
This symbol will flash and then turn solid yellow. It will turn from solid yellow to solid white. When it looks like this it is ready to stream to the control room. |
|
Press the OIS/2 button. This will start streaming video back to the control room. |
|
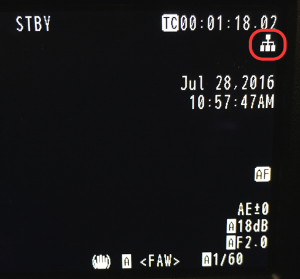
| You should see a little red "LIVE" icon in the top of the camera view finder screen |
|
Not working? Try loading the On Campus configuration by: 1. pressing the menu button 2. Choose System... 3. Choose Network Settings... 4. Choose Connection Setup... 5. Choose Load 6. Choose CAM1 ONCAMPUS 7. Set 8. Load |  |


OFF CAMPUS - The following instructions are for off campus use. This uses the student's cell phone data via their hot spot.
Setup your camera DON'T FORGET TO CHECK OUT A TRIPOD WITH THE CAMERA PACKAGE!!
BEFORE YOUR SHOOT CHARGE THE BATTERIES PLUG IN THE CAMERA WITH THE BATTERIES IN THE Camera and let it charge till all the batteries are charged The orange light will be blinking on the camera while the batteries are charging. 4 blinks = less than 25% charged 3 blinks = less than 50% charged 2 blinks =less than 75% charged 1 blink = less than 100% charged |
|
Setup the remote camera like you normally would. Probably with a tripod. |
|
Plug your lav or handheld into Input 1. If you do not, the control room will not have audio from you. |
|
Make sure your input settings are correct. Channel 1 should be set to Input 1. |
|
WARNING THIS USES A LOT OF DATA, UPGRADE YOUR PLAN!!!
| Video Upload Data Usage (MB/hr) | Audio Download Data Usage (MB/hr) |
|---|---|
| 135 MegaBytes per hour | 691 MegaBytes per hour |
Setup your phone's hotspot
| Go to settings on your iphone | |
choose "General" |
|
| choose "About" and "Name" |
|
Take a screen shot of your phone on this page so you can change back when you're done with your shoot. (This is usually done by pressing your home button and power button at the same time.) Change the name of your phone to JOU |
|
| Now go back to the main settings page on your iphone | |
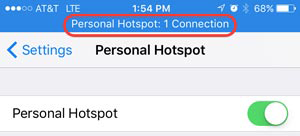
choose "Personal Hotspot" turn it on |  |
change the password to aaaaaaaa (that's eight lower case a's) |  |
stay on the personal hotspot page until the camera is connected to your phone This will happen AFTER you turn on the camera (it takes a little over 2 minutes) |
|
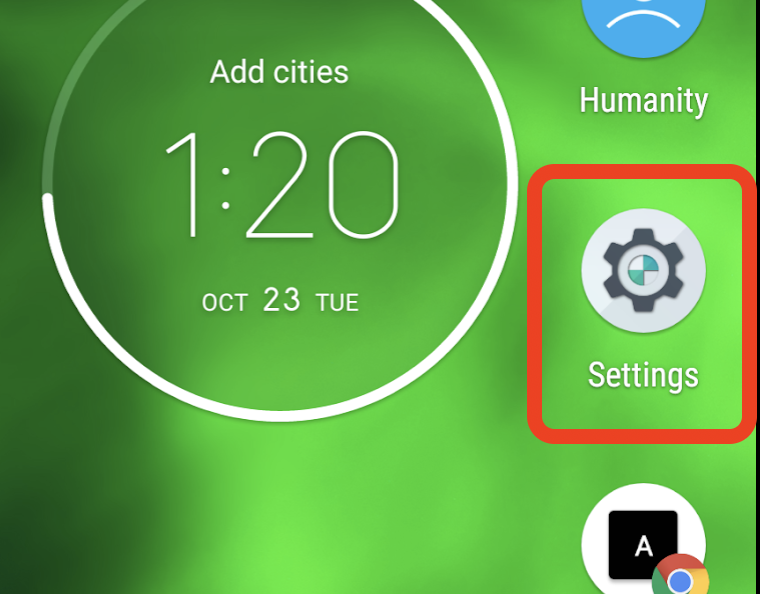
ANDROID PHONE - HOW TO SETUP THE HOT SPOT Click on Settings on your phone |
|
| Click on Network and Internet |
|
| Select the Hotspot and tethering setting |
|
| Choose Setup Wi-Fi Hotspot |
|
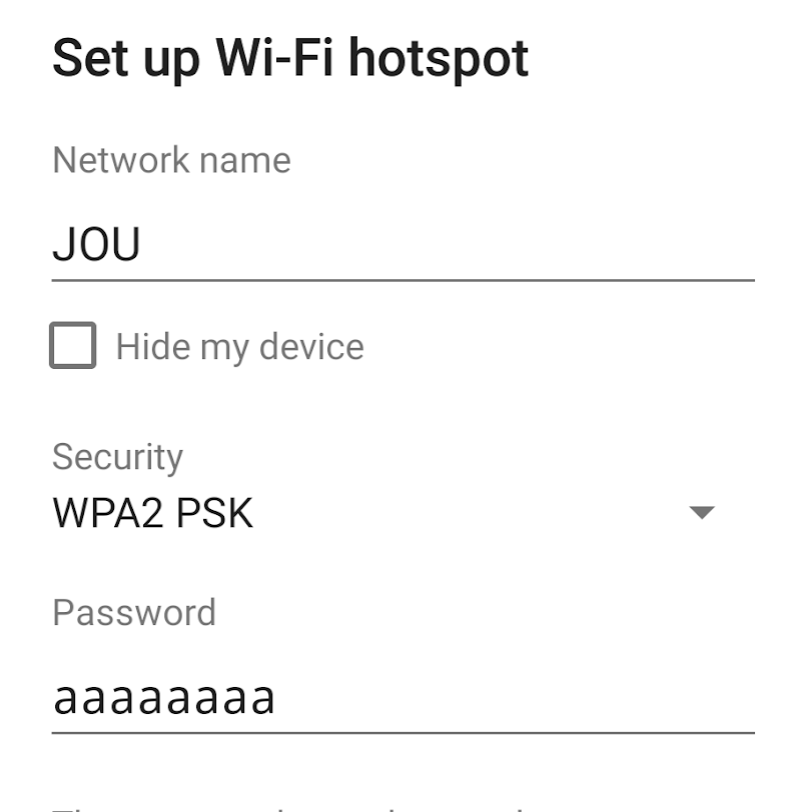
Put in Network Name - JOU Password is aaaaaaaa (that's eight lower case a's) MAKE SURE TO UNCHECK HIDE MY DEVICE |
|
| Go to the mac mini running the "IceCast" and restart it to make sure the terminal window is open. |
|


Connect the camera to your phone's hotspot
Power On the camcorder by pushing in the blue release button and sliding the switch to the ON position | |
This symbol will flash and then turn solid yellow. It will turn from solid yellow to solid white. When it looks like this it is ready to stream to the control room. | |
When the camera is connected and ready to stream, your phone looks like this. |
|
Press the OIS/2 button. This will start streaming video back to the control room. |
|
You should see a little red "LIVE" icon in the top of the camera view finder screen |
Turn on the IFB
| Make sure your IFB is plugged into the headphones port from the camera. |
|
You will need to have network connectivity for the IFB to function correctly. This symbol |
|
Press the "LOLUX/3" button. |
|
This symbol Now the control room can speak to you through headphones connected to the camera. |
|


How the control room talks to remote camera talent/operator
Press and hold the REMOTE IFB button on the panel above the mixing console to speak to the remote remote camera in the field. |
|
Press and hold the REMOTE IFB button on the panel in the producer area to speak to the remote remote camera in the field. |
|
| On the audio board the audio from the remote camera will come up on REM |
|
| on the Program bus choose REMOTE / CAM |
|
Not working? Try loading the On Campus configuration by: 1. pressing the menu button 2. Choose System... 3. Choose Network Settings... 4. Choose Connection Setup... 5. Choose Load 6. Choose CAM2 OFFCAMPS 7. Set 8. Load |
|


When you're done. Turn off your phone's hotspot!!!
If you don't you could use a LOT of data!
Tech Staff go here for secure documents: CMB 4.130 TV Production Control Room - Broadcast Journalism Remote Cam
Overview
Content Tools