To start, touch the panel.
The Select a Source to Begin screen will appear. Press the Source button for the item you want to display. The projector will power on automatically and in rooms with motorized screens, the screen will lower automatically.

There will be a delay while the projector warms up.
The HOME button in the upper left-hand corner will return you to this screen.
If the COMPUTER button is selected, the following screen will appear.

The computer can be restarted to run Windows or Macintosh OS.
Use the Volume Up/Down buttons on the right-hand side to adjust the audio volume.
Mute the audio and blank the projector as needed using the buttons below the volume controls.
LAPTOP Screen
VGA, HDMI, and Audio cables are available in all classrooms.

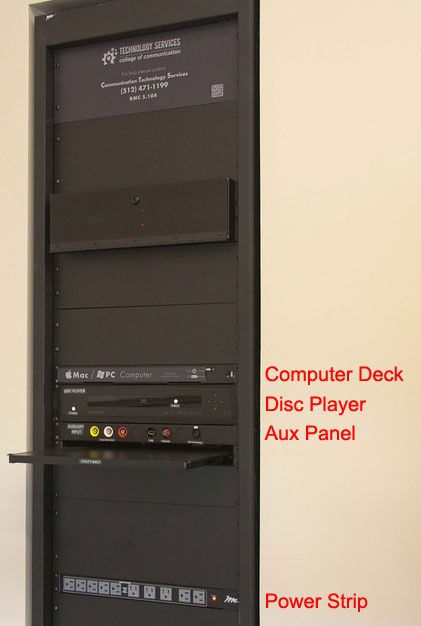
USB and Firewire connections are located on the Auxiliary Panel in the equipment rack.

DVD Screen
All controls are available on the touchscreen or by using the front panel of the DVD player in the equipment rack.

Document Camera Screen
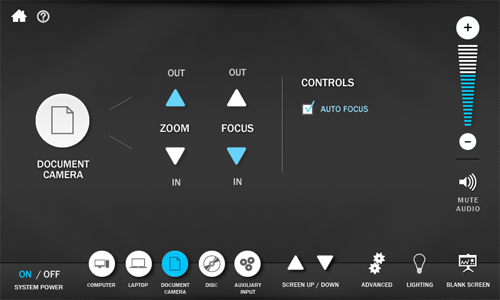
Use the buttons on the touch panel to adjust the zoom and focus on the object as needed.
Aux Input Screen
The Aux Inputs allow users to connect devices brought in to the aux panel on the equipment rack. This feature is available in all rooms.
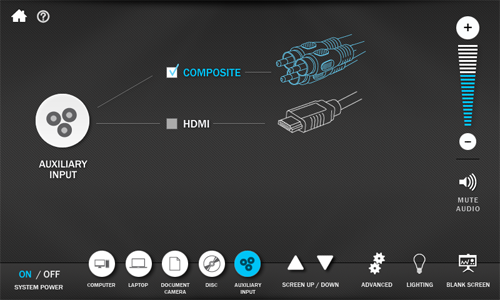
The Aux panel features inputs for composite video sources as well as HDMI sources. If your device has an HDMI connection you will use the HDMI cable on the teaching console. You will still choose AUXILIARY INPUT on the touch panel console.
See the Instruction page on Auxiliary Panels for more information: https://wikis.utexas.edu/display/comm/How+to+Connect+an+Auxiliary+Device+in+a+College+of+Communication+Classroom
Advanced Page
There may be times when a user would want to watch video from one source while listening to an audio feed from a second source. The controls on the Advanced Page, accessible at the bottom of the touch panel, enable users to accomplish this.

Classroom display means the image projected on the screen.
Lectern monitor refers to the computer monitor on the instructor desk.
Note the buttons listed under POPUP CONTROLS.
The IMAGE SETTINGS button on the right-hand side. It calls up the following screen:

The LECTURE setting is for PowerPoint and other presentations.
The SCREENING setting is for showing video from the computer.
Press the blue X to close this popup screen.
The DOC CAM CONTROLS button calls up a screen that enables one to manipulate the document camera.

Again, press the blue X to close the window.
The DISC CONTROLS button brings up the following screen that allows for controlling the disc player:

Again, press the blue X to close the window.
Need Help
The Need Help page can be accessed by clicking the question mark button near the top left corner of all touchscreen pages to allow users easy access to technology support.

Press the blue X in the upper right-hand corner to close.
Powering Down
When finished, press the System Power OFF button in the lower left-hand corner..
The following confirmation screen will appear:

Press YES to shut down the system or NO to leave the system on for the next instructor.
Overview
Content Tools