Use the instructions below to configure your system for Remote Desktop Screen Sharing
How to Set Up & Use Screen Sharing in Mac OS X
To make things easy, the Mac screen being shared will be called the “server” and the other Mac connecting to it will be called the “client”. We’ll break this walkthrough into two parts, one for setting up the “server” and one for connecting to those servers with a “client”.
Enable Screen Sharing on the Mac whose Screen will be shared (as server)
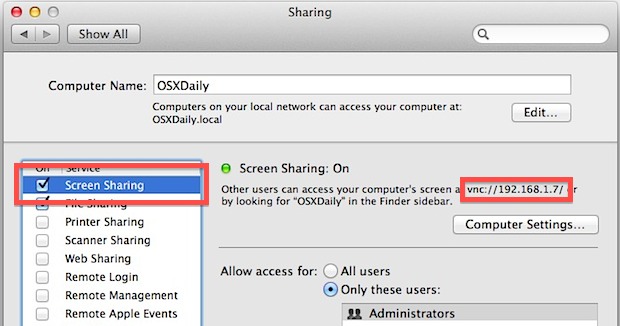
- Open System Preferences from the Apple menu and click on “Sharing”
- Check the box next to “Screen Sharing” to enable the feature on the Mac you want to share
- Set access as necessary by choosing “Administrators” or specifying a specific user that can remotely control the Mac
- Make a note of the Macs IP address, that is what you will be connecting to
With sharing enabled on the server Mac, now a connection can be made from the client Mac (or PC).
Connect to the Remote Mac Screen (as client)
- From the Finder, hit Command+K or pull down the “Go” menu and bring up Connect To Server
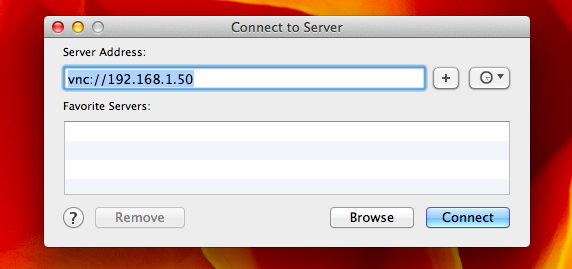
- Prefixed with vnc:// enter the IP address of the Mac you want to connect to and control the screen of, for example:
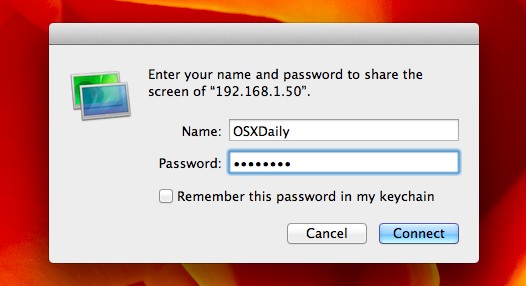
- Authenticate according to the allowed users, and connect to the other Mac to control the screen
You can also directly access and use the Mac VNC client Screen Sharing for this purpose.
The client Mac will now connect to the server and you’ll quickly find the servers screen sitting in a window. Anything left open from the user you logged in as will be visible, and you have full access to everything on the Mac. With fast enough internet connections, there isn’t much lag in using the remote Mac at all, though it’ll likely be smoothest if connected over a LAN.
Overview
Content Tools