Table of Contents
Tip
IMPORTANT Recommendations
- Attach your computer to a wired UT Campus Network before starting a first run backup and leave it attached until the backup process completes.
- Depending on the size of your backup set this may take several hours or longer.
- Select only the files you wish to be backed up
- For Windows, files are commonly located on your "Desktop" or in the "My Documents" folder.
- For Mac, files are most commonly located on your "Desktop" or in the "Documents" folder.
Video - Choosing what to Backup with UTBackup
Step 1 - Launch UTBackup and Create your Account
- locate and launch the installed UTBackup client by double clicking the house icon as indicated in wiki article Installing UTBackup - Windows
Warning
If you have previously created a UTBackup account from another computer, select the "Existing Account" radio button and click sign in.

1. The First name and Last name fields can be left blank.
2. Enter your UT EID in the Username field then enter your UT EID password in the last two fields.
3. Click Create Account.
Step 2 - Selecting which files and folders to Back Up
Configuring Back up for Windows:

1. Open the UTBackup Crash Plan client, log in with your UT EID and password.

2. Select the Backup tab
3. Navigate to the Files to Back Up section and click Change... to open the window for selecting files and folders.
Warning
NOTE: Clicking the box to the left of C:/ will back up the full contents of this drive and is not recommended.
Information
It is recommended that Desktop and Documents folders get backed up, but other folders might need to be added as well.

4. In the Change File Selection window the computer's hard drive will be listed, click the triangle to the left of the C:/ and expand the file structure.
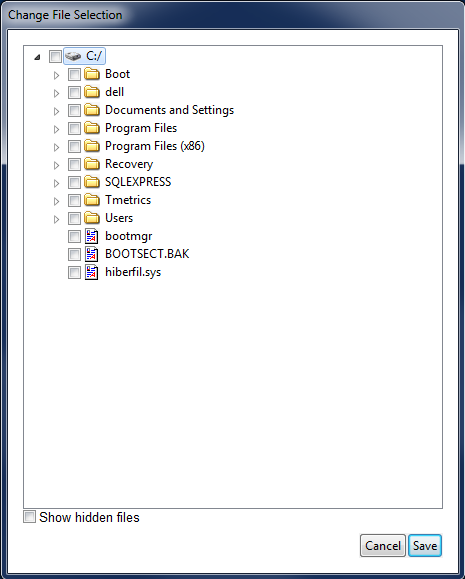
5. To back up your User Profile folder, Click the triangle to the left of Users and expand the contents.
6. Locate your User folder. This folder may be named with your UT EID or by another name if you are logging in with a local account.

7. Clicking the box to the left of your User folder will select the entire contents of that folder for backup.

8. Alternately select which of the listed folders are preferred for backup.
9. For example, you may want to only back up your Documents folder. This is accomplished by specifically clicking the box to the left of the Documents folder.

10. If you were to click the triangle to the left of Documents you would see that the entire contents of this folder is selected for back up.

11. Certain files or folders from selected directories may also be excluded from the backup.
12. For instance if you want to exclude My Music, My Pictures, and My Videos deselect them by clearing the check mark to the left of each of these folders.
13. After file and folder selections are complete, click Save.

14. The files and folders you chose to back up will show up listed under Files to Back Up.
15. Click the "Start Backup" button to begin.
Tip
Please note that you may see an indication of time left for backup.
* The back up will continue even if you close the application.
* If your computer goes to sleep, the back up will continue when it wakes up.
Warning
To maximize backup efficiency the initial seeding of a backup set should be allowed to complete while the computer is attached to a wired UT Campus Network.

Overview
Content Tools